 Speeding up Avid Media Composer … yes, that is a thing. I am always looking for ways to speed up my editing and post-production, and one of the biggest offenders of being slow is Avid Media Composer.
There are several reasons that Avid might feel slow. That can include limited keyboard mapping, no native Apple Silicon support, a less modern code-base, or old machines running old versions, to name a few.
While I had been off of Avid for a while, a recent multi-week editing job put me back on Media Composer and reminded me that I think I’ve done about all I can to make Avid faster.
I wanted to share some of those things here. (Of note, I’m on a Mac so I’m using COMMAND so on a PC that would be CONTROL).
Little commands that achieve big things
The first thing that can speed up editing in Media Composer is being aware of some keyboard shortcuts, and commands that will speed up something that you typically think has to be achieved with a mouse.
Restore Default Patch
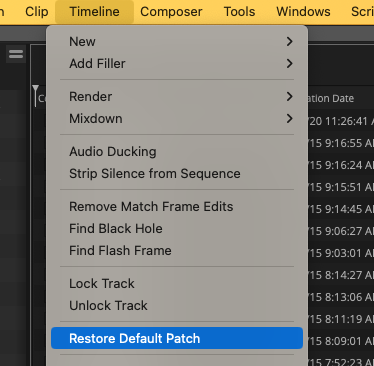
You can’t save source patching setups for audio clips or complex sequence-to-sequence edits. Nor can you move source patches with a keyboard shortcut (yes, I know about Auto-patching, but it’s a poor substitute). But you can use Timeline > Restore Default Patch to get the source patches back to a more default state.
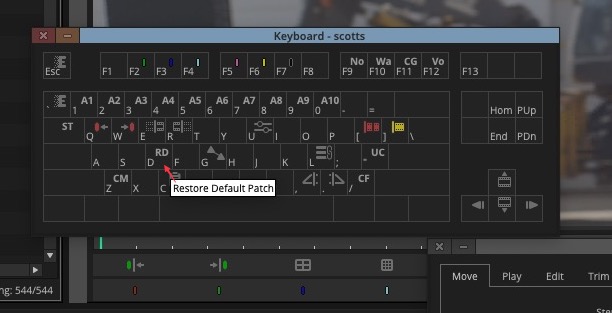
Better yet, you can map Restore Default Patch to a keyboard shortcut.
Waveforms, volume and audio things
Avid does not adjust the size of an audio waveform when the volume or gain is modified, but you can scale that waveform size up and down to make it easier to see when a clip is too low. Or down when it’s way too loud.
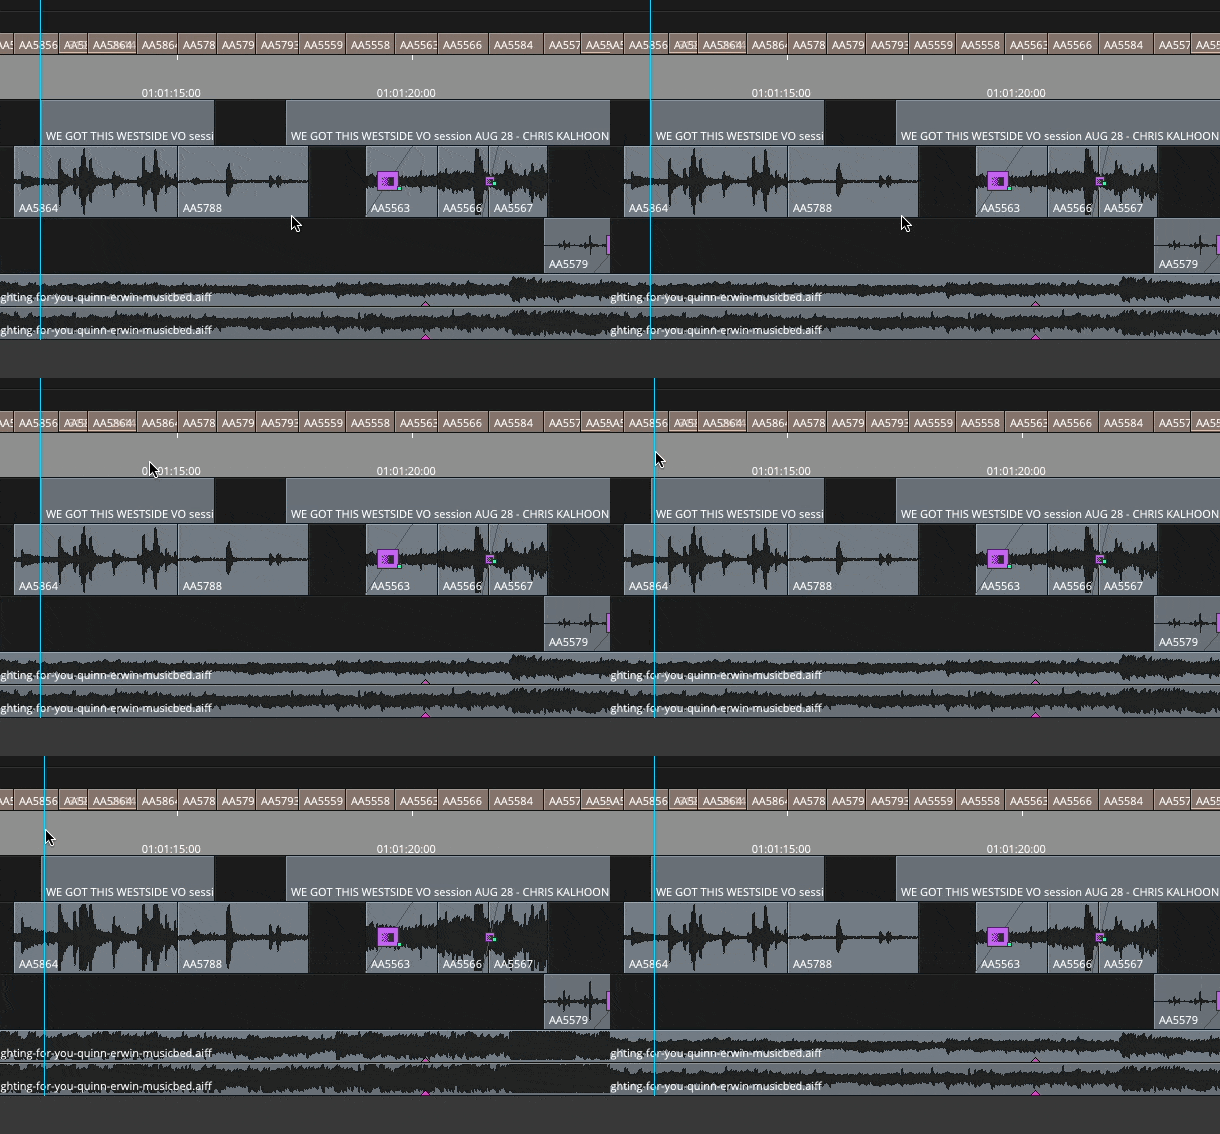
COMMAND + OPTION + K/L is the keyboard shortcut to scale a waveform larger and smaller. Sound kinda familiar? Remember that COMMAND + K/L scales the track size up and down so it’s close to that. But also remember that scaling the waveform doesn’t adjust the actual volume of a clip, just the appearance of the waveform.
Waveforms have to be turned on to view them. And outside of using the Audio Mixer, you have to turn on Clip Gain to adjust the level or a clip and/or Volume to keyframe the volume with rubber banding. Those commands are buried several levels deep under the timeline Hamburger/Fast menu.
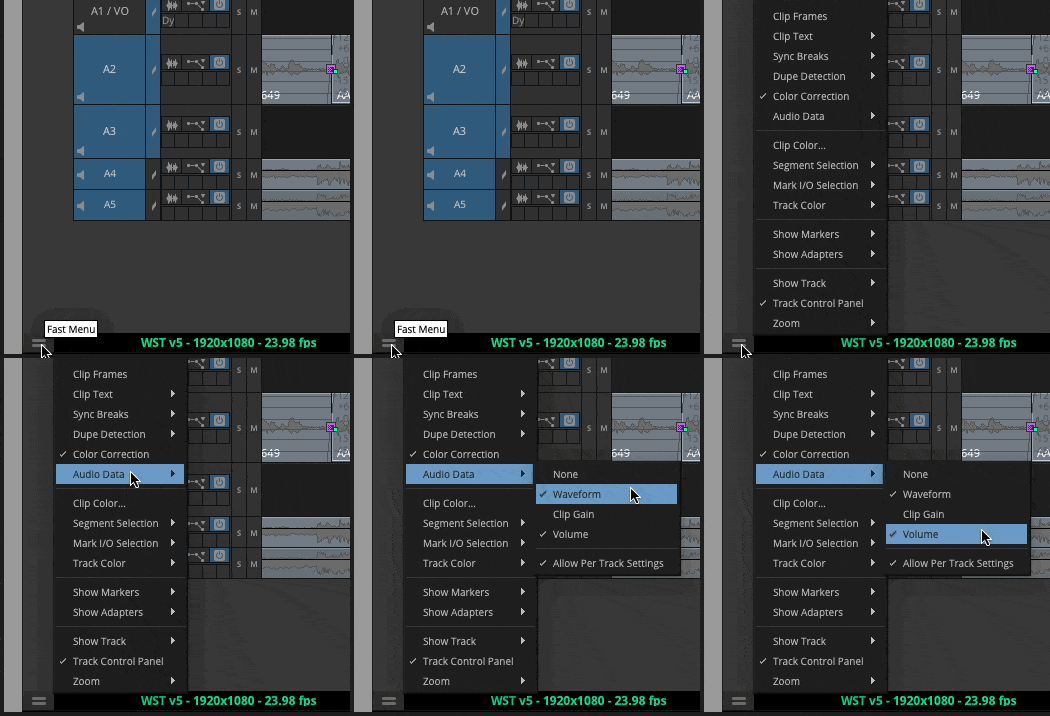
But you can map those to keyboard shortcuts using the Command Palette. If you use the ‘Menu to Button’ Reassignment command, you can not only map items from the Media Composer top menus but also from the timeline Hamburger/Fast menu.
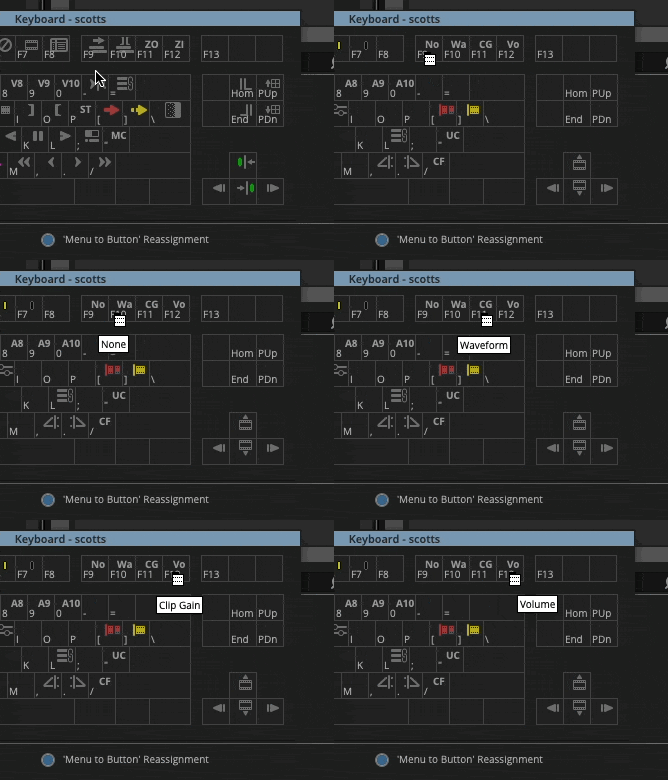
I have these audio items mapped to SHIFT + F9 – F12 on my extended keyboard.
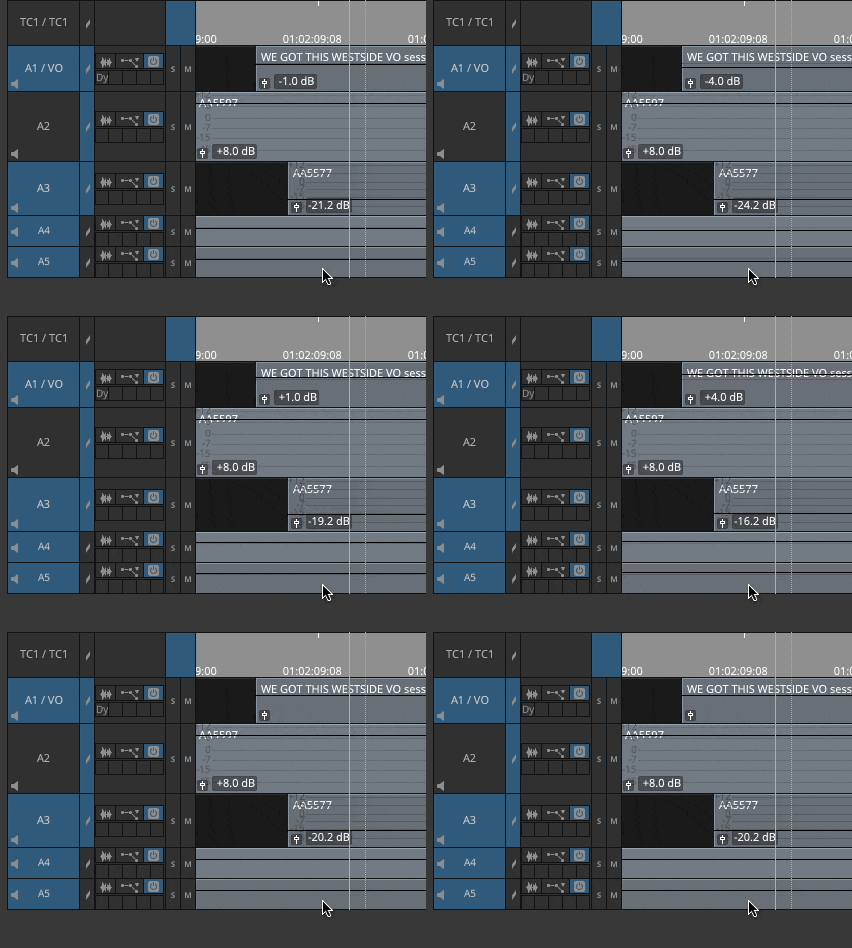
And what about turning up the gain on a clip itself? Yes, we have the Audio Tool, but I find adjusting Clip Gain with keyboard shortcuts much faster. As long as you have Clip Gain turned on (either from the Fast Menu or on a per track basis), you can use the keyboard shortcut SHIFT+OPTION+UP/DOWN ARROW to raise and lower the Clip Gain without ever mousing to a menu or click-dragging anything. Just be aware of what audio tracks are turned on as that is what will adjust with this keyboard shortcut.
Timeline things
One thing you’re constantly doing is zooming the timeline in and out. Rather than hitting the modifier keys of Command + [ and ], I have mapped those timeline zoom keys to F11 and F12. Not having to use a modifier key for something as frequent as zooming the timeline has saved countless keystrokes over the years, especially considering I mapped the same command in all the different NLEs I use.
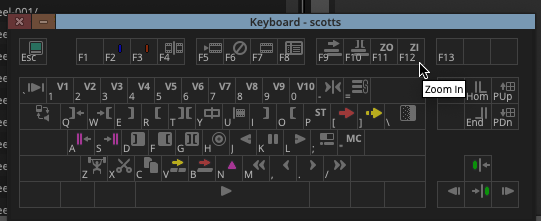
And you do remember there’s also a keyboard shortcut to scale the track heights up and down? That is the COMMAND (CTRL on PC) K and L mentioned earlier.
Loop Selectd Clips for one key Source Monitor viewing
One thing Avid has yet to do over the years is make it faster to view source media. But if you utilize the Clip > Loop Selected Clips command you can select a clip or sequence, execute that menu item, and that will load and begin playing the Source monitor. All that with one command. It’s especially useful on music and selects sequences. I’ll take that one command over a mouse double-click any day.
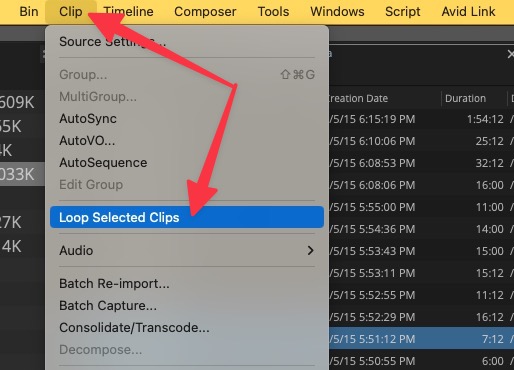
But make note, if you have an IN point marked on the media you’re loading, MC will begin playing from that IN point.
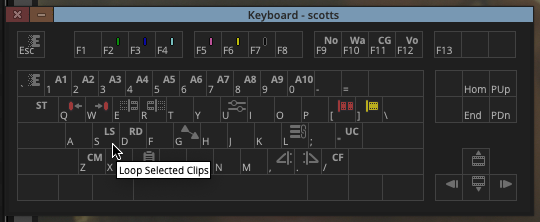
So until we get some kind of skimming or hover scrubbing in a bin this Loop Select Clips option will have to do. We can hover scrub in the Source Browser so why not a bin?
This is the most useful, time-saving command in the click-happy mouse-drag @MediaComposer … loads a clip or a sequence to the Source Monitor and plays it (from an IN point if it has one). Map to a keyboard button and you can speed up the source side of things quite a lot. pic.twitter.com/FgkKSaeL42
— Scott Simmons (@editblog) July 14, 2023
Command / Control X to remove selected clips
Media Composer is a very IN-to-OUT-based editing tool, but there are times when you might have a lot of overlapping clips that you want to remove from the timeline, so you can’t precisely get them all via an IN-to-OUT.
If that’s the case, select those clips via Segment Mode, then hit Command + X (Control + X on a PC) and watch those clips disappear. This is especially useful on audio since selecting audio via Segment Mode and hitting delete will first delete any automation you have on the clips before deleting the actual clip.
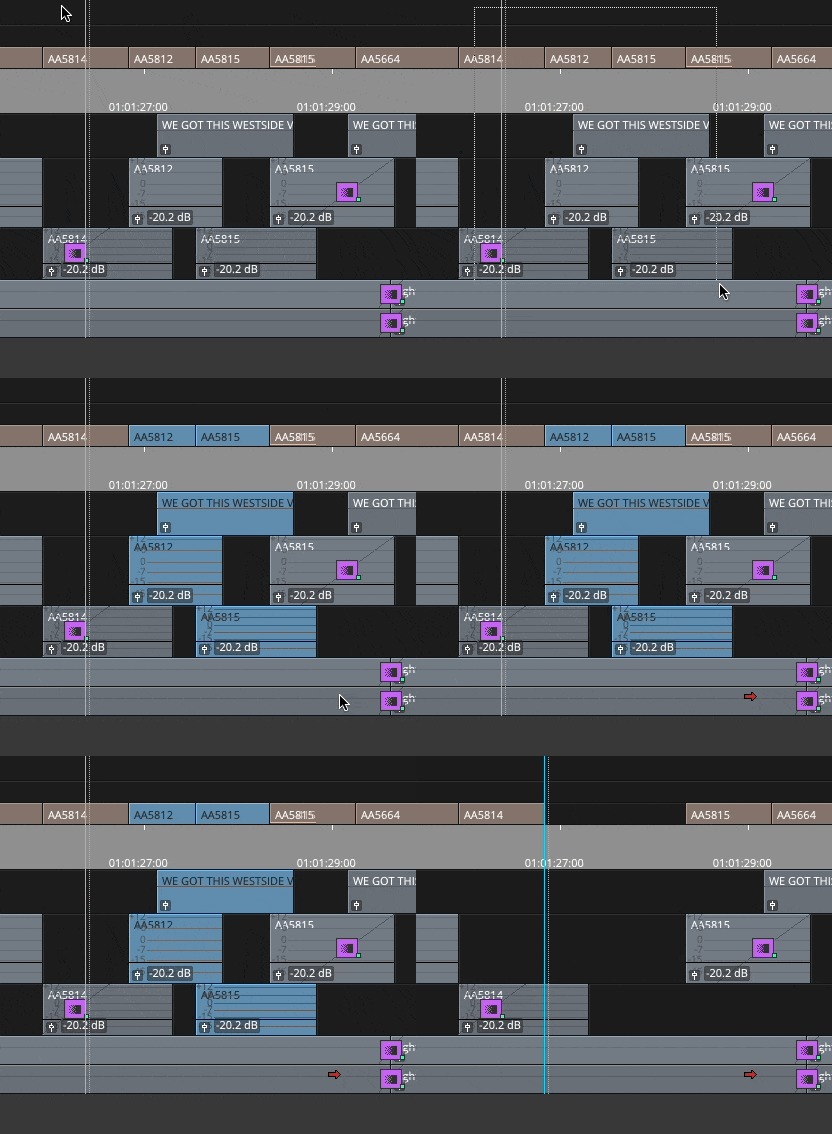
I couldn’t remember this recently and Twitter came to the rescue. See, it’s not completely useless.
Command + X
— Andrew King (@AndrewKing101) May 18, 2023
Select All and Deselect All on the timeline patch panel
If you’re constantly turning track selectors on and off (and you’ve mapped them to ALL your number keys, right?), mapping Select All and Deselect All to a single keystroke sames some time.
Yes, they already have default keyboard shortcuts but those require modifier keys so getting them to one key is great. And they can then be easily mapped to a control surface.
Speaking of control surfaces …
But you can speed things up even more by using a control surface for many of those commands.
If you want to take your Avid speed up to the next level, grab a control surface and map many of the above commands to a single button or dial.
I’ve been obsessed with control surfaces and video editing for years, reviewing everything from the CTRL Console to the Sensel Morph, the Loupedeck CT to the Tourbox and several others.
In that time, I’ve only geared one toward Media Composer in the Loupedeck Live, partly because I don’t get the call to edit in Avid as much as I used to and somewhat because Media Composer has the worst the least detailed support for keyboard shortcuts, and no deep API support for third-party hardware to control it.
So you’re stuck with the keyboard mappings that only include a second level via holding down the Shift key. Couple that with the ability to map commands from menus (not just the supplied buttons), and you can get some decent shortcut support.
Command Post is good to control your control surfaces
The key to making a control surface work is the software to send the commands from your brain to Avid. Command Post is a free and open-source utility that, among many other functions, has extensive support for control surfaces. PVC has a good article about how this works, but let’s talk about adapting to Media Composer.
First, pick the commands you want to map
The first commands worth mapping are things you can control with a dial. These are my favorite dial-based commands I’ve mapped for Media Composer, in order of my preference and how often I seem to use them:
- Timeline zoom
- Audio gain
- Waveform scale
- Trim
- Track height adjustment
There may be other commands worth mapping to a dial, so I’d love to hear your ideas in the comments below if you have others.
Second, identify the keyboard shortcuts to execute the commands
This is my current setup for Media Composer with the Loupedeck CT:
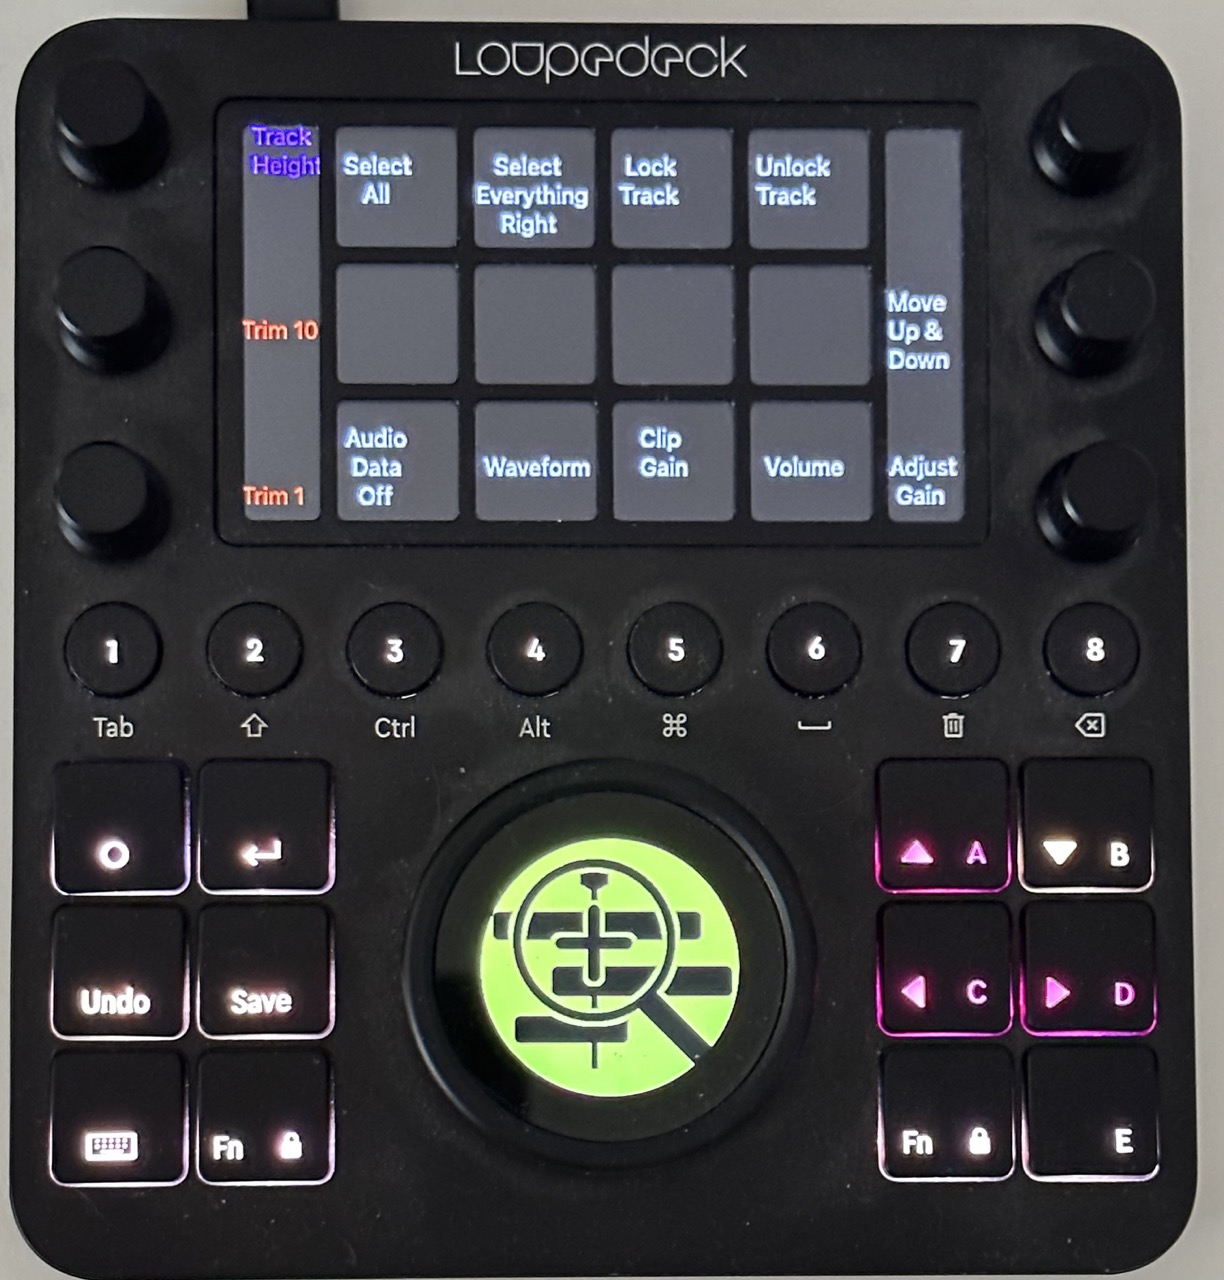
As a couple of examples of things I have mapped:
Zooming the timeline, which as mentioned above is mapped to Zoom In – F12 and Zoom Out – F11. I’ve done that in all the NLEs I work in and that goes onto that big dial at the bottom (but could go on one of the 8 knobs at the top). The nifty graphic is repurposed from a Sideshow FX icon pack for a different NLE.
Audio Clip Gain is one of those commands that is perfect when mapped to a dial. It takes too long to grab a fader in the Audio Tool or try to click and drag the tiny faders in the corner of clips in the timeline (though I am grateful they are there). While the keyboard shortcut mentioned in the section above is great, mapping them to a rotating knob is better.
Another audio-related command that I have mapped is the control to turn on and off audio data in the timeline: waveform, clip gain, and volume. Instead of having those those are buried under the timeline hamburger menu or my shift+F keys I have them mapped to the touch screen on the Loupedeck CT.
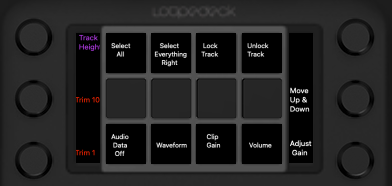
By mapping those above commands with the ‘Menu to Button’ Reassignment option in the Command
Palette you can assign those to keyboard shortcuts and then assign any of them to a control surface.

Third, enjoy a faster Media Composer
These are but a few examples of some 40+ Media Composer commands I’ve mapped to different control surfaces. Depending on where I work, of course, I might not have access to all of those commands, but when I’m working on my system, I do. And they can help speed up the execution of many of these often slow and buried Media Composer commands. Plus, all of the control surface software will let you save, export and import settings so you can carry them with you.
This will work with most all control surfaces beyond the Loupedeck
I’ve mentioned Command Post and the Loupedeck CT a lot as the way I’ve set up my control surfaces for Avid Media Composer. But they aren’t the only way. The official Loupedeck software also supports Avid and has some pre-built commands built into a profile you can download from their Marketplace.
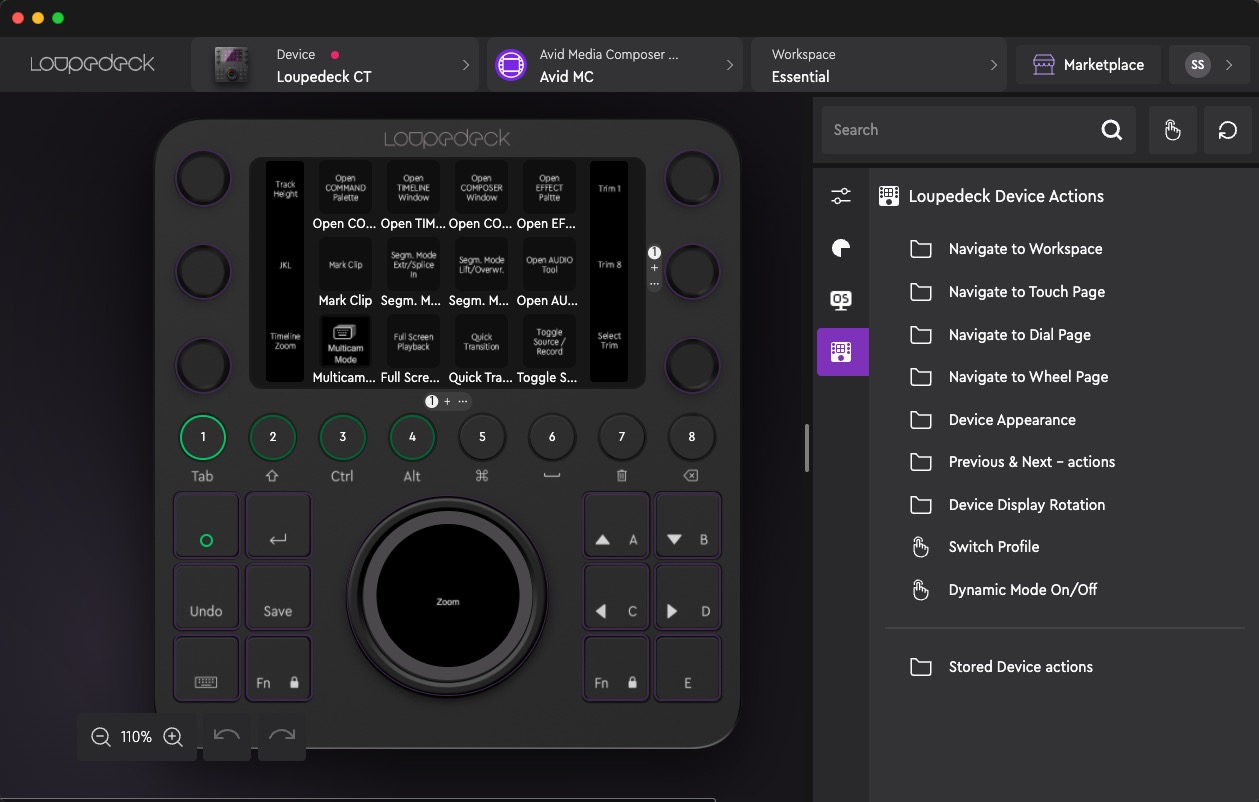
I always find the default settings on anything aren’t as good as my custom settings but these are a good place to start.
Another great control surface I use is a Razer Tartarus. It’s a PC gaming controller ($63 on Amazon right now but once I picked it up for half that) but can easily be adapted to video editing (and be used with a Mac) by using Command Post to control it.
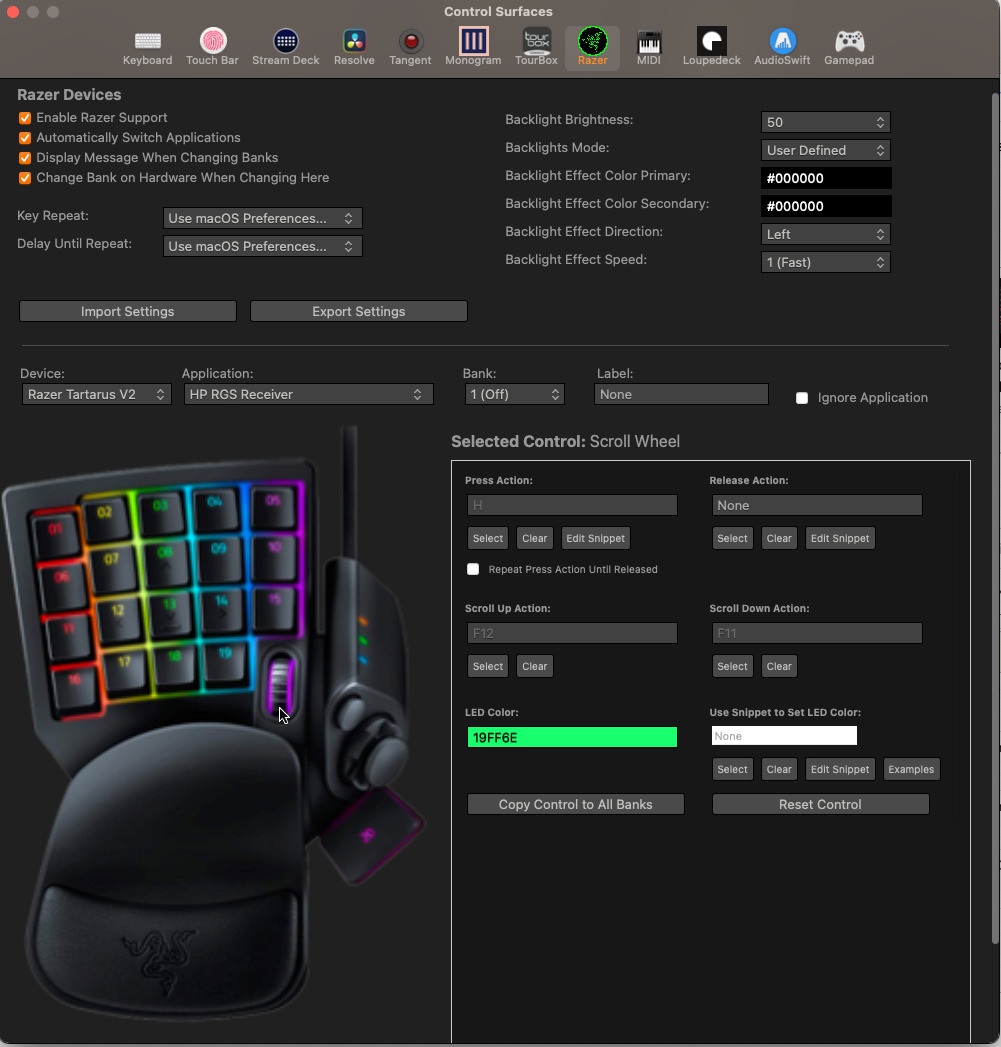
Since the Tartarus doesn’t have little screens to remind me what the keys do, I improvised with gaffer’s tape and some old Media Composer keyboard stickers.
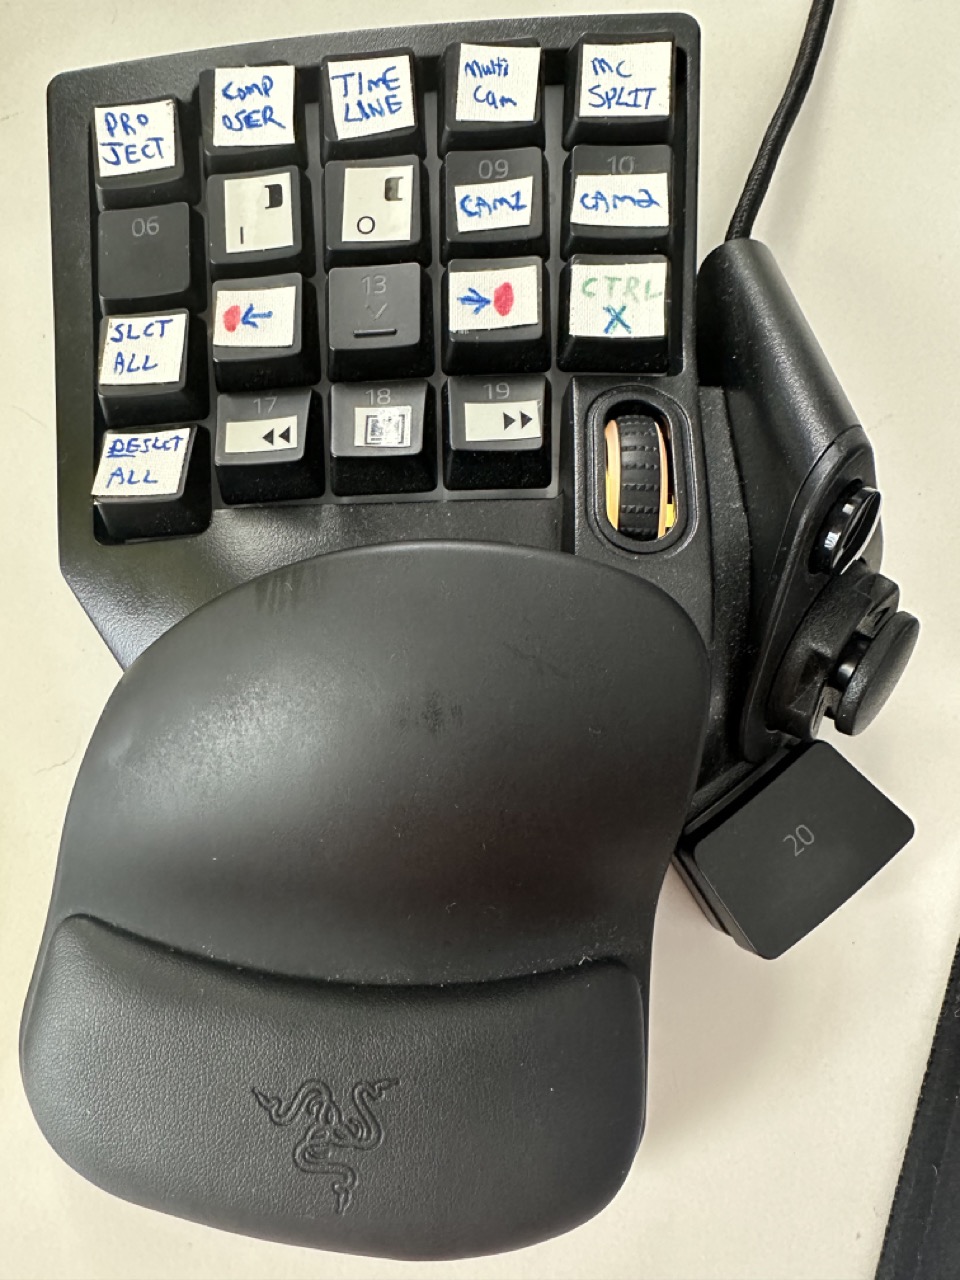
What’s even better is that I can change the mappings in Command Post for other NLEs and pretty much map these Avid commands so they are similar or the same in other NLEs.
And … these control surfaces may be usable when remoting into another system
If your Avid work involves remoting into another system via HP ZCentral Remote Boost, Jump Desktop or something similar, these commands might still be available. I’ve experienced instances when control surfaces or advanced mouse buttons don’t work through the remote software. You’re mapping the commands on your local machine to the remote software and not to the NLE since the NLE is on the remote machine.
But on my last remote Avid job, I was able to make every one of the control surfaces work.
First, follow the steps as directed above and use Command Post as the tool to control your control surface.
Second, when mapping a control via the select menu, use the alternate Triggers a virtual keyboard press using an alternative method (for use in Blender, etc) option as the way to map the command. This isn’t an article on how to use Command Post but this review can help.
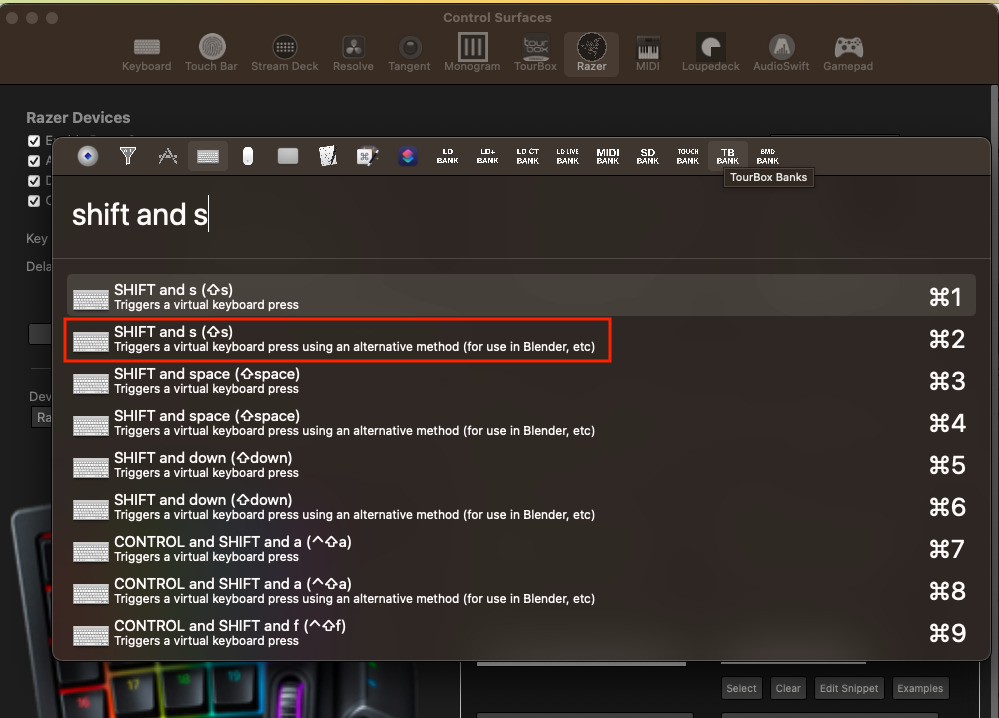
Once I tried this alternate method when setting up a recent remote Avid job, every command worked with this combination of Command Post and the control surfaces.
Command Post has support for many different control surfaces, so YMMV depending on what you want to use. But I was able to use these surfaces while successfully remoting in via HP ZCentral Remote Boost:
- Loupedeck CT
- Loupedeck Live
- Tourbox
- Monogram
- Razer Tartarus V2
I haven’t tried with other remote software.
Speaking of remoting into another system … if you’re a Mac use remoting into a PC but you’re still using your Mac keyboard you can change the COMMAND key to a CONTROL key on your local Mac keyboard. That can save some sanity. Check you System Preferences > Keyboard Keyboard Shortcuts > Modifier Keys.
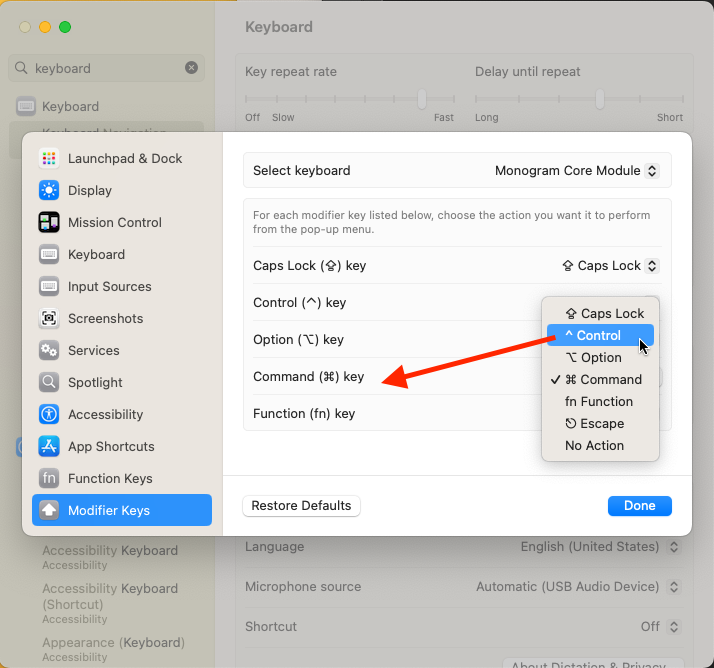
That one is a real lifesaver. I have to think Joey D’Anna for that tip.
settings -> keyboard -> keyboard shortcuts and you can change modifier keys. its stupid because they have one labeled "command" which there is no such key, its called the apple key. but other then that it works great pic.twitter.com/NnwpjorqEg
— Joey D'Anna (@joeydanna) May 8, 2023
Wrap-up
I hope some tips here can help you speed up Media Composer. These tips might be a lot to learn for longtime Avid editors as they are notoriously resistant to change. While most Avid editors consider themselves very fast, many of these tips can make them faster. It did me and I’m a longtime Avid editor not resistant to change 🙄. While some may take some time to learn (like how to integrate a control surface) if you’ve spent years on just a keyboard and mouse, it took time to get proficient with just that, so have some patience. These shortcuts and knobs and dials take time to become second nature, but I believe they are worth it.
Happy editing.

Filmtools
Filmmakers go-to destination for pre-production, production & post production equipment!
Shop Now