

Filmtools
Filmmakers go-to destination for pre-production, production & post production equipment!
Shop NowAchieve an authentic film look in four simple nodes!

Many editors, colorists, and videographers want to achieve the look of film using their favorite digital cameras. There are numerous methods to get a realistic film look, ranging from AI tools to plugins to the tools built right inside of your desired editing software. Some, like Resolve’s Film Look Creator, will have your head spinning with the many sections and options. Where do you even begin? This new set of tools is designed to simplify that process.
Developer Georg Gonz of FutureFX has recently released his Color Foundry Film Emulation System for DaVinci Resolve Studio (Windows and macOS). With this method you can get an authentic, filmic image using only four simple nodes. No color wheels, no curves, no system-taxing effects. In fact, you can use this approach to grade your entire timeline and never touch Resolve’s regular color correction toolkit unless you want to. The Color Foundry system isn’t just designed for colorists. It’s also for editors and videographers who work in Resolve, but might not be as knowledgeable about all of the correction nuances.

Color Foundry is based on three DCTL effects. DCTL (DaVinci Color Transform Language) is a scripting language that developers can use to augment Resolve Studio with additional effects or reimagine existing Resolve effects and corrections into a different layout. The result is a DCTLe file, which is loosely comparable to an effects template in other applications. When you purchase and download Color Foundry, you get a bundle of three DCTLe files along with a set of Technical LUTs (Log-to-Rec709) for various camera brands. To install these, open the Project Settings (lower right gear icon), click the Color Management tab, and from there Open LUT Folder. Now copy the Color Foundry files into that folder and restart Resolve.
Getting set up
The Color Foundry system works in the Rec 709 color space. It’s recommended to set your color management to Rec 709/Gamma 2.4 or DaVinci Wide Gamut/Intermediate. Ideally you are working with camera raw or log clips, but that’s not essential to the process.
To get started, switch from the Edit or Cut page to the Color page. Add four serial nodes to one or more clips. Apply a DCTL effect from the Effects Library to Nodes 1, 3, and 4. The DCTL default is None. Pull down the selector to access a menu for all of your installed DCTL effects. The three Color Foundry effects are named Exposure, Emulsion, and Character. Make sure they are selected in this order: Node 1 – Exposure, Node 3 – Emulsion, and Node 4 – Character.

Node 2 is where you convert the image from log to Rec 709. You can do this by applying a camera LUT or a CST (Color Space Transform) effect to the node (recommended). The CST’s input settings should match the camera model’s color space and gamma (RED cameras, for instance: REDWideGamutRGB and REDLog3G10). The CST output would be Rec 709 and Gamma 2.4. (Other color solutions that also use DCTL files often require a number of CST nodes in the chain to function properly. Gonz has simplified this by choosing to work in Rec 709.)
If you are grading camera raw footage, such as from a RED or Blackmagic Design camera, make sure that you have the correct settings to convert that image to log. This is done in the standard Resolve Camera Raw tab. For example, in my tests, I switched the RED settings to Clip (not project) and then set up the color space, gamma, and ISO to get a neutral log image.
Workflow
Once the four nodes are assigned, the order of operations becomes important to the process. First, set up the CST (Node 2), then pick the desired film emulsion (Node 3). Return to Node 1 to get a nice appearance to the image and then finally to Node 4 for additional enhancements.

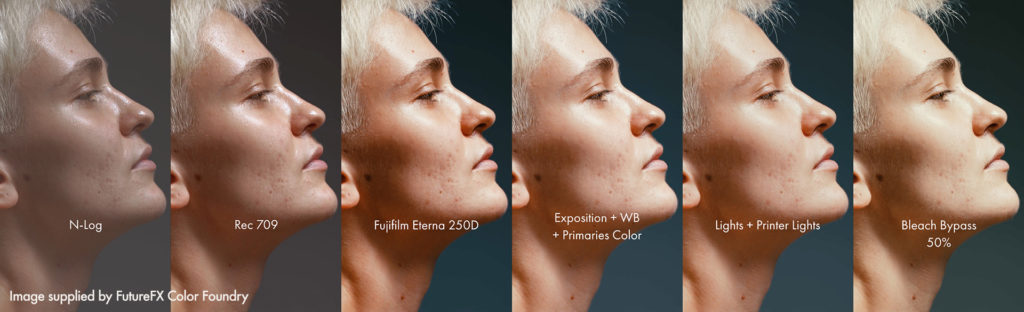
Node 1 is the Exposure DCTL. You are essentially grading ‘under’ the color space conversion. In other words, you are altering the log image, which in turn is being affected by the transform effect. The Exposure DCTL is somewhat equivalent to in-camera exposure coupled with the ‘development’ of your negative at the film lab. All of the controls feature simple sliders grouped into four sections – Exposure, White Balance, Development, and Color Body. The terminology is more like film than video. For example, the Push/Pull slider is the same as a contrast control. If you work with stills in Lightroom, then this will sound similar. Each group has a header control (dot to the left of the name) to adjust its mix percentage, like a dry/wet control in an audio plugin.
Node 3 is for the selection of film stocks – two Fujifilm and two Kodak options. There’s a dry/wet percentage slider, plus three density levels. I hope that in the future more film emulsion choices are added, but for now, it’s only these four. Of course, if you don’t want to apply the film stock emulation in Node 3, simply dial back its dry/wet slider or uncheck the Enable button.

Node 4 is the Character effect. At first glance this might seem similar to the Exposure DCTL used for Node 1. Instead, think of it like the film lab timing (color correcting) step, where your negative is corrected and processed to create the film print. The four sections are Lights, Bleach Bypass, Printer Lights, and Split Tones. All controls are sliders. By working between Nodes 1 and 4, you can dial in a filmic look with ease.
You can grade an entire timeline with this method and not use any of the standard Resolve tools. If you are new to color correction and find color wheels and curves baffling, then this might be a better solution for you. That might also be true of photographers who are adding video productions to their list of services.
A step further
I’ve been discussing creating a look in four nodes, but there are several attributes to most film looks that are not covered by Color Foundry. These would include Vignette, Bloom, Halation, and Grain. Vignetting is a lens function and not specific to film, but it is included with many other emulations. Resolve Studio does include individual effects for all of these, in addition to being part of its Film Look Creator effect. If you wanted to add any of these, simply apply a few more nodes after the Character effect (Node 4). For example, Halation (Node 5), Vignette (Node 6), and Grain (Node 7). Apply each of these effects from the Effects Library and then dial in their settings to taste.

Another option is a timeline correction. Resolve allows corrections on each individual clip, but also as a global set of corrections across the whole timeline – like an adjustment layer. A universal effect that stays consistent, like film grain, could be added to the entire timeline as a single node, instead of to each separate clip.
Final thoughts
The Color Foundry Film Emulation System is a nice set of tools that enhances your Resolve color correction workflow, regardless of skill level. While I’m certainly comfortable using Resolve, I find that this DCTL solution and working with sliders can be far faster and easier than using the built-in tools. This is especially true if you are working Resolve with a mouse instead of using one of Blackmagic Design’s dedicated control panels.

Remember that you are trying to achieve the look of actual film and film processes. Many modern feature films use extremely stylized grading, which is a far cry from a real film look. This system offers a look that is truer to form, but if you still want that hyper-real look, then there’s no reason that other parts of Resolve’s toolkit couldn’t come into play. In either case, FutureFX’s Color Foundry bundle provides some very useful tools, whether part of a larger toolkit or your sole method of correction.