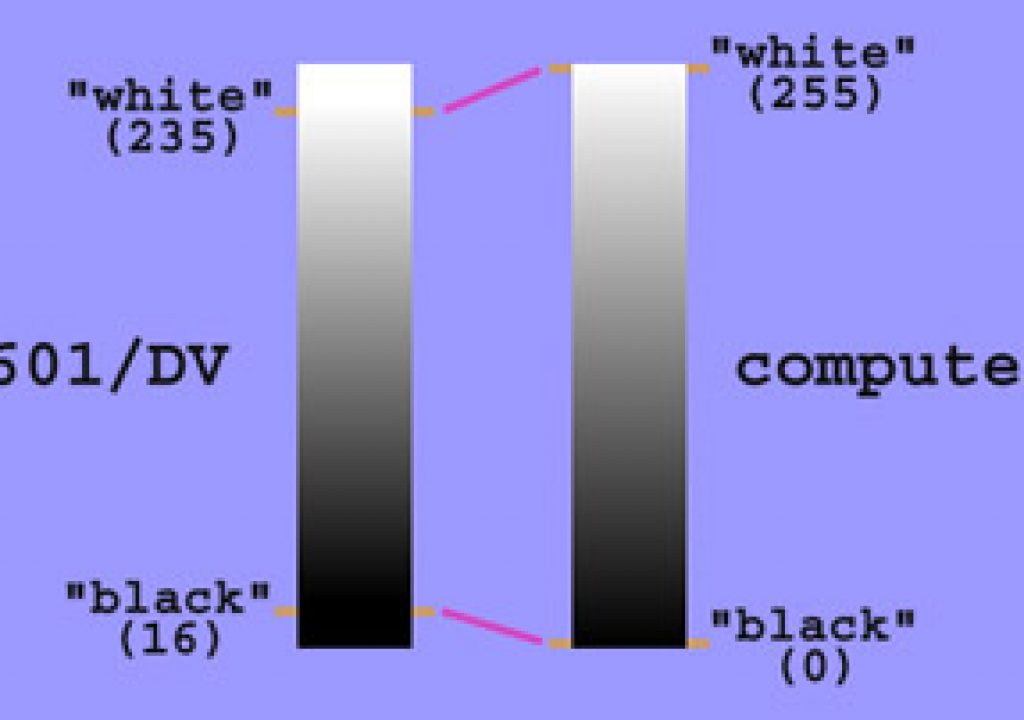
It would seem like a simple concept: “black” is the darkest color you can have; “white” is the brightest color. However, not all video hardware and software think this way. Quite often, systems can go “darker” than black and “brighter” than white, allowing safety margins for certain situations.
This means that some systems uses different values for black and white than others. This can cause a lot of problems for a video editor or artist who uses a variety of tools during a production, because images may shift in relative brightness and contrast for no apparent reason. Compounding this problem is a lack of accurate information about how to manage these shifts. But if you ignore them, the results can range from washed-out images to illegal color values.
Therefore, you will need to take it upon yourself to be aware of the black and white definitions that different systems are using, and to translate between them as needed. We will also discuss the oft-confused analog concept of “set up” and how it relates to these digital values. It initially requires a bit of a mind-twist, but will pay off in the long run. We will be using After Effects for some of the examples later in this article, but these concepts apply to all systems – so read on…
Digital Definitions
The majority of computer graphics software, including most paint, 3D, and compositing programs, use intuitive definitions: Black is 0% brightness, or an RGB color value of 0/0/0; White is 100% brightness, or an RGB color value of 255/255/255 (for an eight-bit-per-channel color definition, where each color channel can have a strength range of 0 to 255; scale accordingly for higher bit depth systems). You can’t get darker than black or brighter than white. We’ll call this system “computer” luminance, with a range of 0-255.
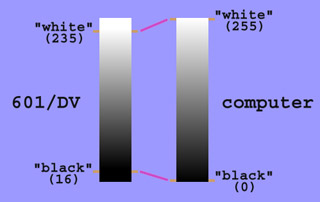
Most digital video systems internally define black as a value of 16, and white as a value of 235. However, most software treats black as 0 and white as 255.
However, many digital video systems use a different set of definitions: Black is just over 6% brightness, or an RGB color value of 16/16/16; White is just over 92% brightness, or an RGB color value of 235/235/235 (again, based on 8-bit-per-channel ranges). This system is defined by the ITU-R 601 specification used by most digital video equipment, from DV to D1 decks, and transmitted over digital video connections such as SDI and FireWire (IEEE1394). We’ll call this system “601” luminance, with a range of 16-235.
The 601 system allows colors that are darker than black and brighter than white. This is especially important for cameras, because you may occasionally shoot an object that has a bright spot that is “hotter” than legal white, and might want a way to later recover the detail in this hot spot. Going darker than broadcast black is also used at times for synchronization signals, as well as some primitive keying applications such as “superblack” where systems mask or key out areas of an image “blacker” than black.
The next trick comes in knowing when and how to translate between these two worlds.
The Two Systems
Many hardware systems never expose you to the fact that internally, they are probably using the 601 luminance range. Externally, these systems present you with the computer luminance range. When they decode or decompress a frame for you to use, they automatically stretch 16 down to 0 and 235 up to 255, scaling the values inbetween as needed and squeezing out the values above or below the 16-235 range. Likewise, when they encode or compress a frame to later play back through their systems, they squish 0 up to 16 and 255 down to 235. Avid, Scitex, Digital Voodoo, BlackMagic DeckLink, and AJA are examples of digital video cards and codecs that can do these translations for you.
However, many systems pass their internal 601 luminance values directly to the user when they decompress their frames, and – surprise, surprise – expect you to have conformed your computer range images back into 601 range before you hand an image back. Aurora cards, the old Media 100, and many DV codecs are examples of these systems, as well as many DDRs (digital disk recorders). Note there is nothing wrong with the way these systems work, and when we get to some DV examples later on, you may be happy they expose these extended values to you. And if you stay entirely within these systems, the issue may never come up, anyway.
Problems occur when you start moving between different systems, and therefore, luminance ranges. For example, say you pulled up some archived footage captured on a Media 100 that you were going to combine with still images and graphics inside Adobe After Effects – your footage will be using a different luminance range than your stills, making the video appear more washed out and less contrasty than you expected. Or say you created a 3D render that you intend to play back through DV – your darkest and brightest areas may now get pushed darker and brighter than you intended, resulting in more contrast and some illegal values. These can be fixed, as long as you know what is going on in the first place.
Translation
Translating between these different worlds is actually quite easy, once you’re aware they exist. The questions you need to ask yourself, at every step of your production, are:
-
- Which luminance range is this source using?
-
- Which luminance range does the software I am currently using assume?
- Which luminance range does my output codec and hardware expect?
Once we know these answers, all we have to do is make sure we keep the various black and white points aligned throughout our workflow.
Again, if you stay in a “closed” system, you don’t have to worry about these issues. The best example is a non-linear editing system where all your sources are either captured or created inside that system – it already knows which luminance range it is using, and will keep things consistent internally.
The confusion comes when you mix and match. Let’s walk through a few scenarios and see how they would need to be treated.
Case Study: Compositing
We used to have a Media 100 system, as did many of our clients at the time. Therefore, it was common for our captured footage, as well as our final renders, to be in Media 100 format, which used the 601 luminance range. We do most of our compositing inside After Effects, also drawing on an extensive stock footage library we have in house, plus additional 3D elements that we render.
When we ask ourselves The Three Questions listed above, the answers are:
-
- Our captured sources use the 601 luminance range; all of our other sources use the computer luminance range.
-
- Our software uses the computer range.
- Our final output should be back in the 601 range.
Therefore, we needed to translate all of our 601 sources to computer range while working inside After Effects, and then translate our final After Effects render from the computer to the 601 range.
To perform this input translation in a program like After Effects, each Media 100 source must have a Levels effects applied to it, with the Input Black parameter set to 16, and the Input White parameter set to 235. Leave the Output Black parameter at its default value of 0, and the Output White at its default value of 255. An example of these settings is shown in the figure below:
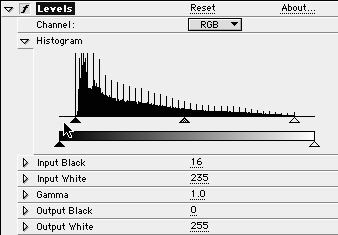
To translate footage that uses the 601 luminance to the computer’s luminance range, we apply a levels-type effect, with Input Black set to 16 and Input White set to 235. The lack of color values in the source below 16 (where the cursor is pointing) is a hint the footage uses the 601 luminance range.
If you are going to be using a single source more than once, you might consider placing each source in its own “composition” with Levels applied, and then use this already-treated comp – not the source itself – when it is needed in other comps. Note that some systems, such as old Videonics’ Effetto Pronto, allow you to set a parameter in the options for each source that does the same thing (this feature also appeared briefly in After Effects 7, before being replaced by a more comprehensive color management system – lick herec for a column on these subjects). This is a good model for other programs to emulate.
Why not leave the Media 100 footage alone, and treat the other sources to match the Media 100’s range? Because After Effects is not inherently aware that it should keep black at 16 and white at 235. As you add treatments such as glows and transfer modes, it is easy to get hot spots that hit 255; when you want to fade a layer to black, you would have to fade it instead to another dummy source set to a color of 16/16/16; when you create “white” text, you would need to make sure you selected a color of 235/235/235 instead of 255/255/255. Yes, you can do it, but it’s a lot more work.
There are a couple of approaches to end up with 601 luminance range images when we render our final composite. The old way was to nest our “final” comp into a new “render” comp, and again apply Levels to it. At this stage, the input and output settings are reversed: Output Black is set to 16 and Output White is set to 235, while the input settings are left at their defaults of 0 and 255, respectively. Ever since Adjustment Layers were introduced in After Effects 4.0, we now place one of these layers at the top level of our final comp, and apply Levels as described. Our blacks will now be placed at 16, and our whites at 235.
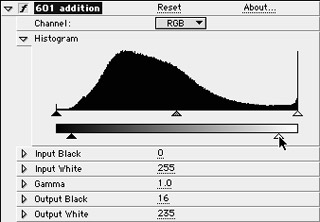
To translate typical computer images to the 601 luminance range, again apply a levels-type effect, this time with Output Black set to 16 and Output White set to 235.
There is a “gotcha” to this way of working: The Levels effect will only translate the portions of the image that are not completely transparent. This is a problem if you are creating simple titles on black, for example. If you have any areas were the alpha channel is 0 in value, the background color will not bumped up from 0 to 16. Therefore, it is best to place a black, full-size dummy layer (such as a “solid” in After Effects) at the bottom of the stack in the final composition. This will fill in these transparent areas, and make sure they get translated properly. (There are, of course, exceptions to every rule; see the sidebar on the last page of this article on Superblack.)
Ultimately, we hope this treatment migrates to an Output Module option. It would make it easier when we’re rendering multiple versions of the same composition – for example, to both our Media 100, which operates in 601 space and therefore needs this translation, and a codec the client may require that happens to do this translation automatically. Moving it to the output module, after the alpha channel is calculated, would also eliminate the transparent/black background workaround above.
Case Study: 3D Renders
Many 3D animators do not have a PAL or NTSC video card in their workstations. However, it is desirable to be able to make demo reels to attract clients, as well as videotape proofs of your work before delivering the final version.
The ease with which DV equipment can be interfaced to computers has enticed many to go this route to create video proofs. However, with many DV codecs default to working with the 601 luminance range, rather than the computer range most 3D software uses. Therefore, if you render direct from your 3D program to DV, the final result might have a different contrast range than you were expecting.
To get around this, you need to render to an intermediate codec, such as Animation, and then process the render through a program such as After Effects to change its luminance range. Again, you can do this by adding a Levels effect to the footage, and setting Output Black to 16 and Output White to 235. Hopefully, more 3D software programmers will catch onto this issue, and include this as an option in their file-saving routines to save this extra step.
If you are using captured video as a texture map on 3D objects, the issues are similar to the compositing example above: Does this footage use my 3D software’s computer luminance range, or does it use the 601 range? If the latter, it means you will need to translate it before applying it as a texture map.
Since most 3D programs don’t know how to handle video’s frame rate and fields to begin with, you’re probably pre-processing video maps through another program anyway. If that’s the case, and your capture came from a 601-based system, add a Levels effect with Input Black and White set to 16 and 235, respectively. For 3D programmers considering adding necessary features such as field separation to their texture map modules, you should also add an option to do this luminance stretch automatically.
Case Study: Graphics for Editors
Now let’s turn the tables, and say you are working in a video editing system that lives in the 601 luminance range. You want to process a few still images from scans and your CD library to include in your work. Remember The Three Questions from the first page: Your new sources are in computer space, but your software is in 601 space.
If this is the case, you may need to do some translations. Some systems, such as the Avid, have an import option that can perform this scaling for you. Note this is only available for sources not already rendered to their codec. Otherwise, process your stills in a paint program such as Adobe Photoshop, and apply Levels, with Output Black set to 16 and Output White to 235. This will squeeze the luminance range of your stills into the 601 range.
How can you verify if your editing system is working in the 601 space? Through a combination of test images and a video waveform monitor. Create a simple image that includes four swatches of different levels of gray: 0/0/0, 16/16/16, 235/235/235, and 255/255/255 respectively. Import this into your editing program, and look at its video output. If you see only two swatches now, it definitely is working in the 601 range (16-235), and has squeezed out the colors that were outside this range.
If you still see four swatches, place a waveform monitor on the output. If you see areas above 100 IRE, and below your set-up pedestal (0 or 7.5 IRE, depending on how you have your hardware set), then your system again is working in the 601 range, and the two swatches at 0/0/0 and 255/255/255 are illegal colors – because they are darker than black and brighter than white, according to the 601 specification.
If you see four swatches, and your waveform monitor says nothing is illegal, then the values below 16 and above 235 got through cleanly. This means your editing system is working inside the computer’s luminance range, or translating the files for your automatically. If you don’t have any test equipment, create a test tape and have someone with a waveform monitor look at it for you. And don’t adjust the 0/7.5 IRE setup switch as a way of “fixing” this – it’s the wrong tool for the job, and won’t help the whites anyway. (IRE issues are discussed on page 5 of this article.)
Yesterday’s Highlights
Normally, we recommend always converting 601 luminance range sources into the computer’s luminance range while working, and then convert back to 601 at the output stage if required by your video system of choice. However, as an increasing variety of DV footage crosses our virtual desk, we’ve been forced to rethink this approach.
For whatever reason – the default or “auto” settings in many DV cameras, a potential lack of technical experience of some DV camera operators, whatever – a lot of DV clips simply have whites that are brighter than 100 IRE. Which means the digital values for these highlights are higher than 235. Which means that if you or your codec automatically stretches 235 to 255, the details inside anything brighter than 235 are going to get clipped, causing flat spots or “posterizing” in the highlights. Figure 5 show what can happen if you automatically stretch your luminance values; pay attention in particular to the white areas underneath the lion’s nostrils.
Automatically stretching luminance values can flatten out highlights recorded at higher than 100 IRE. Compare the unprocessed image above to the stretched one in the to the upper right, looking closely at the brighter areas. The image on the lower left uses a Curves compensation to preserver some of these highlights. Footage shot by Harry Marks at the Wildlife Waystation.
This is not an problem inherent with DV, DV cameras, or their operators; it just seems to happen far more often than with tapes shot on other professional formats. As people gain more experience dealing with things like “zebra patterns” (that function inside your camera that can warn you when you are shooting illegal ranges), or as auto-brightness algorithms get smarter, we’ll see it less. But today, it has to be dealt with.
To deal with it, we used to use the ProMax DVSoft codec set to unclamped luma to get the full luminance range, illegal whites and all. Then, instead of applying Levels, we apply a Curves effect to the footage. This curve clamps the black down from 16 to 0, just like our Levels treatment, and has a straight line through the middle part of the range. The difference is at the top of the range: Rather than clipping off the values from 235-255, we gently roll them off. The result is shown in the last of the three figures above; notice the highlights are not quite as flat now. The curve that got us there is show in the figure below. We’ll tweak this curve as necessary, depending on the shot.
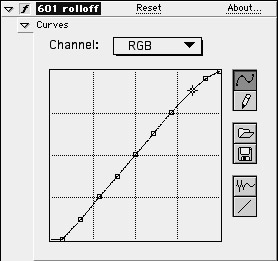
A more gentle way to deal with illegal whites is to round them off with a curves-type effect.
This approach does mean losing a little picture information in problem shots, but it is better than just crushing all your highlights, or having someone adjust your entire output downstream to make it legal. We do not perform the opposite of these curves on output – we just apply our normal Levels that convert computer luminance ranges back down to 601 range. Why? The whites we were correcting were illegal in the first place; we have no desire to re-introduce illegal values on output!
(A workaround for this is also detailed in the column we mentioned earlier, which can be found here. In short, the Interpret Footage dialog in After Effects 7 or color management in After Effects CS3 lets you decide whether to use the 0-255 or 16-235 ranges when decoding some footage. Also, Final Cut Pro has access to the full luminance range under the hood; we use its 3-way Color Corrector to reach and tame out-of-range values by having it auto-conform the black and white points and re-exporting the footage.)
Fade to Black
Dealing with different definitions of luminance ranges can seem like a blur of numbers. However, ignore this issue, and your final video may not look like you intended. Just focus on this overall concept: Where does each file or program think black and white are? If there is a disagreement, then you have to adjust one to match. Ask on input, and then ask again on output, adjusting a second time if necessary. If you don’t know the answers, then call tech support for the products you’re using. Don’t be surprised if they don’t know the answer either initially, but press on until you do get an answer.
In the end, you’ll encounter fewer mysteries as you work. More importantly, your clients will remember you as the video house where they didn’t have problems with their images looking different than intended.
IRE Issues: You’ve Been Set Up
It is common to confuse the digital luminance value issues discussed in this article with the analog measurement of brightness, known as IRE (Institute of Radio Engineers) units. They are indeed both definitions of how to represent black and white, but in different worlds – they are not interchangeable nor a replacement for one another.
In analog video, the electrical reference for white is generally defined as 100 IRE, using near-identical electrical levels regardless of format. The electrical reference for black depends on what video format you are using, and even what country you are in: PAL and the Japanese version of NTSC always use 0 IRE to define black. Composite NTSC video in North America uses an electrical value of 7.5 IRE, which is sometimes referred to as set-up. Component video in North America can use either 0 or 7.5 IRE for black; 7.5 seems to be more common.
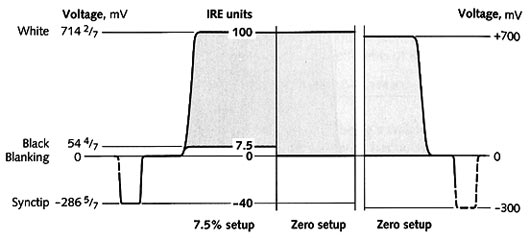
A comparisons between different IRE references for black and white. The one on the left is for NTSC composite video in North America; the center is used in Japan; the one on the right is for PAL, and is also occasionally used for NTSC component video.
The analog-to-digital and digital-to-analog conversion portions of your video card or deck decide how to translate luminance values between these two worlds. For example, if set to 0 IRE and digitizing to a 601-specification data stream, a video signal at 0 IRE would be translated to a value of 16, and video at 100 IRE would be translated to 235. Hot spots brighter than 100 IRE would be captured as values above 235.
If this same data stream was output through hardware with 7.5 IRE setup enabled, a value of 16 would create a video signal at 7.5 IRE, and a value of 235 would create a 100 IRE signal. Most video editing systems have a 0/7.5 IRE switch, but note that some – such as the Media 100 – actually only change this reference on the output, always keeping the input at 7.5 IRE for NTSC systems.
Some mistakenly assume that a luminance range of 16-235 means 7.5 IRE setup was used, but this is not true. For example, a value of 16 still defines black in any 0 IRE system, including PAL and Japanese NTSC. If a videotape was recorded with 7.5 IRE setup, but digitized through hardware that uses 0 IRE for its black reference, and then translated through a codec that stretched video black down to a numeric value of 0, “black” on the 7.5 IRE tape would indeed decode at a value around 16 – but only because someone made a mistake.
You can imagine the number of permutations that can pop up if someone does not align both their digital and their analog luminance ranges throughout the production chain. Again, it’s just a matter of tracking which definition each part of the chain is using, and translating where necessary.
If you are working with a codec that stretches the common internal values of 16-235 out to 0-255 for software, take particular care when digitizing tapes to make sure your source material doesn’t regularly measure over 100 IRE – otherwise, these areas will just get clipped off later by the codec. Tame these by adjusting your input processing amplifier (either external, or built into your editing system).
How can you tell if a videotape was recorded at a reference of 0 or 7.5 IRE? Look at a waveform monitor on input while looking at some color bars, and see where the lowest level of the picture information is landing. If your system lacks a waveform monitor, one unscientific method is to eyeball the color bars at its head – specifically, the three skinny “PLUGE” (Picture Line-Up Generator) bars in the lower right corner. The middle of these three skinny bars is supposed to be reference black; the ones on either side are 4 IRE lower and higher than reference black.
In theory, you should adjust your monitor so that the middle reference bar and the darker one beside it blend together. This makes sure black in the video signal truly is black on your monitor. In reality, most monitors I’ve seen default to a brighter setting. Because of this, if you can see all three bars, chances are good that the tape you are viewing was recorded at 7.5 IRE (the darkest bar is at 3.5 IRE); if you see one double-wide bar and one lighter bar, chances are it was recorded at 0 IRE (and the “minus” bar is blending into the middle reference bar).

In a color bar pattern, the black square that’s second from the lower right actually contains three skinny bars, known as the PLUGE (picture line-up generation equipment). The middle skinny bar – as well as the two squares on either side – are true black; the skinny bars on either side of the center bar are lighter and darker than black.
This is not a dependable system – after all, your monitor might actually be calibrated correctly – but it’s often a clue if you have no other idea. To remove some of the guesswork, we now label all our tapes either 0 or 7.5 IRE; it is a good practice to get into, and to encourage others you work with to do as well.
sidebar: Superblack
Videotapes, as well as a surprising number of digital video codecs, do not have embedded alpha channels. This is a bit of a shortcoming when you want a matte or key to travel along with your footage, such as when you are passing lower third titles on to a video editor to later composite over footage.
The most common solutions to this problem include using an extra tape or file that contains just the alpha matte, or to pre-composite the image over blue or green and then to key this color out later. However, some also use a technique known as superblack, which is a form of luminance-based keying.
In this case, “black” in the portion of the image area you want to keep is actually lighter than pure black. The background area you want to drop out is then set to pure black (or, depending on how you think about it, “blacker than black” – superblack). The equipment that receives this footage is then set up to key out any luminance values darker than “black” in the portion of the image you wish to keep.
To perform this digitally, you need a video editing system that works in the 601 luminance range (which virtually all do), and a codec that does not auto-stretch the 16-235 luminance range out to 0-255. In other words, you need a system that will allow you to preserve colors darker than “legal” black.
Either build your graphics using the 16-235 range, or build then at 0-255 and then apply a Levels effect with output black and white set to 16 and 235 respectively. Then composite this over a pure, “0 black” background. In After Effects, this happens automatically if your foreground image has a transparent alpha, and you have nothing behind it in the composition. When you import this render into your video editor, again, do not perform any luminance stretching, and tell its luminance keyer to matte out levels below 16.
You can also record an image with an embedded superblack matte to videotape. Prepare your image as above, taking care that your video system does not clip or remove black values lower than 16. Make sure the hardware has 7.5 IRE setup enabled. File values of 16 will go out at 7.5 IRE, but your background values of 0 will go out closer to 0 IRE, allowing them to be keyed downstream.
Superblack keys don’t look very good – they have essentially no antialiasing. However, they render fast inside a NLE, and don’t require a second synchronized tape deck in the linear world. Eventually, most editing will be performed digitally, and most NLEs will allow an embedded, real-time alpha channel matte – but until then, don’t be surprised if a client asks you for a superblack matte.
Special thanks to the numerous people who added to the knowledge base from which this article was assembled: Brad Pillow, Richard Jackson, Don Nelson, Greg Staten, Mike Conway, Mike Jennings, Jerry Scoggins, Peter Hoddie, Rob Sonner, David Colantuoni, Tony LaTorre, Tony Romain, Knut Helgelund, Frank Capria, and finally, Charles A. Poynton’s book A Technical Introduction to Digital Video.
The content contained in our books, videos, blogs, and articles for other sites are all copyright Crish Design, except where otherwise attributed.

Filmtools
Filmmakers go-to destination for pre-production, production & post production equipment!
Shop Now