We’re going through our book Creating Motion Graphics with After Effects 5th Edition (CMG5) and pulling out a few “hidden gems” from each chapter. These will include essential advice for new users, plus timesaving tips that experienced users may not be aware of.
Continuing with Part 5, Nesting Compositions is the first of three chapters that show you how to build a hierarchy of comps. Here, our focus is on creating complex animations that are easy to edit, and we explain the various ways to efficiently navigate and edit a chain of nested comps. We also delve further under the hood of After Effects’ rendering order: Understanding how data travels through the hierarchy will help you troubleshoot if the result is not exactly what you expected…
This chapter includes many examples showing you the benefits of nesting 2D comps; the following chapter will cover Precomposing (sort of like nesting backward). The third chapter in this series, Collapsing Transformations, covers specific issues that arise when nesting and precomposing comps containing 3D layers.
The Benefits of Nesting
Graphics applications vary wildly, but advanced ones usually have one thing in common: a method of “grouping” items so you can transform multiple layers as easily as you can transform one layer. In After Effects, there are two main ways to edit layers as a group: Parenting (covered in Chapter 17), and Nesting Compositions.
By placing a group of layers in their own composition, then “nesting” this comp inside another, you can not only apply transformations to a group (which is the benefit of Parenting), but also trim, fade, and apply effects to the group as if they were one layer.
Another benefit is that you can create a precomp and nest it into multiple comps. (A precomp is simply a regular comp that you don’t intend to render directly.) A precomp can be useful when creating an animated element (like a logo) that may need to change; when you edit the precomp, its output will ripple through to all the other comps in which it is nested.
Nesting comps serves a second purpose: It allows you to override the default rendering order performed on a layer in a single comp. In those cases where nesting is a better solution than parenting, the question becomes whether or not you were planning ahead. If you were, you’ll find nesting comps to be quite straightforward and intuitive. However, if you discover a problem after the fact, you’ll probably need to use the Precompose feature (which we’ll cover in the next chapter).
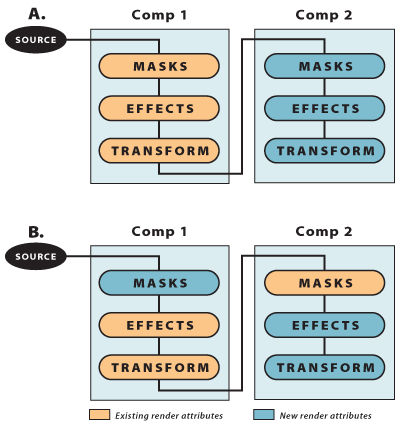
By nesting Comp 1 into Comp 2 (A, above left), you’ll have two render orders to work with and can pick and choose which attributes render in what order. By applying the effect in the first comp and the Mask in the second comp (B), the default rendering order of Masks > Effects is reversed. In this case, you would animate transformations in Comp 2 (after the mask).
Nesting a Comp
Nesting a comp is very straightforward. Let’s say you have already created the Main Comp (the one that will be rendered as the final movie). You also have a group of layers that comprise an animated logo or title, a layered Photoshop file, or even a sequence of edited movies that you wish to edit as a single layer. Create a second comp and organize this group of layers. This second comp can be any size and any pixel aspect ratio, but make sure it’s at a high enough resolution so that you don’t have to scale it later above 100% when you nest it.
To nest it, bring the Main Comp forward, select the second comp in the Project panel and drag it into the Main Comp (it’s just like dragging in a piece of footage) where it appears as a single layer. Now you can mask it, apply effects, and transform it easily.
Remember that the second comp is still “live” – any changes you make to the group of layers will appear immediately in the Main Comp. The second comp renders all its layers first, and then sends a composited image to the Main Comp. Note that as far as the Main Comp is concerned, it’s receiving a flattened RGB+Alpha image, not a group of individual layers (unless you collapse the transformations, which we’ll cover in Chapter 20).

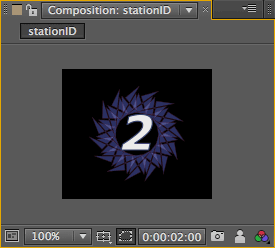
The station ID bug is animated in the small [stationID] precomp. This comp can be nested into multiple comps.
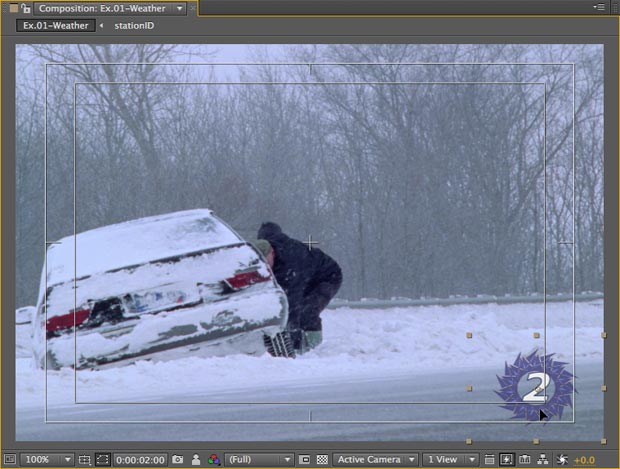
Nest the small [stationID] comp into the D1-sized [Ex.01-Weather] comp and snap it to the bottom righthand corner (above). Note that it appears as one layer in the Timeline panel (below) and that the comp marker in the precomp appears as a layer marker when nested (Chapter 6). Footage courtesy Artbeats/Winter Lifestyles.

Double-clicking Duplicity
Double-click on a nested comp layer to open the original comp; add the Option (Alt) key to instead open its Layer panel. The opposite is true when the layer has Roto Brush or Paint applied (yes, this will drive you crazy).
Navigating Nested Comps
After Effects CS4 introduced two very useful enhancements for navigating chains of nested compositions: the Composition Navigator and the Mini-Flowchart:

The Composition Navigator is a new user interface element that has been added to the top of the Composition panel. Click on a comp’s name to jump directly to it.
A shortcoming of the Composition Navigator is that it shows just one “thread” of a chain of nested comps. If there are more than two compositions nested into the currently forward comp, After Effects displays the name you opened most recently. If you don’t see the comp you’re looking for, try using the Composition Mini-Flowchart.
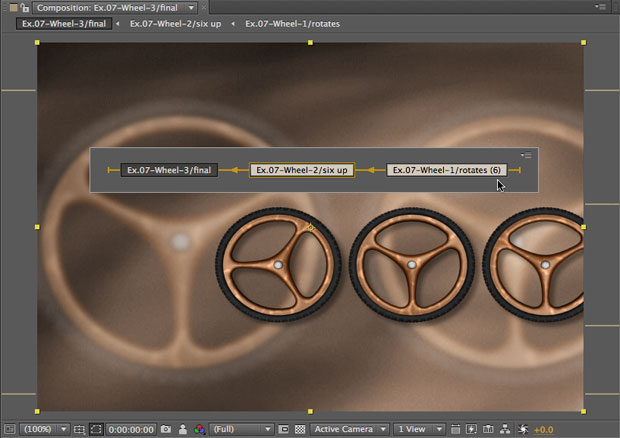
Press the Shift key to have the Mini-Flowchart pop up centered on the cursor’s location. When a comp is nested more than once into another comp, the number of times it is nested is displayed in parentheses after the comp’s name (circled in red).
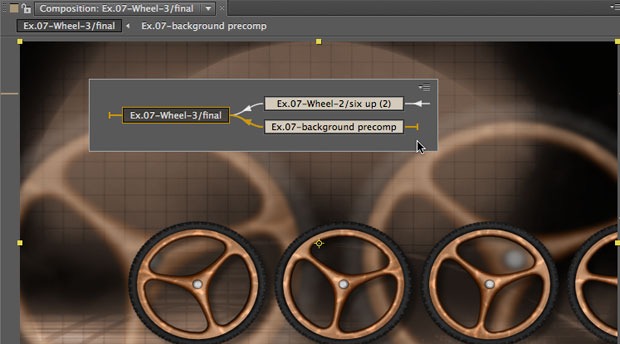
After we replaced the background layer with the comp [Ex.07-background precomp], the Mini-Flowchart will now display two nested comps in this hierarchy. Note that the Composition Navigator (along the top of the Comp panel) will display the precomp you opened most recently.
Edit This, Look At That
After Effects CS4 also introduced enhancements to the “Edit This, Look At That” (ETLAT) behavior. Previously, you could lock the Effect Controls panel of a layer used in one comp, then bring another comp forward. This allowed you to edit an effect’s settings inside a nested comp while viewing the results in a master comp downstream.
You can now also lock the Comp panel for a master comp, then edit layers in the Timeline panel for a nested comp. To try this out:
- First make sure two (or more) comps in a nested chain of comps are open in the Timeline panel – the ETLAT behavior works best when all the comps you might edit are open!

Background grid from Artbeats/Digital Biz.
- Bring the Main Comp forward and click on its lock icon to the left of its name along the top of the Comp panel. The lock will turn yellow.
- Select the tab in the Timeline panel for the nested precomp. Its timeline will come forward, but the Comp viewer for Main Comp will still be displayed.
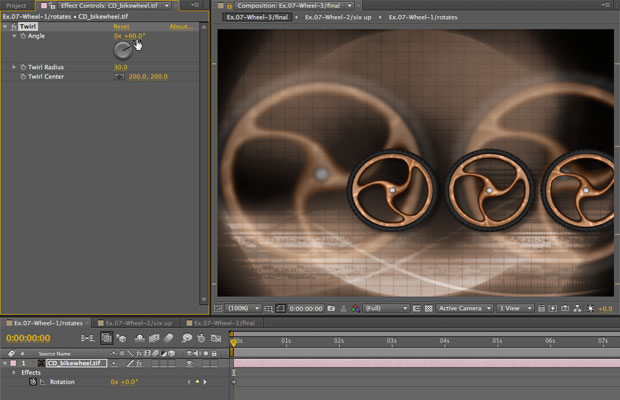
- In the Timeline panel for the precomp, edit one of the layers any way you choose (in the figure we’re editing an effect). The Comp panel will display the result in the Main Comp.
- To return to normal behavior, click on the lock icon in the Comp panel to unlock. The comp you were working in will now be displayed in the Comp viewer.
This trick will save you from having to open two Timeline and Comp panels while working with tricky chains of nested comps. Note that selecting comps to using the Timeline tabs is the most reliable method for getting this trick to work: If you switch to another comp using the Composition Navigator along the top of the Comp panel, the newly selected comp will then become the “locked” comp.
Preserve Frame Rate
Normally when you nest a comp, the second comp determines the frame rate that the precomp is sampled at; so if the final comp in the chain is set to 29.97 fps, all nested comps also render at that frame rate. At the end of the chain, the frame rate is ultimately controlled by the Render Settings, which determine how the comp being rendered – and all comps nested within – actually renders. However, the Preserve Frame Rate option is designed to override this default behavior.
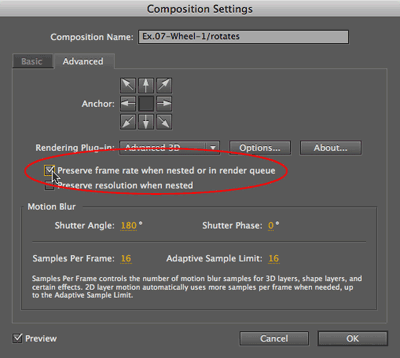 Check the Preserve Frame Rate switch in the Advanced tab of Composition Settings to force this comp to be sampled at its frame rate no matter what frame rate it is eventually rendered at.
Preserve Frame Rate is particularly useful when you want to “lock” animation keyframes to a movie’s frame rate. For instance, if you’re rotoscoping or masking a 24 fps clip shot on film, do the work in a precomp set and preserved to 24 fps. Nest this into your final 29.97 fps comp, and the mask keyframes will remain locked onto the film frames when you render.
Preserve Frame Rate can also be used for locking effects that randomize, such as Numbers, to a different frame rate than the comp they’re nested into. Here we’ve created random numbers with the Numbers effect, and set this precomp to 10 fps with Preserve Frame Rate turned on. When this is nested in the Main Comp, it can be duplicated and time-stretched to create many other frame rates.
Trish and Chris Meyer share seventeen-plus years of real-world film and video production experience inside their now-classic book Creating Motion Graphics with After Effects (CMG).
The 5th edition has been thoroughly revised to reflect the new features introduced in both After Effects CS4 and CS5. New chapters cover the new Roto Brush feature, as well as mocha and mocha shape. The 3D section has been expanded to include working with 3D effects such as Digieffects FreeForm plus workflows including Adobe Repouss©, Vanishing Point Exchange, and 3D model import using Adobe Photoshop Extended. The print version is also accompanied by a DVD that contains project files (CS5-only) and source materials for all the techniques demonstrated in the book, as well as over 160 pages of bonus chapters on subjects such as expressions, scripting, and effects.
We will be pulling a few “hidden gems” out of each chapter to share on ProVideoCoalition.com roughly every week. These will give you a taste for the multitude of time-saving tips, not-obvious features, little gotchas, and other insider knowledge you will find in CMG.
The content contained in Creating Motion Graphics with After Effects – as well as the CMG Blogs and CMG Keyframes posts on ProVideoCoalition – are copyright Crish Design, except where otherwise attributed.

Filmtools
Filmmakers go-to destination for pre-production, production & post production equipment!
Shop Now


