One of the most common refrains in editing forums and Facebook groups is “Don’t use H.264 for editing!” There are good reasons for this and in many ways this simple rule is one to live by. But if you have time to delve a little deeper, you will see that things aren’t always as simple as they seem.
But’s let’s back up a little and go over some ground that will be familiar to many. Video files use a codec to enable file sizes and bitrates to be manageable – whether that’s to help the camera give you more than ten minutes on your SD card or helping you upload your final video to social media in a reasonable time. A camera, for example, encodes the video data to compress it into a smaller file, leaving the job of decoding it or decompressing it to later. A video file will also use a wrapper – like .mp4 or .mxf or .mov, more on that later.
Codecs in cameras
In any given week, an editor might be dealing with a number of different codecs from different cameras. Many consumer and prosumer cameras record in either H.264 (aka AVC) or its successor H.265 (aka HEVC). Within those options, the better cameras will record 10 bit 4:2:2, keeping more colour information and avoiding banding (especially if shooting LOG – LOG and 8 bit are not friends), whereas older cameras might shoot in 8 bit 4:2:0. Often there will be the option to record intra-frame or inter-frame, again more on this later. If you’re not sure, drag a file into MediaInfo and change the view to Tree to check it out.
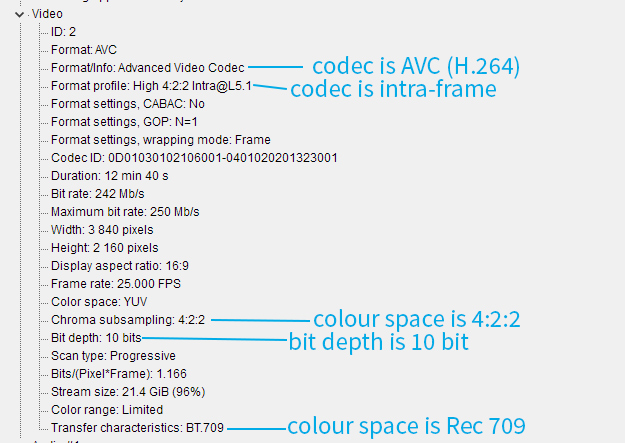
If cameras aren’t recording in these codecs, then generally it is either ProRes or one of the proprietary RAW formats. Arri cameras for example can record in ARRIRAW or one of the ProRes formats. Blackmagic in BRAW or various ProRes flavours and so on. And these options can be gained for a camera that doesn’t have them from an external recorder from manufacturers like Atomos. There is also an increasing need to shoot in HDR and that is coming down to cheaper cameras (as well as the iPhone!). One of the main advantages of a RAW codec is that it’s easier to fix any mistakes during the shoot – ISO or colour balance for example isn’t yet burnt into the file, but it has the downside of much larger file sizes. The advantage of shooting ProRes is that your editor will buy you a drink.
Codecs in post
As an editor, my interest in all of the above is what it means to me in the edit suite. Thankfully, Premiere Pro is remarkably forgiving when it comes to what codecs, formats and wrappers it can accept. That said there is a great deal of difference in how taxing things will be for the computer and therefore how responsive the edit will be.
The basic rule is that the more compressed the codec, the more work your computer needs to do in order to playback or export the video. The main DP I work with shoots ProRes HQ on his Arri Alexa and it edits like a charm. However, other clients tend to send me files from Sony or Canon or Panasonic cameras that tend to be H.264 10 bit 4:2:2 albeit often intra-frame, meaning each frame stands alone which makes it a little easier to decode.
The worst case is an inter-frame codec as this means that not all the frames are actually there in the data. Instead it is made up of I, P and B frames – the I frames are whole frames and the P frames are predicted or put back together from previous I frames. The B frames are bi-directionally predicted from the I and P frames. If you think about a video at 24 frames per second, a lot of any given frame will be the same as the frame before it, so it actually makes a lot of sense to do it this way. Inter-frame may be the worst case for editing, but it is the best case for keeping quality high and file size low, which is why it is standard as an export codec as well as being used in shooting.

Transcode vs Proxies
But even an intra-frame H.264 codec (where every frame is an I frame) will still be mighty taxing for your computer. This is why the general advice is to either transcode or make proxies and this is good advice almost all of the time. It might be a time commitment up front, but for all the time you are editing you will be thankful for your responsive system (here I’m talking about the microseconds between hitting play and it actually playing or the time it takes to show a frame when parked on it or whether trim mode is even usable at all).
Transcoding method:
Re-encode the H.264 file into a high quality edit friendly codec like one of the flavours of ProRes, DNxHR or Cineform, with ProRes 422 HQ being perhaps the most common. These become the new master files from this moment forward. The only real downside to this method is the high storage requirements and the need for good hard drive speed as the bitrates are also high – but this is not a massive issue any more given that most are not using HDDs any more. Where this method comes into its own is when the source files have something that will trip Premiere up, even when using proxies – like VFR (variable frame rate – looking at you iPhone). Removing that at this stage can solve a lot of issues. (And you might choose to go on to make proxies as well depending on the resolution of the source material and your hardware.)
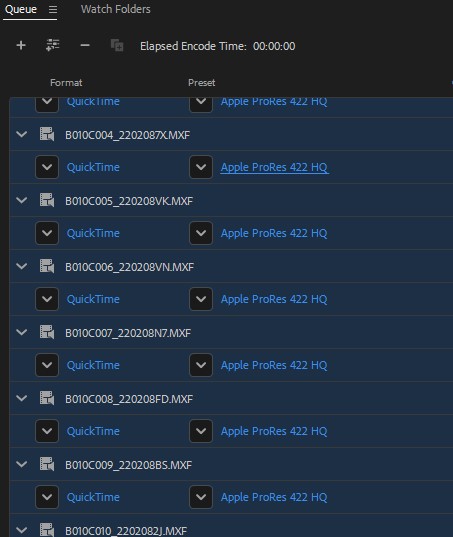
In-built proxy method:
Import the H.264 files and make proxy files within Premiere Pro (or whichever NLE – even Avid has proxies now!) – the proxies will be in an edit friendly codec like ProRes, but can be lower in resolution and quality as they won’t be used for any exports (unless you choose to for a quick export). This saves on storage, though it can get a bit tiring to work with overly compressed proxies, so keeping the quality higher is good if you can afford the space (and you can make your own preset to increase the quality, for example the default is ProRes 422 Proxy 720p which you could up to ProRes 422 LT 1080p). It means exports come from the source files, keeping the most possible quality (a very slight advantage over the transcode method). Proxy files can also be attached within Premiere if you prefer to make them externally. Working remotely can work well by sending someone a project with the proxies only, as well as any audio or stills. Then they just send you the finished project back to re-link to the original files.
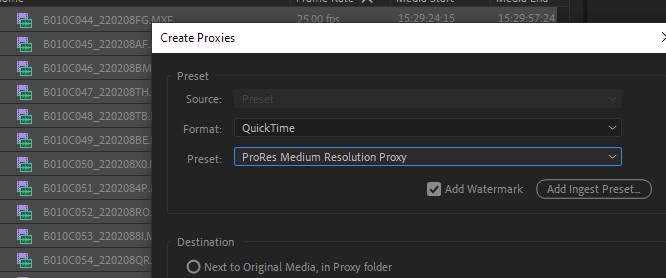
Offline/Online method:
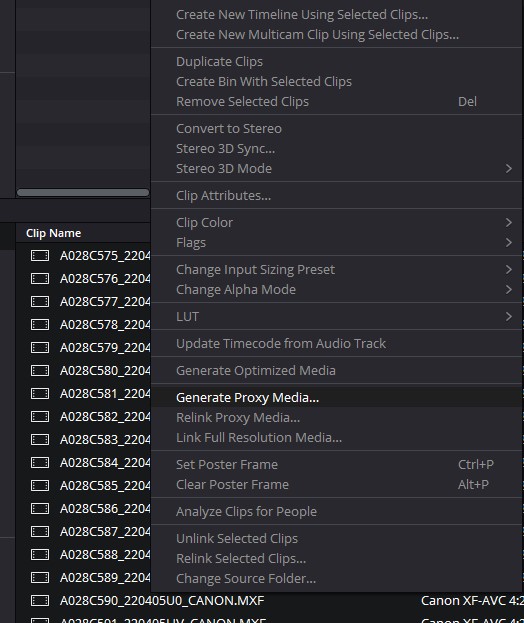
Make proxies in for example Davinci Resolve or Adobe Media Encoder or Shutter Encoder – again in an edit friendly codec like ProRes & generally at lower resolution than the original camera files. Then use them as source clips during the edit and export an XML at the end for the colourist or online editor who will re-link to the original camera files. This is a great way to work remotely with someone who isn’t a Premiere user. The main downside is that the XML will not carry over everything so it’s not great for complicated edits involving a lot of effects and reframes.
But do you really need an “edit friendly” codec?
Or to put it another way, why would you ever not need an edit friendly codec – it would only be if your hardware could make the unfriendly friendly. And it turns out that is possible to a limited extent with hardware acceleration.
Premiere has only had Nvidia and AMD based hardware decoding acceleration since 2020 and it’s still a work in progress to some extent. This very interesting article from Matt Back at Puget Systems, where he did a deep dive into the hardware decoding support in Premiere Pro, shows the various flavours of H.264 and H.265 which are supported across different platforms. I repeated the test myself and got the same results.
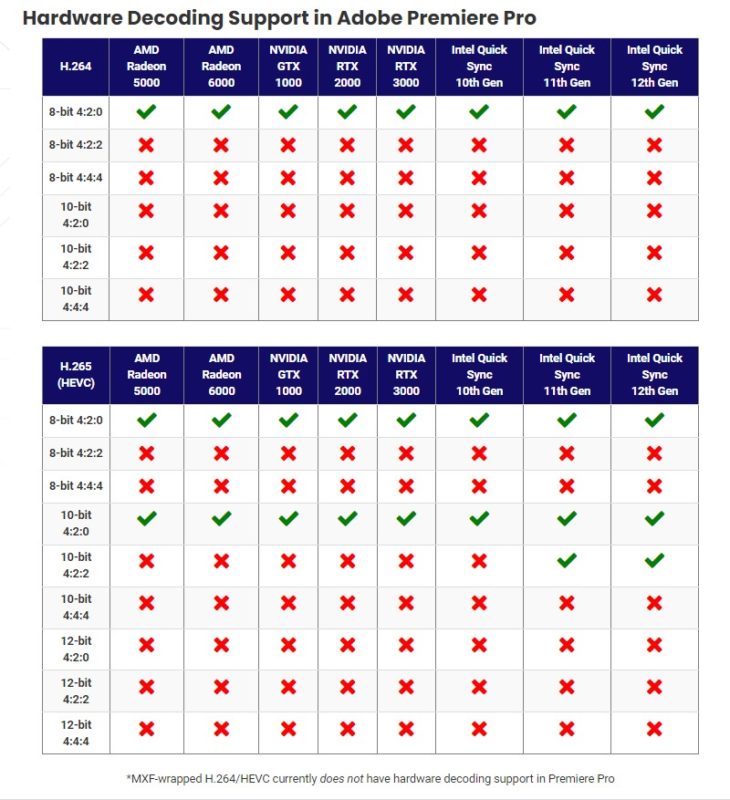
I even did the test on an M1 Pro Macbook Pro and interestingly got one more tick than even the Intel 12th gen (for 10 bit 4:2:2 H.264). Nevertheless, for PC users it is a clear advantage to have a recent Intel chip – Premiere is able to use their inbuilt Quick Sync technology alongside the main GPU for great results, especially if you are shooting 10 bit 4:2:2 H.265 like on a Sony A7siii or a Canon R5. Apple users can be excited that MXF-Intra support is being tested in the current beta, given that currently no MXF files of any format are supported on PC or Mac.

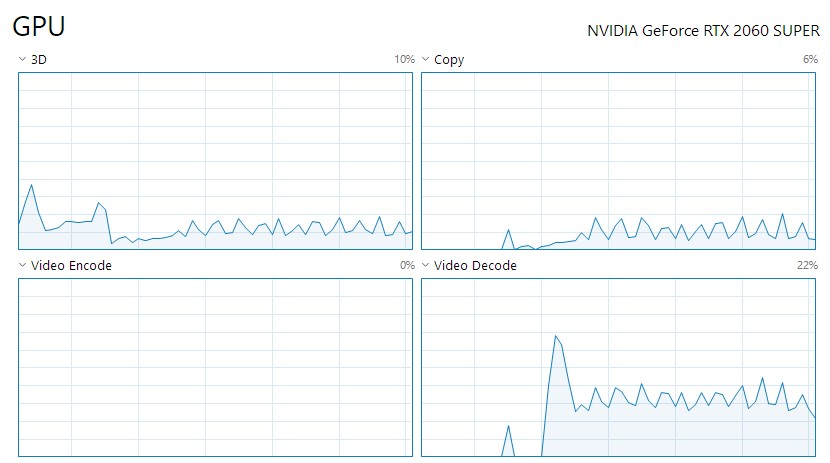
Whatever hardware you have, for files that are supported, editing is much more responsive. Notably if you make H.264 proxies in Premiere, which is one of the available presets, it makes 8-bit 4:2:0 files, wrapped in MP4 – which is supported across the board (though this preset falls down for certain formats that have more than two audio tracks).
Re-thinking H.264
All of this has got me thinking of H.264 and H.265 as being in two varieties – hardware accelerated and non-hardware accelerated, because the two operate very differently within Premiere Pro. I have started thinking of them as two different entities. And more than that, on some occasions – and I hope I don’t get un trouble in the forums for this unorthodoxy – I go ahead and purposely edit with H.264.

I’ll give you a couple of examples. The first is when I’m on a tight turnaround project and simply don’t want to put the time into transcoding or making proxies. Usually I’m given non-hardware accelerated clips and this is why I have set myself up to be able to handle this scenario with a rather powerful CPU (the Threadripper 3960x) which can deal with the difficulty of decoding by brute force with its 48 threads, though admittedly the fans spin up like it’s trying to take off.
The other example is when I’m working with a remote editor and I want to send them only proxies and I want to keep the file sizes down. In this instance I often use the inbuilt H.264 proxy preset, which makes 720p 8 bit 4:2:0 MP4 files, or choose H.264 in Davinci Resolve’s proxy settings if making them there (where you have greater flexibility to keep the audio tracks same as source). These are hardware accelerated, as well as being only 1/9th the number of pixels on each frame for Premiere to deal with compared with a UHD source. Even without a powerful computer most people can edit with these.
My point is that you’re in charge. If you pay close attention to your own hardware and to the compressed formats you are working with, sometimes you can make H.264 work for you.

Filmtools
Filmmakers go-to destination for pre-production, production & post production equipment!
Shop Now