

Filmtools
Filmmakers go-to destination for pre-production, production & post production equipment!
Shop NowAuto Mask, burned-in captions, and useful smaller changes too

Sooner than you may have expected, yes, it’s time for another major release of Final Cut Pro, with features both long requested and those you never knew you needed. Some of these updates are for social media creators (yes, burned-in subtitles are here) while others are for editors (persistent two-up displays while editing with the keyboard, edit detection) and some gems unique to FCP (Auto Mask) will find many fans.
Beyond the headline features, many tiny changes will make people happy, but none more than Background rendering finally being turned off by default. And rejoice — Motion got some useful updates this time too!
One at a time, here we go. While the focus here is mostly on FCP for Mac, some of these features have made their way into FCP for iPad too.

Burned-in captions (subtitles)
Final Cut Pro has supported closed captions for years, but it hasn’t supported hard-coded subtitles that some social media platforms prefer — and now, it offers both.
Closed Captions are the good kind: font and size under the control of the viewer, they can be turned on and off, and typos can be corrected after upload. These are usually exported as an SRT file, then uploaded alongside the final video file, and are the best choice for accessibility.
What Final Cut Pro has lacked are Open Captions, the ones that not everybody likes, where words light up one at a time, are burned into the video, and are not good for accessibility. Essentially, these are just titles, and if (for your sins) you’re making videos for a platform like TikTok, or creating an “organic” reel on Instagram, they’re your only option, and their absence in FCP has been keenly felt.

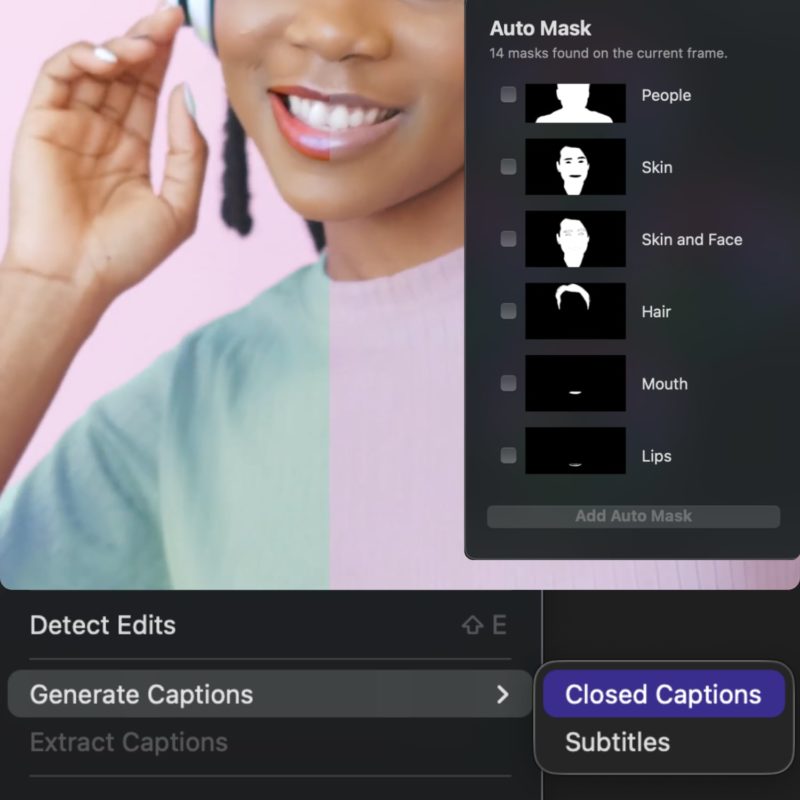
Anyway, they’re here. A quick right-click on timeline clip(s) can now automatically generate closed captions or (open) subtitles, and you can change the font, size, color, and apply simple highlighting by word.
If you’ve already created closed captions (perhaps with a third-party tool like the one I helped develop) you can convert them to subtitles instead. Behind the scenes, subtitles are simply titles, tagged with a new Role called Subtitles. This makes it easy to use the Command-left/right arrow shortcut to jump between them.

If the built-in title options aren’t enough, it’s easy to change a title’s style. Select all the titles you want to replace, find another title with a single text element in the Titles Browser, and just double-click it. This is a welcome feature; not groundbreaking, but integrated well into the app.
This feature has also been added to FCP for iPad.
The next new feature wasn’t on most people’s lists, but is actually surprisingly helpful…
Auto Mask — automatic selection of parts of your clips
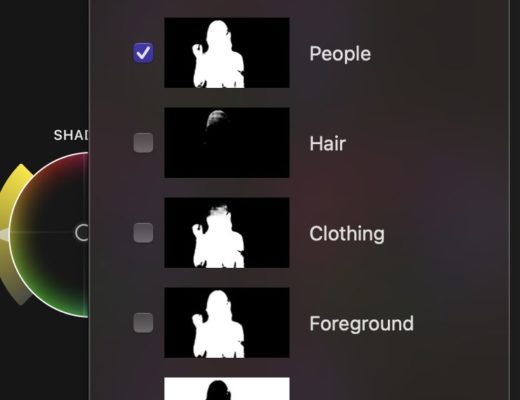
Auto Mask brings the advanced image segmentation previously seen in Adobe Lightroom to the world of video, allowing you to instantly isolate not just people, but their hair, clothing, skin, lips, mouth, teeth eyes, eyebrows, or foreground or background elements, environmental elements like sky or foliage, or even cats and dogs. This is sky replacement, portrait enhancement and much more, all together.

To use it, create a color correction or add an effect, then choose the new icon at the top, then Auto Mask, and pick one of the masks that FCP has found.

Different shots will reveal different masks, so experiment with several different options to see the real potential here.

This feature is now built in to the header of every color correction unit and effect, making it trivial to tint a speaker’s hair, brighten their teeth, boost the vibrancy or even change the color of their lips, blur out the background behind them, or to spotlight that cat walking past. Here’s a video example using a free source clip from pexels.com:
You can add several different corrections (or effects) and use a different Auto Mask with each one. Masks can be blurred, shrunk or expanded, and corrections can be applied inside or outside a mask. If you couldn’t light a subject in the way you wanted, now you’ve got extra options.
It’s even possible to combine masks with one another, so you could, for example, expand and blur out an “eyes” mask to create a fuzzy halo mask centered on the eyes, and then subtract a regular “eyes” mask from that to exclude the eyes themselves. (The only issue with this plan is that the masks will disappear when someone blinks, causing the eyes mask to disappear entirely for a frame or two.)
Despite the limitations, potential uses abound, and all this plays (more or less) in real time.

This detection takes place on every frame, which is both a strength and a weakness. If, for example, a cat isn’t recognised as such in a single frame of a shot, the mask may not trigger on that frame, which can cause flickering in the correction or effect you’ve linked to that mask.
I’d love to see a little more consistency from frame to frame, but for now, if a shot is proving tricky, you can either stack multiple masks (such as cat and foreground) or simply use Magnetic Mask. This does require a little analysis, but it doesn’t take long, and it’s found in the same menu as the new Auto Mask.

The smaller an element is in frame, the less likely it is to be detected, so the best results are most likely with interviews and pieces to camera, where a person is dominant in the frame. Of course, these shots are plentiful, and I think editors will find plenty of ways to apply Auto Mask.
Correction tasks which used to require complex, tricky tracked masks are now trivial: make the eyes pop, whiten teeth, soften the background — that’s now just a collection of color corrections with masks that you can paste onto every interview clip in one hit. Each masked correction maps automatically to the face/eyes/hair/clothing/etc. in each shot, and a very similar feature in Adobe Lightroom has been very useful indeed.

Honestly, I think this is the hero feature of this release. Once you see the power that this brings, you won’t want correct color without it. However, if you have teenage editors in your house, don’t show them this unless you want them to bless everyone with bright virtual lipstick.
What next?
Improved Match Color, with flexibility
Making one shot match another is a common enough task: two shots taken at different times of day, or simply on different cameras, may need to placed back-to-back in a timeline and you need them to look at least similar. Manual correction isn’t always hard, but it can be good to start from somewhere closer.
Previously, the Match Color feature didn’t have enough flexibility to be truly useful. It either worked or it didn’t, and you could take its results or (more often) leave them. Now, rather than adding a fixed, unchangeable correction, Match Color adds a new color correction module — a lot like Color Adjustments — with sliders pre-set to match the frame you just chose. This new Match Color adjustment has all the same sliders as Color Adjustments, but instead of buttons to automatically set light, color or both together, you’ll see a button to pick a new source to match.

One sneaky change here is that both Color Adjustments and Match Color have a new slider — Super Highlights. This targets just the brightest parts of the frame, and makes it easier to rescue parts of the image getting too hot. While Highlights starts to affect brightness values from about 20IRE (and brighter parts much more than darker ones) the Super Highlights slider doesn’t touch anything below about 70IRE. More control is always better.
Edit Detection, finding cuts in re-imported videos
Edit detection is one of those tasks which not everybody needs, but is essential to those who do. To use it, drop an edited piece onto a timeline, then either choose Trim > Detect Edits, right-click and pick Detect Edits, or press Shift-E. After a brief analysis, the cuts are found and through edits are added to the clip. In my testing, it’s been reliable enough to be useful, and it’ll take the pain out of pulling out a shot or two from a high quality export.

If you ever have to extract parts of pre-edited pieces, you no longer need to rely on Resolve to get this job done. It’s not a complex feature, and there’s nothing to tweak, but it’s good to see it nonetheless. If you’re in the habit of exporting a ProRes version of your finished timeline, it’s now going to be a lot easier to re-use parts of your old video jobs.
Like burned-in captions, this feature is also present in FCP for iPad.
Next, something every keyboard-loving editor will appreciate.
Persistent Two-Up Edits when trimming with the keyboard
When using the mouse, a ripple edit operation displays a two-up display in the viewer, showing you the edit point you’re adjusting and the neighboring frame that isn’t changing. In a roll, slip or slide operation, you’ll see the two edit points you’re adjusting, either out and in on different clips (on a roll or slide) or the in and out on a single clip (with slip). This is a pretty common feature in NLEs, but it’s normally a mouse-exclusive feature, and keyboard editors haven’t been able to see it. Now, the two-up display works with the keyboard, and remains visible after nudging as well.

In this version of FCP, when you make an edit with the keyboard (comma and period, with or without Shift) the two-up display persists, so you don’t immediately have to play the video to see what you’ve done. (Of course, you still can, if you wish.) This makes the existing keyboard commands to select edit points (like \ to select a nearby out+in for a Roll Edit, or [ and ] to select the left or right edges) far, far more useful.
It’s now possible to traverse every edit with up and down arrows, use \ to select the point you’re over, then use comma and period to move that point with visual feedback and repeat the process. Obvious? Yes. Simple to understand? Yes. An important workflow boost? Also yes.
Other welcome improvements
A new keyboard command (Option-left and Option-right) allows two neighboring clips to swap positions. This is pretty trivial with the mouse, but for editors who prefer to stay on the keyboard, this is very useful. Also new, Select Connected Clips (Control-Command-A) gives an easy way to select any clips connected to a selected primary storyline clip.

Background rendering is now off by default, a tiny but impactful change that will help many new FCP users wondering why their hard drives are suddenly filled with giant libraries. Modern Macs have been fast enough to live-render most color corrections and transitions for many years, and most users never need this feature. If you’re working with heavy media on a slower Mac, sure: turn it on if you need it. Everyone else should leave this off.

Finally, when generating proxies, H.264 has been replaced with HEVC. This codec is accelerated on all modern Macs and supports HDR, so this should save space and improve workflows. ProRes Proxy remains an option too.
Motion 6.3
Yes, Motion got some attention this time around, including some new features and an important bug fix. If you have a large number of Motion templates installed — and many long-time FCP editors do — then Motion will no longer take multiple seconds to create a new file. As someone with about 45GB of templates installed, this is very welcome indeed.
On the new feature side, SVGs can now be imported. This open source vector format has become quite common on the web, and it’s great to be able to re-use logos from websites at any size in a video context.

The other new feature is simple, but welcome. When multiple items are selected, they can now be distributed in time, either with no gap between them, or offset or overlapped by a customisable number of frames. When you need a number of different elements to appear in sequence, this is a nice level of control to have.
Compressor 5.3
The improvements this time around are all about immersive support for Apple Vision Pro. In this release, there’s support for APMP profiles for 180° 3D footage, and also anaglyph preview of 3D content, so you can pop on your cardboard red/cyan glasses for a quick check.

This broadens Apple’s toolset for dealing with high-quality immersive content. Despite constant rumors of the demise of Apple’s expensive-but-excellent Apple Vision Pro, there are massive teams at work on the platform at Apple, with many more still being hired. My suspicion is that while we might not see a new Vision Pro for a while yet, the software will continue to mature. There’s nothing better in the marketplace, and it’s not yet possible to make a lighter, cheaper version.
Final Cut Pro for iPad, now with better keyboard support
Final Cut Pro for iPad continues to chart its own separate path from the Mac version. Some new features discussed above, burned-in captions and edit detection, have been added to this iPad version in this release.

Also included are these new features:
- Slip in Montage Maker — so you can choose which part of each clip you include in a montage.
- Audio can now be detached from video — to enable more advanced mixing of audio and video

You’ll also find new titles and other content, and plenty of new keyboard shortcuts:
- Generate Captions: Shift-Command-S
- Detect Edits: Shift-E
- Detach Audio: Control-Shift-S
- Position Mode: P
- Split All: Shift-Command-B
- Play Selection: Slash (/)
- Raise Volume 1 dB: Control-Equal Sign (=)
- Lower Volume 1 dB: Control-Hyphen (-)
- Increase Clip Height: Shift-Command-Equal Sign (=)
- Decrease Clip Height: Shift-Command-Hyphen (-)
Final Cut Camera, now with direct Finder offloading
This popular app for iPhone has also been updated. It’s now possible to get a clean HDMI feed from the app — opening up the possibility of using external recording devices — and you can disable digital zoom if you want to maximize image quality.

While a clean feed is welcome, most exciting for me is that when you connect your iPhone to your Mac, you’ll be able to see individual video files directly in the Finder.

Previously, the files shot in Final Cut Camera were stored inside a DCIM folder, and this is still the case for Blackmagic Camera, which stores its clips in a Media folder. Unfortunately, because the Finder only allows you to see files and folders at the top level of each app’s storage, you can only download the whole folder at once with this method.
Now, with the files exposed at the top level, you can pick and choose only the files you want. Kino got this right a while back, and it’s great to see Final Cut Camera go the same way. The closer that iPhone apps come to regular professional workflows, with direct, cabled access to media files, the better.
Thoughts on the pace of change
FCP 12.3 is an unexpected but very welcome feature update alongside updates to related apps too. I don’t think this release was widely expected; after all, we had a feature update just before NAB. If Apple had followed their traditional cadence, later this year would have been more likely; it seems the Apple Creator Studio has inspired a bit more change than usual. While this release doesn’t bring Apple up to Blackmagic’s development speed, honestly — that’s fine.
While new features are welcome, it’s important to integrate those new features in a way that doesn’t disrupt. An interface that stays relatively consistent means that more casual users aren’t suddenly confused, and a clean, approachable UI is easier to learn.
Change is a double-edged sword. Resolve is known for the pace of their changes, and while many users (myself included) love playing with their new toys, others find it a bit overwhelming. Adobe Premiere is about to rework its color correction UI quite a bit, and if the next Premiere does away with Lumetri to the extent that the current beta does, I suspect they’ll have a minor mutiny on their hands. Too much change, too fast, is not a feature most users want.
As a trainer, I don’t think I could face rebuilding my training courses every year, and with my user hat on, I don’t think I’d want to relearn the app all the time either. (And hey, with my developer hat on, I can’t complain that Apple haven’t added keyframe graphs or transcript exporting.)
Conclusion
Whatever your perspective, it’s a good thing that Final Cut Pro is seeing more features added more quickly than in the past. There’s no need to keep up with Blackmagic, and as long as Apple keep adding new features like Auto Mask alongside missing features like Detect Edits, I think they’ll keep a lot of users happy. Genuinely useful features like Beat Detection (in 12.0) and Auto Mask (in 12.3) are hard to give up once you’ve tried them out.
Though the masking UI has had to change a little to make room for Auto Mask, I think they’ve made some good decisions here. FCP remains a solid choice with a clean UI, but it’s not stuck in stone.
While I use Premiere and Resolve too, Final Cut Pro is still the quickest way I know how to cut. If you haven’t taken a look at FCP for a while, do. There’s some genuinely useful stuff in here, and it’s easy to grab a cheap subscription or buy it outright if you prefer.
Final Cut Pro (and also Motion and Compressor) are available for outright purchase from the Mac App Store, or as part of the Apple Creator Studio subscription. Updates are free.