Filmtools
Filmmakers go-to destination for pre-production, production & post production equipment!
Shop NowWelcome to Tool Tip Tuesday for Adobe Premiere Pro on ProVideo Coalition

This series is courtesy of Adobe.
Filmmakers go-to destination for pre-production, production & post production equipment!
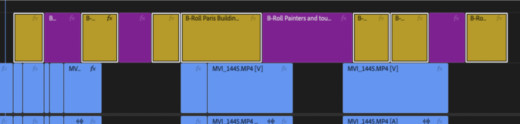
Shop NowTL;DR: Right-click any labeled clip, hit Label > Select Label Group, and watch Premiere grab every clip with that color instantly. Your timeline just got a lot more manageable.
Welcome to Tool Tip Tuesday for Adobe Premiere Pro on ProVideo Coalition
How aggressive are you about labels? I use labels strategically throughout my edit.
Sometimes I’ll change a clip’s label color mid-workflow, knowing I need to return for a specific task. For example, I tackle all my Warp Stabilizer clips in one focused pass, applying the effect to multiple clips simultaneously, then walking away while Premiere processes them in the background.
Look, complex timelines are part of post-production life. Dealing with vertical chaos? I’ve worked on timelines with 24+ organized video tracks and 60+ audio tracks. Really long edits? In both cases, smart categorization using labels keeps me sane.
To find this, you have to right-click on a specific label in the timeline.

This command lets you select every clip sharing the same label color.
Whether it’s selecting all clips from a specific actor, grabbing every piece of footage from one interview, or gathering clips that need the same treatment, Select Label Group makes this super easy. With all your similarly labeled clips selected, applying effects like Warp Stabilizer becomes trivial. It’s one of those buried features in Premiere that most editors aren’t using.

I find editors don’t even know this exists. Now that you know, you can start thinking about how you might change the labels on your timeline.
This series is courtesy of Adobe.
Sign up for the ProVideo Coalition weekly e-newsletter and get the most popular articles, blogs, and reviews right to your inbox.