Filmtools
Filmmakers go-to destination for pre-production, production & post production equipment!
Shop NowA powerful feature that lets you decide what you want to view in your bins

For the next few “In Depth’s”, we’re going to be talking about bins, as they are really the core of your workflow. It’s all about organization when editing, and bins are central to that. With that said, Set Bin Display is a feature that’s tucked away, but something that can really be useful, especially when projects start to get bigger. So, let’s take a look at this great Media Composer feature.
WHERE CAN YOU FIND SET BIN DISPLAY
In the upper right corner of every bin, you’ll find the bins FAST MENU or, if you’re old school like me, you’ll probably still call it the HAMBURGER MENU. No matter what you call it, you’ll find some common Bin functions in here like “Snapping to Grid”, “Choose Columns” and even the ability to import or link to your footage here as well. However, if you look towards the bottom of the fast menu, you’ll notice the Set Bin Display option.
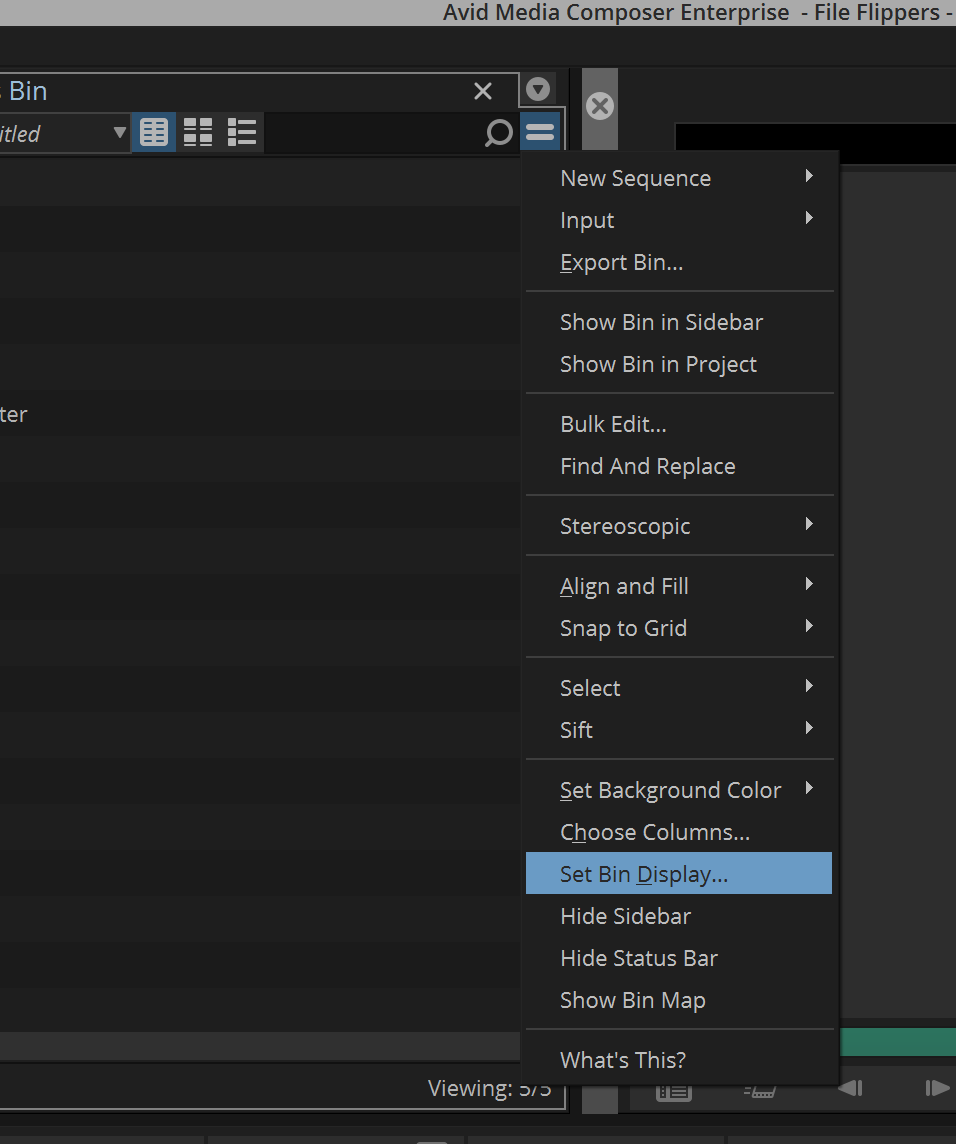
What’s interesting about Set Bin Display is that it’s purpose is pretty simple, but it’s something that can really mess up your bins, if you or your team is either a) not aware of it, or b) doesn’t know that someone has made some changes in there.
WHAT DOES SET BIN DISPLAY DO?
Set Bin Display does, well, really what it says it does. It sets what will be displayed in your bin. Everything (well, almost everything), is turned on by default, meaning that in every bin you’ll see all the types of clips you need to see. Master Clips, Sub Clips, Multi-cam clips, etc. There are really only a few clip types that you don’t want to see, like the sources (actual media files), or your Precomputes (rendered files) in your bins as, to be honest, it would just bog everything down. If you head into your Set Bin Display options, you’ll see all the clip types that are displayed and/or not displayed.
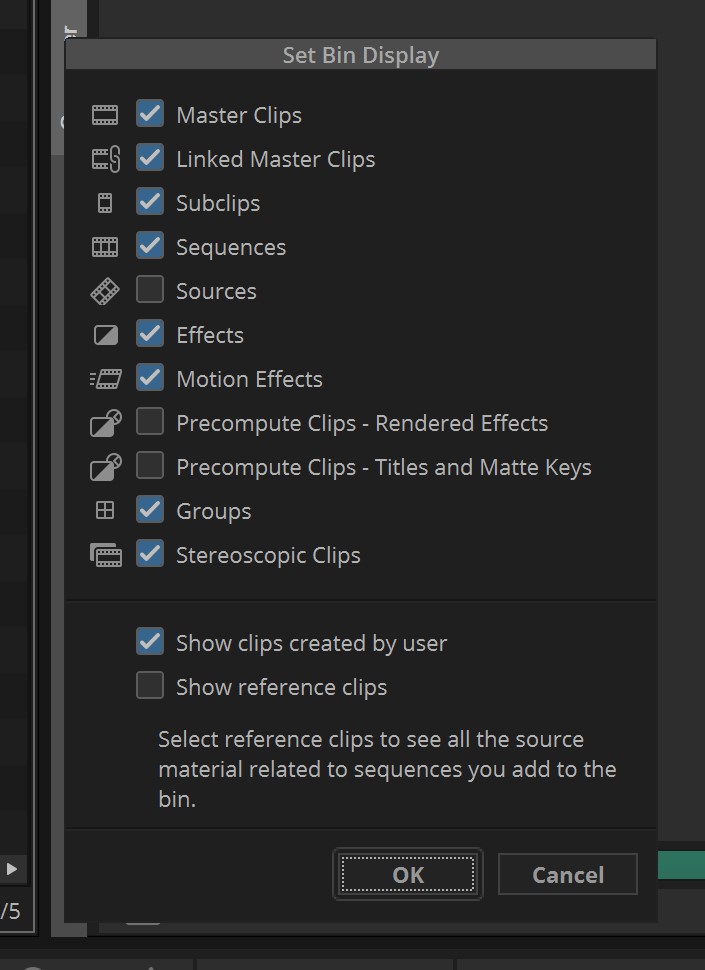
What is important to keep in mind about Set Bin Display is that it works on a bin by bin basis, and not as an overall adjustment to all your bins. So, that does beg the question, where would you use a feature like Set Bin Display. Well, for Windows editors who are still using the classic Title Tool, we’ve all run into this situation, where you have a timeline in your bin, and you have to go through and update a ton of titles. Well, every time you update the title, it creates a new piece of title media in your bin, and you find yourself constantly having to move all those title updates to another/other bins to keep things organized. Well, the easiest way to get around that is to simply call up your Set Bin Display window, and deselect “Effects” in that particular bin, and those types of clips will now be hidden from view.
Now, you might be thinking, well, I don’t really like to hide those types of elements from my bins, so I guess this is a feature I would never use but again, to be honest, that’s only one small reason that I use this feature. The main reason that I use this feature is for the “Show Reference Clips” option at the bottom of the window. What does that do? Well, here’s a perfect example. There has been a ton of times where editors will send me sequences, or parts of sequences that they want me to work on, and I want to see all the clips that are associated with the sequence that was sent me. Most people would use the Decompose feature, but I don’t want to create more clips, I just want to have Media Composer show me the clips associated with the timeline, and then let me decide what I want to do with them. Well, that’s where the “Show Reference Clips” feature comes into play. With a sequence in a bin, simply turn this feature on, and you’ll immediately see all the clips associated with that timeline in the same bin. A fantastic feature that I use all the time, made super simple, with the Set Bin Display feature.
If you’d like to check out more of my “In-Depth’s” on Media Composer, you can find them here:
Media Composer Project Creation
Avid Attic
Alternating Left And Right Audio
Keyboard Shortcuts
And you can download a 30 day trial of Media Composer at this link.