Upon the release of After Effects CS5 in 2010, Adobe tried an interesting experiment: Part of the After Effects engineering team was split off to start work on major new features for CS6 with a 24-month time horizon, while the rest started work on AE CS5.5 before joining their compatriots in 2011 to also work on CS6. In addition, Adobe has a separate Dynamic Media Advanced Product Development Group, which has produced such major new features as Roto Brush (CS5), Warp Stabilizer (CS5.5), and the new 3D Camera Tracker (CS6).
As a result, After Effects CS6 is an important new release that has something for nearly every AE user. We’re going to explore a number of those features here, starting with the most visible new one – the Ray-traced 3D rendering engine – and then moving onto the 3D Camera Tracker, Rolling Shutter Repair, Variable Mask Feathering, the Global Performance Cache, and other interesting bits. We’ll be sharing pros, cons, preferred workflows, gotchas, and a number of tips that we hope will get you up to speed with this new release.
Ray-Traced 3D Rendering Engine
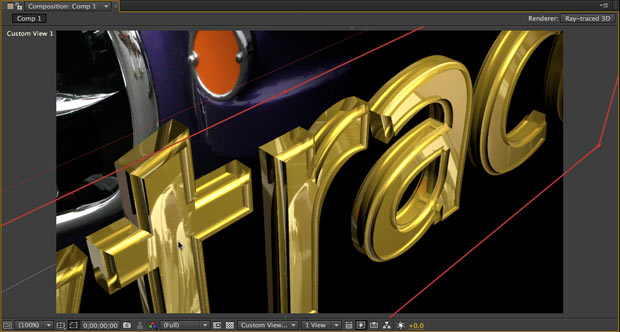
We have long advised our fellow motion graphics artists that they would be wise to learn a 3D program – or at very least, a 3D plug-in such as the excellent Zaxwerks Invigorator or ProAnimator. This is because until now, AE’s own implementation of “3D” has actually been 2.5D: layers could be placed in 3D space, but had no thickness of their own. This is finally starting to change as of AE CS6 – but this release is just a first step along what we hope turns out to be a long and fruitful path.
As of After Effects CS6, you now choose which rendering engine you wish to use for 3D layers: the “Classic” renderer (formerly known as the Advanced renderer), which is the prior 2.5D engine, and the new Ray-traced 3D Renderer. When you choose the ray-traced renderer, you can now extrude and bevel text and shape layers (and bend – but not bevel and extrude – other pixel-based layers), and they gain additional Material Options in the areas of transparency and reflectivity. This new renderer also enables support for Environment layers: The ability to wrap a layer around your virtual 3D world, and have it show up in reflections.
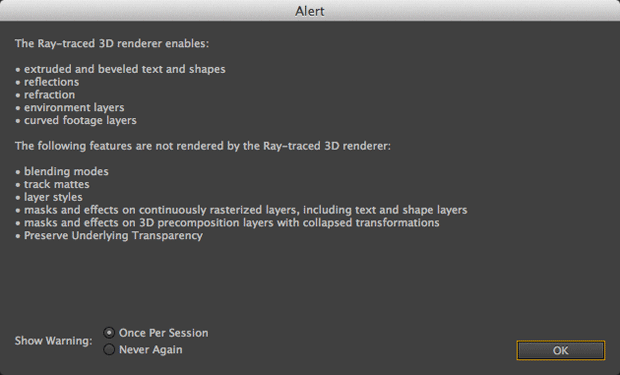
The trade-off is the new renderer disables a number of 2D-ish features for 3D layers, including masks, effects, blending modes, layer styles, and track mattes: a limitation that hopefully goes away in the future, but which you have to live with for at least this release. You can only choose one 3D renderer per composition, and an Alert dialog appears when you first enable a comp to use the Ray-traced 3D Renderer:
The beveling options are pretty basic in this release: You only have a choice of a straight chisel (“angular”), rounded (“convex”), or scooped (“concave”) shapes – nowhere near as flexible as Adobe Repouss©* in Photoshop or Zaxwerks Invigorator. The bevel always adds to the size of the underlying shape rather than cuts into it. You get the same shape for inner and outer bevels (although you can reduce the inner bevel size, to tackle problems with the insides of characters swelling shut) and for the front and back (with no current ability to disable the back bevel). On the plus side, the transparency parameters include Index of Refraction to simulate the distortions of light rays bending when they hit the interface between air and another material, and the reflection parameters include the ability to blur the reflection for satin, matte, and other restrained but classy looks.
(*By the way: Support for Photoshop Live 3D layers has been dropped in this release of After Effects. We know not many of you used it, as it was limited and slow to render, but for some it was the only way to import 3D models and get other Photoshop-generated geometry into After Effects.)
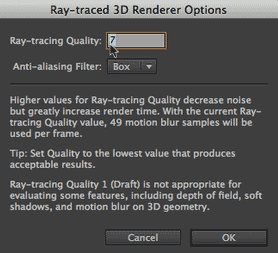 The subject of transparency and reflections leads directly to a discussion of render quality. In short, ray-traced 3D objects in After Effects are capable of looking exceptional: You can keep zooming in and never see faceting. However, noise can appear in transparent and reflective areas at the default settings – especially with blurred reflections. You need to dive into Composition Settings > Advanced > Options (the shortcut is to Command or Ctrl-click on the Renderer indicator in the upper right corner of the Comp panel) and play with the number of rays per pixel until you are satisfied the noise is no longer visible or distracting. More rays take a lot longer to render: An array of 3×3 rays (shown below left) means just 9 calculations per pixel, but is often not good enough; an array of 9×9 (shown below right) means 81 calculations per pixel, but often looks quite nice. The number of rays also affects motion blur with ray-traced 3D layers, while the Anti-Aliasing Filter popup affects sharpness versus aliasing for 3D object edges.


The subject of render quality directly leads directly to a discussion of rendering speed. The Ray-traced 3D Renderer can work either on your CPU alone (and is multithreaded, taking advantage of all of your available processor cores), or can use the NVIDIA OptiX library to render on CUDA-enabled NVIDIA video cards. If at all possible, you really, really want to use ray-tracing with an approved CUDA card: The difference will make or break this feature for many users. For example, a 48-frame-long animation of a reflective and transparent logo at 1920×1080 took 44:30 (min:sec) on a 12-core 2.93 GHz MacPro with an unsupported ATI Radeon HD5970 video card (the fastest the Apple Store currently offers); installing a previous-generation NVIDIA Quadro FX 4800 dropped that to 14:30; replacing it with a current-generation Quadro 4000 dropped it to 6:15. Installing a second Quadro 4000 – yes, After Effects can take advantage of multiple GPUs, as long as they’re running the same version of CUDA – dropped the render time further to 3:37. (If you are having trouble getting AE CS6 to work with your card(s), make sure you’ve installed the latest CUDA driver – for example, 4.2.5 had some issues on the Mac.) As of the time of this writing, here is the current list of approved CUDA-enabled cards; check the After Effects Tech Specs page for updates:
Approved NVIDIA CUDA-enabled cards for Windows:
- GeForce GTX 285, GTX 470, and GTX 580
- Quadro CX, FX 3700M*, FX 3800, FX 3800M, FX 4800, FX 5800, 2000, 2000D, 2000M, 3000M, 4000, 4000M, 5000, 5000M, 5010M, and 6000
- Tesla C2075
Approved NVIDIA CUDA-enabled cards for Mac OSX:
- GeForce GTX 285
- Quadro CX, FX 4800, and 4000
(*M designates mobile solution for laptops and all-in-one computers)
Fortunately, that list is nearly identical for Premiere Pro CS6 (Premiere Pro also supports OpenCL on a few MacBook Pros; AE CS6’s Ray-traced 3D Renderer does not), plus NVIDIA Quadro is recommended for the OpenGL-based Adobe SpeedGrade CS6 which is now part of the Production Premium suite. After Effects CS6 has also reworked its list of Fast Previews options, including a Draft mode (1 ray), and Fast Draft (works on any OpenGL card at the cost of reflections and transparency). You’ll find yourself working in one of the draft modes or with a low ray count initially, and then optimizing the quality right before you render.
Enough tech – lets get back to talking about visual capabilities. As mentioned above, you can extrude and bevel only vector-based text and shape layers in After Effects CS6. A new feature in After Effects CS6 allows you to convert other vector-based layers such as Adobe Illustrator files into shape layers. It’s imperfect – gradients are currently unsupported, and tricky compound shapes might cause some issues – but this feature by itself is very welcome. Also remember that you can convert unflattened Photoshop text layers into After Effects text. The cool thing is, text and shape layer animation still works, so you can still twist or wiggle your shapes, or apply text Animation Presets:
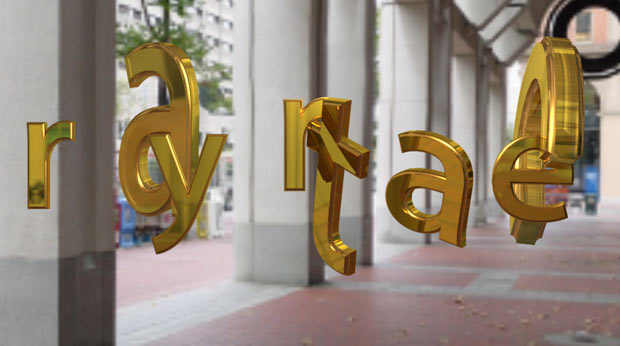
Reflection map courtesy dvGarage.com
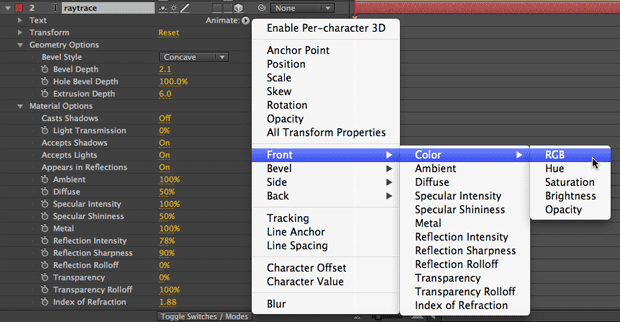
Adobe has extended the previous ability to add Text Animators or Shape Operators to also allow you alter specific Material Options for extruded shapes. For example, if you want the face of your text to be a different color than the bevels, sides, and back, you just add an Animator property, as shown below. (Yes, we said “just” – if you haven’t already, you really should learn how to use Text Animators.) This means you can assign your per-surface modifications to a specific range or characters or shape group, and even animate these modifications through your text. Just remember to rename these Animators to something more descriptive than the default “Animator 1” and so forth; otherwise, you might run into problems when you later try to add an Animation Preset that already uses that name.
Ordinary pixel-based layers cannot be extruded and beveled. This is a major bummer, but somewhat understandable, as the pixel dimensions of a layer would impact how well its shapes could be converted in polygons – especially if it has an interesting alpha channel. However, these layers still support transparency and reflections, and can also be bent around their Y axis to produce more interesting reflections and specular highlights. At maximum bend, they form a shallow U; no, you can’t uncurl a sphere, or create a page curl.
The other option mentioned is the ability to tag any layer as an Environment Layer. This wraps it around a virtual sphere enclosing your 3D world, and makes it available for reflections. You can choose whether it is visible in reflections and/or normally. Ideally, you want a seamless panoramic layer with a 2:1 aspect ratio. You also want it to be very large, as you see only a small percentage of it at a time: With the default 50mm camera, which has a 39.6 degree field of view, you only see 360 ÷ 39.6 = 9.1% of your image’s width at a time. The animated text image above has a 2000×1000 pixel Environment Layer in an 872×486 pixel comp, meaning only 182 pixels of environment are being stretched across the entire comp’s width; study the black circular object in the upper right corner to see the implications of this. For standard definition video, you may want to use at least 8k images, and larger for high-def – which in turn requires more VRAM on your video card. To take advantage of larger maps, also dive into Preferences > Previews > GPU Information and set the Texture Memory to a larger-than-default size, such as 80% of your card’s total VRAM.
All of the above is probably leaving you feeling pretty ambivalent about the new Ray-traced 3D Renderer. In truth, we’re actually excited about having this capability inside After Effects as can create some lovely imagery (and is integrated with other After Effects layers, including shadows and intersections); others are already creating photorealistic objects with it. We just want to make sure we properly tempered your expectations before you tried to create Avatar with it on a laptop without an NVIDIA GPU.
next page: 3D Camera Tracker; Rolling Shutter Repair; mocha AE integration; Variable Mask Feathering
3D Camera Tracker
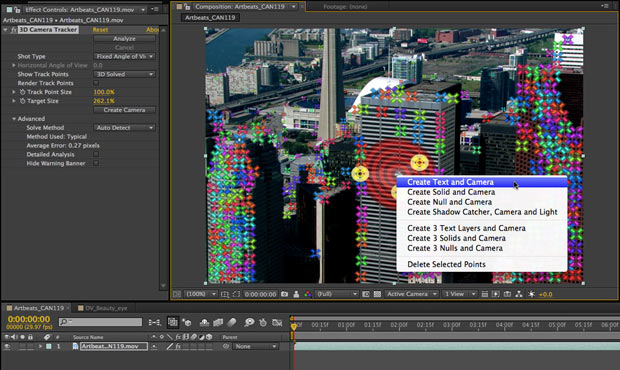
Clip CAN119 courtesy Artbeats.com
The big new visual effects feature in After Effects CS6 – which will also be highly useful for motion graphics artists – is a new 3D Camera Tracker. Rather than tracking an object in already-shot footage, the 3D Camera Tracker tracks a number of objects, and then tries to reverse-engineer where the camera originally was. It can then create a corresponding Camera layer, and can place new 3D layers at coordinates that line up with objects and surfaces it found in the original scene. This means you can add new layers in After Effects that seem to have camera movement and perspective changes that match already-shot footage.
As is the case with the Warp Stabilizer introduced in CS5.5, the 3D Camera Tracker is highly automated, automatically determining which points to track. Another similarity is that you can use a precomp to mask out areas you know should not be tracked (such as a stationary bug in a scene with a moving camera, or a person moving in the scene separate from the camera’s motion), yielding better results. However, unlike the Warp Stabilizer, the 3D Camera Tracker exposes the track points it chose, making it possible to verify that it used good points, and enabling you to delete points where the track goes astray. You can also enter additional information such as the original camera’s angle of view, whether it had a fixed lens length or was zooming, and broad settings of how the scene was shot.
To create new objects in this world, you can choose an individual point, have After Effect triangulate between a trio of points (shown in the figure above), or manually select a group of points to average together for reference. The latter is the preferred approach, as you can explicitly select good track points on a surface (the further apart the better), or select multiple points and let After Effects average them together (it can also automatically reject bad points you might have accidentally selected). You can create text, a null object, or a solid (which you can then swap out for a footage layer) that can be used directly or as a parent for another footage layer. Another new feature in After Effects CS6 is the ability to hold Shift while parenting a layer to another; this zeros out its positional offset, placing it exactly where the null or other parent layer is located.
A really nice trick is the ability to create a “shadow catcher” layer: a white solid that is set to only receive shadows (a new parameter option in CS6). This makes it easier to have your new layers appear to cast shadows on objects on items in the original 2D scene, which is normally not possible without a bit of manual trickery.
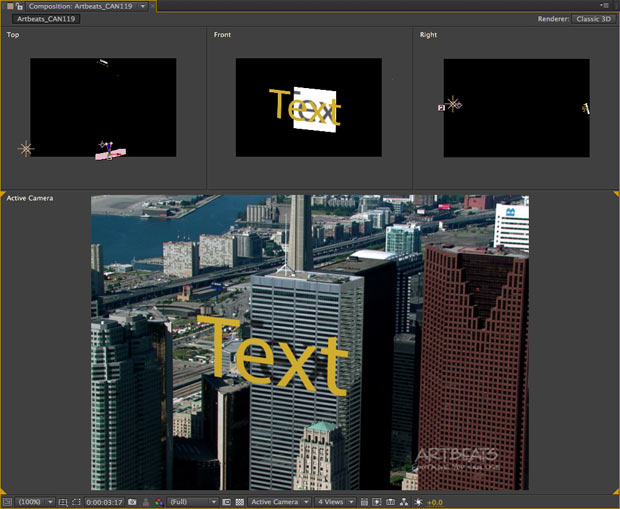
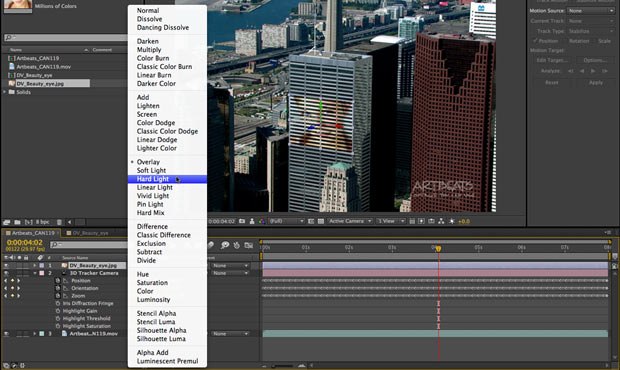
This is a case where you need to be very conscious of which 3D rendering engine you choose. As noted on the previous page, the new Ray-traced 3D renderer does not support effects, masks, mattes, or modes – and can take longer to render as well. Quite often you will want to use effects or blending modes to match your new footage into your scene (as shown below), and use masks or mattes to cut out portions that are not supposed to be visible to simulate them being obscured by objects in the original scene (for example, appearing to pass behind a foreground building).
![]() Inevitably, the question will be asked if this is a replacement for The Foundry’s CameraTracker. For many applications, it is. However, The Foundry’s plug-in allows much more control over refining your track, including the ability to remove lens distortion – so it will remain the choice for some industrial-strength tasks.
Inevitably, the question will be asked if this is a replacement for The Foundry’s CameraTracker. For many applications, it is. However, The Foundry’s plug-in allows much more control over refining your track, including the ability to remove lens distortion – so it will remain the choice for some industrial-strength tasks.
By the way, a small side effect of the addition of the 3D Camera Tracker is that the Tracker panel in After Effects has received a slight (and welcome) overhaul, making it clearer if you’re applying the traditional point tracker or stabilizer, the new Warp Stabilizer, or the 3D Camera Tracker.
Track in mocha
Clip courtesy Kevin Dole
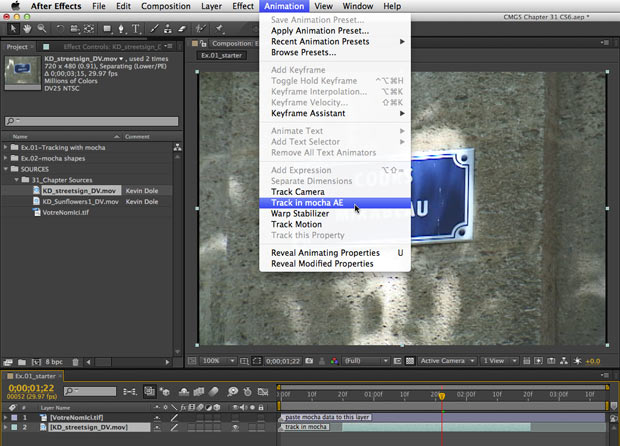
While on the subject of tracking, we should mention that Imagineer Systems’ mocha AE is still bundled with After Effects, and is better integrated as well. Instead of launching a separate application, you now select the footage to be tracked inside an After Effects composition, and choose the new menu command Animation > Track in mocha AE. mocha AE will honor the layer’s In and Out trim points, as well as the frame rate, field order, and pixel aspect ratio from After Effects, making the process more fluid and less error-prone. Note, however, that you still need to manually copy and paste the tracked data from mocha back into After Effects.
The one downside of this new scheme is that mocha AE can’t be launched on its own any more – including by Mathias Möhl’s excellent MochaImport+ add-on for After Effects. Hopefully the complications this presents will be resolved in the not too distant future.
Rolling Shutter Repair
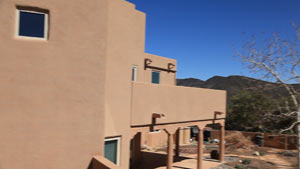
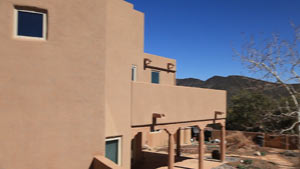
The image on the left is a slow pan shot with a Canon 5D mkII, which has a CMOS sensor: Note how the building and its posts are leaning to the right, even with this slow movement. The image on the right is after Rolling Shutter Repair.
An outgrowth of the Dynamic Media Advanced Product Development Group’s work on Warp Stabilizer and 3D Camera Tracker is a new Rolling Shutter Repair effect in After Effects CS6. This simple effect strives to remove some of the “jello cam” effect we’ve come to know and love hate in footage shot with CMOS sensor cameras such as DSLRs. We’ve found it to be very effective on some shots, such as camera pans and wobbly hand-held shots where there is not a lot of conflicting motion (one object moving one way, and another object moving a different direction). It is somewhat less successful on shots with conflicting motion, such as car drivebys where the road and background is stationary, and the car is moving: It has trouble determining which pixels to unwarp and which to leave alone, even when set to Pixel Motion mode with maximum Pixel Motion Detail. Sometimes, reality is just hard. But it’s a welcome addition, helping to straighten out many shots before you attempt to composite in new non-jelloed layers.
Variable Mask Feathering
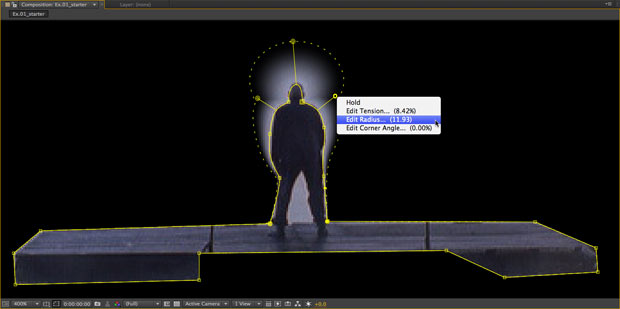
Clip LM111 courtesy Artbeats.com
A long-requested feature in After Effects has been the ability to change the size of the feather around a mask shape. That wish has finally been granted in After Effects CS6 with a new Mask Feather tool. You can add as many feather points as you like around a mask outline – they don’t have to be aligned with normal mask verticies – and drag them either in or out (but not both at the same point). Similar to the way Auto Bezier mask points work, you don’t have explicit Bezier handles for the feather outline; instead, you Option (Alt) drag a mask feather point to alter the “tension” of the feather outline around that point. As shown above, you can also right-click a mask feather point to bring up additional options including the Radius (similar in operation to a brush size) and Corner Angle for each feather point.
A Layer > Mask option also allows you to set the Feather Falloff. A Linear falloff in opacity creates the optical illusion of a hard edge where the feathered falloff begins; the default setting of Smooth has an S-shaped falloff curve, which has fewer artifacts. This can be set per Mask Path, so make sure you select the desired mask before trying to get the menu command to work.
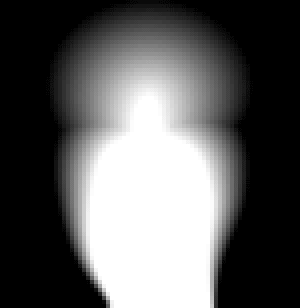
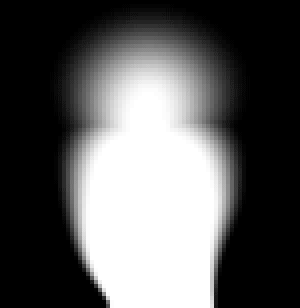
The figure on the left uses a Linear falloff for the mask feather, which makes transitions more obvious; the default of Smooth on the right often yields more visually pleasing results, although it may require tweaking the mask shape and feather outlines to get the result you envisioned.
There have been other minor tweaks to the Pen tool as well. Pressing G now toggles between just the Pen and Mask Feather tools, rather than scrolling through the entire list of options. If you like the old behavior, you can revert to this by unchecking Preferences > General > Pen Tool Shortcut Toggles Between Pen and Mask Feather Tools. In either mode, hovering the cursor over a mask point no longer auto-switches to the Delete Vertex tool; the Selection tool remains active unless you also press Command on Mac (Ctrl on Windows).
next page: Global Performance Cache, plus other improvements and issues
Global Performance Cache
Although we’re personally partial toward features that create new looks we can offer clients, Adobe is to be commended for putting an equally high emphasis on performance under the hood, as well as user workflow. The Global Performance Cache (GPC) is a blanket term applied to a suite of three individual areas of improvement that will improbe your efficiency:
Global RAM Cache
You’re no doubt familiar with the RAM Preview cache in After Effects: Before you can play a footage item or composition in real time, first After Effects must transfer it to RAM; this process is confirmed with a green line over the timeline. You’re also no doubt familiar with “blowing away” your RAM cache: Virtually any action – such as turning a layer or effect off or on, trimming a line, changing a keyframe, and so on – wipes out the coveted green bar, meaning you have to rerender the cache for your next real-time preview.
In After Effects CS6, blown-away caches are still retained in memory. If you do something that recreates a previously-previewed condition – such as undoing an action that blew away the cache in the first place – the cache will automatically be restored without the need to rerender, as was the case in the screen capture below. This makes it a lot less painful to play “what if” exercises, such as trying different background layers in a composite:
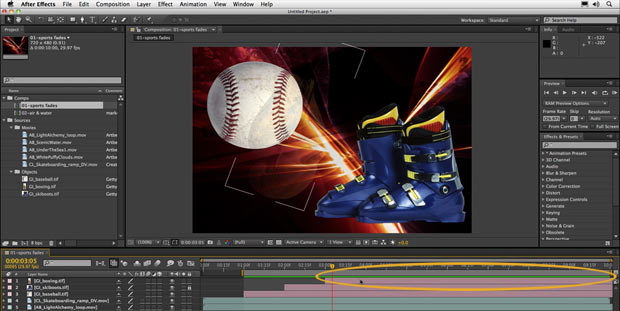
Source layers courtesy Artbeats.com, Getty Images, and Creative License Media Group
Even more cool is that if you do anything else to recreate a previously-cached frame – duplicate a comp, open a previous version of the project file that has the exact same comp in it, etc. – those already-cached frames will automatically be reused.
Persistent Disk Cache
Related to the Global RAM Cache is the ability to save this cache to disk. Previously, when you closed a project, all of your RAM caches disappeared into the ether. In After Effects CS6, if you save a project before you close it and quit the program, all associated RAM caches are saved to disk as well. This is in addition to the previous disk cache feature (when you fill up your RAM, older cached frames that took a not-insignificant amount of time to render are also transferred to the disk cache) – but now they aren’t deleted when you close the project or quit After Effects. There is also a nice new feature in CS6 to Cache Work Area in Background: Hold Command or Ctrl and press Return, and a background copy of After Effects is launched to render those frames straight to the disk cache.
This means when you boot up After Effects the next day, and open an old project, blue disk cache lines appear where there were green RAM cache lines, as was the case with the screen capture below. Now RAM Previewing just requires retrieving the already-rendered frame from disk, rather than calculating all the layers again from scratch.
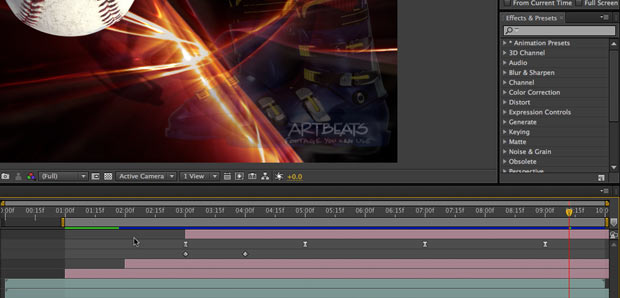
To make this feature work more efficiently, you will want to assign the disk cache folder to a fast drive – even an SSD (Solid State Drive) – with tens or even hundreds of gigabytes free. The drive not to use is your system drive, as you don’t want to compete with it as it does its own virtual memory page swapping in the background (nor do you want to crowd it out to the point where it doesn’t have enough room to perform these swaps – it needs roughly twice your installed RAM in free disk space to breathe easy). Note that this is different than the Conformed Media Cache, which is used to convert certain file formats into quicker-to-read files, and which is shared by other Adobe applications such as Premiere Pro.
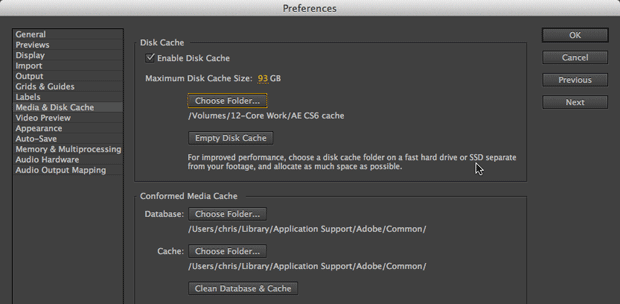
By the way, you can change the cache folder whenever you like, perhaps using a portable drive you move between a laptop and desktop machine, or reserving different folders for different clients that you can then erase when that particular project is done.
Faster Graphics Pipeline
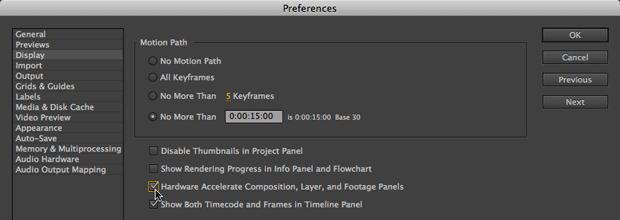
Lumped in with the “Global Performance Cache” is an update to the way Composition, Footage, and Layer panels are drawn. Previously, the default was to let the operating system handle this, with a Preference hidden away to let OpenGL handle it instead. As of After Effects CS6, OpenGL now always handles many of these drawing functions, including overlays like grids, guides, rulers, and bounding boxes. Video card manufacturer NVIDIA did some tests, and claims they found this sped up these drawing routines typically 150-250% – with some overlays being up to 16 times faster than before, depending on hardware configuration. Adobe says the performance gains are particularly noticeable under Windows with large displays.
By the way, that old preference to let OpenGL handle some drawing functions is still there: Enable it, and After Effects will attempt to move even more of the display pipeline – such as color management transforms – onto the GPU, using more advanced and less-consistently implemented features of OpenGL.
In some cases it is an improvement, in others it is not. A good strategy is to enable it, but make it your first suspect if display oddities occur (remember to check that you’re running the newest drivers for your video card).
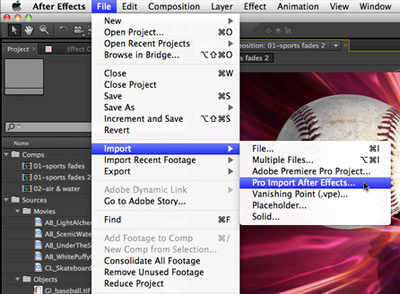
And There’s More…
These are just the heavy-hitter features in this release. There are also other numerous tweaks and upgrades, including:
- Automatic Duck’s Pro Import After Effects is now included.
- CycoreFX HD is now bundled, which means greater bit depth (16 or 32 bits per channel) plus more effects.
- Drop Shadow, Spill Suppressor, Timewarp, Transform, Set
Matte, Photo Filter, and Fill, and the Transition effects Linear, Iris, and Radial Wipe have been updated to support 32-bit floating point calculations. - The Apply Color LUT effect now supports CineSpace .csp, overrange IRRIDAS .cube, and SpeedGrade .Look files. (Indeed, the powerful color grading tool SpeedGrade is now bundled with Adobe Production Premium CS6 as well as Master Collection CS6.) Gotcha alert: Don’t mix color management with Apply Color LUT; quite often the LUTs assume a certain color profile that may disagree with the one you might set under Color Management.
- ARRIRAW files from the ARRIFLEX D-21 and ALEXA cameras may now be imported.
- A number of MXF OP1a video codecs may now be exported.
- Render-only machines no longer need their own serial numbers. Just install the software, and place a blank text file named ae_render_only_node.txt in either /Users//Documents/ or /Users/Shared/Adobe/ on Mac, or C:UsersDocuments or C:UsersPublicDocumentsAdobe on Windows. Note that a number of codecs will not be available to you on these unlicensed machines, including MPEG1 encode or decode, AMR encode or decode in MPEG4 formats, XDCAM HD or Ex encode or decode, Dolby encode or decode, audio-only AVCHD, and HDV decode.
- A long list of scripting additions have also been made (see the blog mentioned below for more details).
Although Adobe mostly giveth with this release, there are a few things they taketh away as well:
- As mentioned earlier, Photoshop Live 3D layers are no longer supported. Neither are Photoshop video layers. This is bound to cause a touch of consternation, as they’ve been improved in Photoshop CS6.
- FreeForm AE is no longer bundled. Fortunately, FreeForm v2 and FreeForm Pro are still available for purchase from their creator, Mettle.
- Custom Pixel Bender effects are no longer supported.
- Although After Effects CS6 can save a project to the CS5.5 format, it cannot save to the CS5 format – you’ll need to then open it in CS5.5 and re-save it as CS5 to migrate a project back two software versions.
For an exhaustive list of what’s new and changed in After Effects CS6, check out Todd Kopriva’s blog on Adobe.com. Todd is the guardian angel of AE users (a large, shaved-headed, motorcycle-riding angel, but an angel nonetheless), and his blog should be one of your most prominent browser bookmarks.
How Does This Affect Our Books?
We have two books on After Effects – Creating Motion Graphics and After Effects Apprentice – and both are getting updated in their own ways for this release:
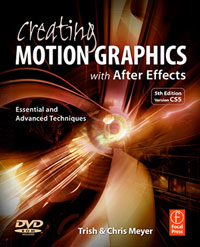 Creating Motion Graphics with After Effects 5th Edition (CMG5 for short) was written for AE CS5. It’s a big, expensive book, so rather than make you buy it again so soon, we’ve released a pair of “new features” video courses demonstrating the major advances in AE CS5.5 and CS6, using the project files in CMG5 as starting points. They are available now to lynda.com subscribers, and also will soon be released by our book publisher Focal Press through Class on Demand for a nominal price ($11.95 was what we heard most recently). Slightly lower resolution versions of the CS5.5 videos may also be viewed here on PVC.
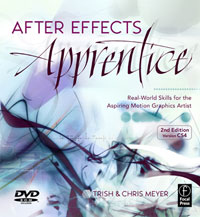 After Effects Apprentice 2nd Edition is going to be updated for CS6; look for it this summer. The video courses we’ve created to date based on this book were recorded using CS5 or CS5.5 (the book was written for CS4), and remain very relevant for CS6. We will also record a few new Apprentice video courses this fall based on the new features covered in the third edition of the book. You’ll hear more about these later this year.
All in all, this is quite a significant release, and we’ve enjoyed using it so far. We hope the information above helps you get a faster start putting these features to work on your own jobs.
FTC Disclosure: Adobe gave us access to pre-release versions of the software in exchange for testing and feedback. They also paid us to create a few documents for this release, although – as you can probably tell by the mix of pros and cons we’ve shared – this article is not one of them. We already had a pair of Quadro FX 4800s plus a Quadro 4000 video card; NVIDIA loaned us another pair of 4000s so we could test multi-card rendering and the such.

Filmtools
Filmmakers go-to destination for pre-production, production & post production equipment!
Shop Now


