

Filmtools
Filmmakers go-to destination for pre-production, production & post production equipment!
Shop NowAnd a deeper look at Keyframe Toolbox

Keyframe animation is an important topic for a video editor and animators alike. While not every editor needs to master keyframes, the difference between a basic linear keyframe animation and one which has a little bit of smoothing applied is critical. It can be the defining factor that separates a basic “my first edit” from a professional finished piece. In the world where you have to know a little bit about a lot, it pays to recognise where you can make a subtle but important improvement.
Here, I’ll take you through the basics of keyframes, the support you will find for them in many different animation and editing packages, and then finally introduce you to the solution I created for the NLE with arguably the weakest keyframe support, Final Cut Pro. Let’s start with the basics.
Keyframe Basics
A keyframe remembers a value at a point in time.
A single keyframe doesn’t do much on its own though. If you create two keyframes, remembering different values on the same property at different points in time, then you can transition between these two values to create some kind of animation. In After Effects, that process is usually:
- At one end of the animation, press the stopwatch on the property you want to animate. This creates a keyframe.
- Move the playhead to change the time.
- Change the value on the same property to create another keyframe.
Most other apps work in a similar way; you’ll probably need to record the first keyframe manually, and then others on the same property will be automatic.
Crucially, not all animation is movement. Keyframes on Position create movement, but keyframes on Scale create a grow or a shrink, keyframes on Rotation create a spin; keyframes on opacity create a fade. Also, keyframes don’t just affect common transform properties. In most circumstances, any property on any effect or any colour correction can be keyframed. In audio terms, this is often called automation — most commonly applied to volume — and it can be very important in both video and audio contexts.
In many programs, keyframes are shown as diamonds in a single horizontal line, and it’s not immediately clear what value a keyframe stores — you have to navigate to it, or you may be able to double-click a keyframe to reveal its value.

But with a little more space, you can use a keyframe graph to visualize how values change far more clearly, with a keyframe graph. The way in which you transition from one keyframe to another is where the magic often happens, and where a boring animation turns into a beautiful, subtle one. Alas, support for keyframe graphs is not universal.
Keyframe Graphs
A keyframe graph in any application works in much the same way. it maps horizontally to time starting on the left and proceeding to the right. Vertically, it’ll control the property. To interpret what’s going on, just remember that the steeper the line between two keyframes, the faster the transition. A flat horizontal line between two keyframes means there’s no change at all. That very likely the two neighbouring keyframes have the same value.

When you first make a keyframe, it is likely to be a linear keyframe. In most programs, these appear as diamonds. All the lines connecting linear keyframes are straight lines. A linear transition from a straight line to instantly moving at a fixed speed can seem unnatural and jarring in many contexts.

Importantly, not all keyframes are linear; some keyframes smooth (or interpolate) the transitions between keyframes. The most popular method uses bézier paths, the same method used to control shapes in vector drawing programs like Adobe Illustrator. Bézier paths can be complex at first, but if you’ve already spent time in the trenches doing graphic design, you may already be familiar with them.

While a linear keyframe has no handles, a non-linear Bezier keyframe has one or two handles. These handles govern the shape of the curve that passes through the keyframe. The further you pull the handle out from the keyframe, the more of an influence it has over the curve. Unlike curves in a drawing program, curves in a keyframe graph cannot move backwards in time.
So what kind of support exists for keyframes in the common animation and video editing packages that you’re using today?
Keyframes in Adobe Animate
Animate, once called Flash, has employed a few different animation strategies over its existence, and it’s where many creatives begin their animation journey. Two main ways to change parameters over time are included:
Classic Tweens allow you to create a single keyframe to remember all properties at once. This transition can be eased, but because all properties are glued together, options are limited.

Motion Tweens are a much more complex and powerful system which enables different keyframes on different properties. If you want an object to spin somewhere along a lateral movement, and want to be able to control these different properties independently, this is what you need.

While a Motion Tween will show you a full graph for the entirety of an object’s life, a Classic Tween only allows you to control the smoothness or or easing between two keyframes at a time. For simple animations, this two-keyframe focus can work well, but for complex animations it falls short. Choose Motion Tweens for maximum flexibility.
Keyframes in Tumult Hype
For many years, this undersung HTML animation tool has been a great choice for flexible, interactive HTML-based projects. Hype allows for separate keyframes for each property, and also allows custom curves to be used between each pair of keyframes.

Although it’s not possible to see an entire animation graph at once, it’s a step above Classic Tweens in Animate because the properties can be controlled independently.
Keyframes in After Effects
In the timeline pane in After Effects, you can create keyframes on any property, and in fact, I’ve written an article to help you remember the shortcut keys which reveal specific properties — STARPLUME is all you need. From the timeline pane, click the graph icon to enable it for one layer at a time. While the graph here is functional, and does a decent enough job of telling you what’s going on, it feels a little dated.

Crucially, you can work directly in the keyframe graph if you want to.
Command-clicking (Control-click on PC) creates a new keyframe or deletes an existing one. Command-dragging (Control-drag on PC) creates a new non-linear keyframe with handles. If you double-click a keyframe in a keyframe graph you can change its values, and you can also add handles to a keyframe with an Option/Alt-drag.
While you can select from a few interpolation types, you can’t define a handle’s strength or angle numerically. On the plus side, you can select multiple keyframes and resize them all together.
One common gotcha is that if you are observing a property that stores two or more values, such as position, then the graph can be harder to interpret because it’s showing you velocity, not merely position. If you want to keep things simple, right-click on Position and choose Separate Dimensions to see two separate graphs for X and Y.

It’s also worth noting that keyframes aren’t always the best way to get a job done. Expressions, if you’re not afraid of a little code, can enable complex movements like a bounce. But it’s a big jump from keyframes all the way to expressions, and many animators never master them. If you select all your keyframes and press F9, you’ll activate Easy Ease, simple smoothing that extends two handles out to the sides of each keyframe.
Keyframes in Blender
The keyframe graphs in Blender are seriously capable. Almost anything is possible here, including numeric entry of keyframe and handle values, and there’s good use of color and control over which graphs are visible. Unfortunately it’s not possible to hold a modifier key to drag out a handle from a keyframe, and for anyone with muscle memory built by drawing vector shapes, that’s a shame.

Still, there’s so much power here, for free, that it seems unfair to complain at all. You can get the job done, and the curves are easy to interpret.
Keyframes in Apple Motion
Motion is best known as the effects engine behind Final Cut Pro, which is in some ways a shame as it’s an excellent animation package in its own right. While it is easier to create keyframes in After Effects, the keyframe graphs in Motion look much nicer. They’re in colour, include several presets for interpolation, and allow for advanced controls like Ping-Pong and Progressive to repeat an animation before the first and after the last keyframe. (Maya includes this too.)

Command-dragging on a keyframe extends handles for custom smoothing, and you can hold Option as you drag a handle to split an asymmetric pair.
Also, while Motion doesn’t include Expressions, it includes Behaviors: a library of elements that can control multiple properties of an object for you — Grow/Shrink, Fade In/Out, or simulations like Attract or Vortex. A subset of Behaviors is Parameter Behaviors, which can directly control the keyframes on any property. Whichever you choose, the keyframe graphs will show you the patterns that any behaviors have made, even if you haven’t added any manual keyframes.

Because a behavior’s parameters can be published and then changed in Final Cut Pro, many Motion designers don’t use manual keyframes at all. Keyframes are great for specific animations, but not flexible enough to suit every job.
You’d expect animation packages to have solid animation controls with graphs, but what about NLEs? While you don’t always need extensive animation controls in an editor, sometimes they can be very helpful indeed. A quick, smooth punch in on a shot; a quick title moving up as it unblurs? Keyframe graphs give you precise control.
Keyframes in DaVinci Resolve
In the edit pane with a clip selected, Resolve lets you view keyframes in keyframe lanes, and then a selection of those keyframes in keyframe graphs. In the graph, you can right-click a keyframe to access simple interpolation presets on one or both sides of a keyframe. It’s also possible to double-click to change a value, and to select a group of keyframes and resize them together.

Unfortunately you can’t hold a modifier key to smooth a keyframe; you must right-click. Motion and Maya’s graph looping options were recently added in the v21 beta, and it’s great to see good ideas spread.

The graphs here are very comprehensive for an NLE, I just wish I could smooth keyframes with a bit more control.
Keyframes in Premiere
The basic keyframe display in the Effects pane in Premiere allows you to see where a keyframe is and to change its value. Unfortunately, the graph here is not as good as the graph in After Effects, and usually, you get two graphs instead of one. Most properties show a Value graph above and Velocity graph below, but Position (a two-dimensional value) shows only Velocity. The graphs are small by default, and a little fiddly, but you can hold Command (Control on PC) as you drag to extend a handle from a keyframe.

Fortunately, the lack of a Position value graph isn’t a big deal because you can use on-screen controls in the viewer to see and smooth out motion paths quite effectively.
Keyframes in Final Cut Pro
Some properties in FCP have smoothing built in, but most don’t. Unfortunately, in most circumstances, you can’t tweak interpolation manually at all. As in Premiere, you can see and smooth the Position of an object quite well in the Viewer, but other properties don’t have useful graphs.
Selecting a clip and pressing Control-V reveals the Video Animation pane in the Timeline, but most properties here only show the time of a keyframe, and you have to refer back to the Inspector or the Viewer to see or change values. Of the standard Transform properties, only Opacity gets any kind of graph by default, and there’s no way to extend handles to smooth a transition.

As a workaround, it’s possible to use Motion’s Parameter Behaviors to create an Effect that automatically smooths out all keyframes on transform properties, using the Average parameter behavior. It’s also possible to simply use templates made in Motion and avoid keyframing entirely.
While these solutions are useful, they don’t give enough control. Since people have been asking for proper keyframe graphs in Final Cut Pro since the X was added, I thought it was time to make one.
Solving FCP’s problem with Keyframe Toolbox
First up, full disclosure: I made this product, with help from Chris “CommandPost” Hocking, and I profit from its sale. Apologies in advance for my enthusiasm; I’ve been wanting proper keyframes in FCP for years, and it’s crazy that I was finally able to make it into a real product.
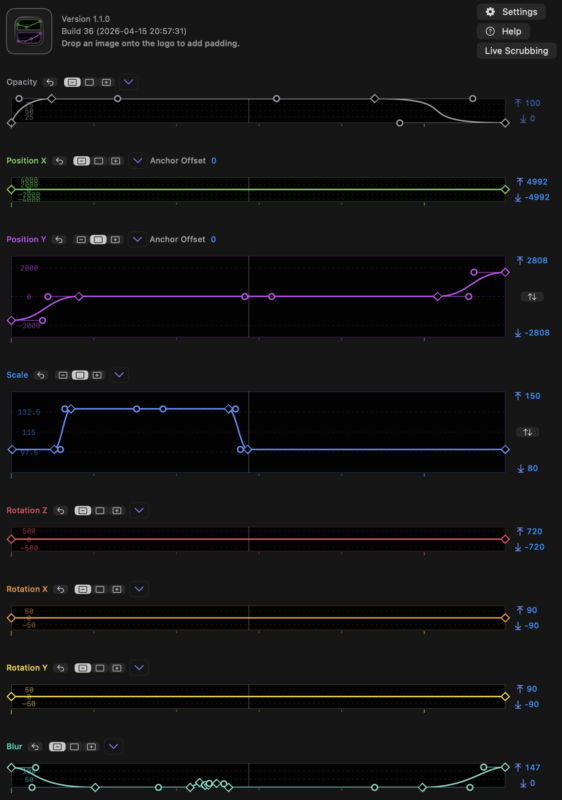
Keyframe Toolbox adds resizable, zoomable keyframe graphs to Final Cut Pro, including separate graphs for all the common transform properties, plus rotation around X/Y/Z axes and Blur. The graphs here work independently from the built-in transform controls.

With separate graphs, it’s easy to see how each property changes over time. We might be able to include an “all in one” graph in a future version.

To please users of both After Effects and Motion, I made Command and Option more or less equivalent. You can hold either modifier as you drag to make a new keyframe, to smooth a linear keyframe, or to split a symmetric pair of handles.

While you can drag whatever shape you want manually, you can also apply common easing patterns between pairs of keyframes or handles on single keyframes. Beyond simple easing, presets can add common movements, oscillations and bounces, and you can save and share custom presets too.

There’s also motion blur, absolute or relative timing, group selection and scaling, snapping of keyframes between graphs… essentially, I’ve added everything that made sense or that users have requested. One of the sneakiest additions is the Before First and After Last graph extenders from Motion, added a couple of weeks before Resolve 21 added the same features.

Many other good ideas haven’t quite made the cut yet, and top of the list is allowing the keyframe graphs to control Time. After Effects offers a graph in which horizontal movement is sequence time while vertical movement is clip time, and hopefully that’s possible down the line.
For everyone who’s been waiting for full keyframe graphs in Final Cut Pro — sorry it took so long. Check it out at FCP Cafe, or from the Mac App Store. It’s US$20, once. If you don’t use FCP, but would like to see some of these features in your favorite apps — ask your developers! Design might still be hard, but implementation has never been easier.
Conclusion
If you’ve never engaged deeply with keyframe graphs in one or more apps, I’d strongly recommend getting more comfortable — and of course, Keyframe Toolbox is only one of many ways to get started.
After Effects is well known, but it’s not alone. Two more animation tools (Cavalry and Autograph) just became free, and I’ll try to take a look at them soon.
A linear zoom in will always feel clunky, but keyframe graphs will give you a consistent, repeatable way to achieve the same kinds of movements in different contexts. Style isn’t just about how a video looks or sounds; the way that titles and clips move can matter a lot.
If you can master keyframe graphs in one app, you can figure them out in any other. Enjoy!