

Welcome to Tool Tip Tuesday for Adobe Premiere Pro on ProVideo Coalition


I’m gonna tell you the number one reason editorial tools crash in post-production.
It’s Variable Frame Rates. Clips where the video frame count (30fps?) varies and sometimes is higher or lower. This is bad.
It’s not Premiere-specific, and as the lead moderator of r/editors, I see this pop up daily, and it doesn’t have to do with Premiere. Variable frame rates are the devil.
Symptoms: Premiere crashes, my timeline is stuttering, playback is choppy, my footage is out of sync. Renders take forever.
Nine times out of ten, the answer isn’t the editorial software. It’s Variable Frame Rate footage.
Why VFR happens.
Your iPhone or drone drops frames to deal with heat and to save battery. Action cameras drop frames during fast motion. Screen recordings speed up and slow down based on system load. These files look fine when you play them back, but they’re editing nightmares.
Unlike Variable Bit Rate (VBR), which changes quality to maintain file size, VFR actually changes the timing between frames. Editorial tools have to constantly recalculate where each frame should be, creating a computational nightmare. This can happen in video or the audio portion of a file.
Do you have VFR footage?
Right-click any clip in your Project panel and choose Media File Properties.

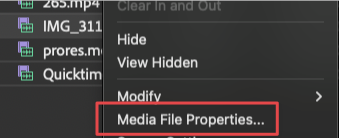
At the bottom of this window is the key item Variable Frame Rate Detected. And just to call this out, it’s the last line.


So what do we do about it?
If you want the least amount of pain, I am actively advocating for you to re-encode your footage one generation through Adobe Media Encoder.
Here are the presets that you should use:
- QuickTime ProRes 422 – large files (like 1GB/min!), but the best editorial performance on your system.
- QuickTime H264 – Using Adobe’s H264 Match Source – High Bitrate. Way smaller of a file. (It’s worth opening it up and tripling the bitrate settings for UHD)
- QuickTime ProRes 422 PQ – If the footage is an HDR source (iPhones!) to retain HDR functionality.

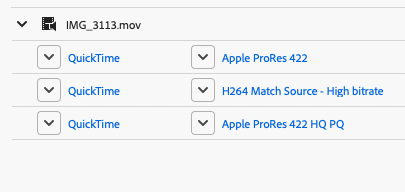
Burn the time and drive space. These are new masters.
These encodes are wildly quick to encode, even on older hardware.
We are maximizing the access to hardware-based encoding, which is what makes this so valuable. I would rather waste hard drive space and my time than face pain towards the end of the process.
This is what Professionals do for a reason.
This will actually make exports go faster.
(This is the most amount of bold I’ve ever put in a tip)
Last thoughts
Could I tweak the presets so they are finer-tuned?
Sure, and in fact, I do on my system. If there’s enough demand, I’ll publish a tip with them.
Could I use other encoding tools?
Absolutely. But I wanted to show you the ones that are easiest to use and most accessible for you with the Adobe suite.
Just because your media worked yesterday doesn’t mean your hardware won’t do this tomorrow due to a software update, temperature change, or high-speed motion. The best approach is to run it through a generation and consider these new camera masters.
VFR is timeline poison. Transcoding is the antidote.
This series is courtesy of Adobe.