

Filmtools
Filmmakers go-to destination for pre-production, production & post production equipment!
Shop NowA drone you can simply fly, then aim in post

Drones have become mainstream over the past few years, and I probably won’t get to hang out of a door-less helicopter again, with drones like the DJI Avata 360 around. DJI’s Mini Pro series has allowed solo operators to deliver quality aerial shots, while more serious drones (Mavic and beyond) are available for higher end jobs. Off to the side, the world of FPV drones became popular, first just for fun, and then with gradually better cameras. Eventually, interior/exterior FPV flythroughs became a popular way to show off large facilities (hotels, schools) and more recently, the Winter Olympics made extensive use of live video from FPV drones that followed athletes down slalom courses, ski jumps, and luge tracks.
Still, there’s a huge gulf between the more traditional “high and slow” opening drone b-roll and a single kinetic shot that flies through open doorways and around people. Traditional drone operators usually need clean shots in straight lines — tracked orbits around a building, flying over, flying alongside… usually just a few opening and closing shots.
FPV is not like that at all.
Wearing goggles, an FPV drone pilot sees the world from the drone’s perspective, and might use a traditional controller with twin joysticks or a motion controller. The aim here is to get fast, fluid movements, with tight turns, as close to objects as you dare. Flying FPV requires an entirely different skillset to a normal drone, and it’ll produce an entirely different kind of footage.
With that mind, here are a few specs to kick us off:
- Two 1/1.1-Inch Square CMOS Sensors
- Effective Pixels per Sensor: 64MP
- Storage: MicroSD card slot + 42GB of on-board storage
- 360° Photo: 15520×7760
- 360° Video:
- 8K (2:1): 7680×3840@60/50/48/30/25/24fps
- 6K (2:1): 6000×3000@60/50/48/30/25/24fps
- Single Lens Mode Video:
- 4K (4:3)*: 3840×2880@60/50/48/30/25/24fps
- 4K (16:9): 3840×2160@60/50/48/30/25/24fps
- 2.7K (4:3)*: 2688×2016@120/100/60/50/48/30/25/24fps
- 2.7K (16:9): 2688×1512@120/100/60/50/48/30/25/24fps
While I haven’t done extensive speed tests, I was able to fly straight up at 2.5m/s in Cinema mode, or a much faster ~10m/s in Sports mode. Cinema is best for controlled shots, but if you might need to move quickly, stay in Normal mode. Sports mode is fun, but as obstacle avoidance is turned off in this mode, it’s riskier, and Normal mode is still quick.
How far can you fly it?
- Max Transmission Distance (unobstructed, with interference)
- Strong Interference: Urban landscape, approx. 1.5-4 km
- Medium Interference: Suburban landscape, approx. 4-10 km
- Low Interference: Suburb/seaside, approx. 10-20 km
- Max Transmission Distance (obstructed, with interference)
- Low Interference and Obstructed by Buildings: Approx. 0-0.7 km
- Low Interference and Obstructed by Trees: Approx. 0.7-4.5 km
So where does the Avata fit in?
A hybrid, safer drone
Working solo filmmakers need to be able to respond to changing (and varied) client requests. If you sometimes need a “cinema style” drone for an aerial opening shot, but also want to sometimes follow action sportspeople as they move quickly, an Avata 360 can tackle both jobs. (Shooting in 360° is also the perfect solution to delivering in portrait and landscape from the same source shot — but more about dealing with 360° footage later.)

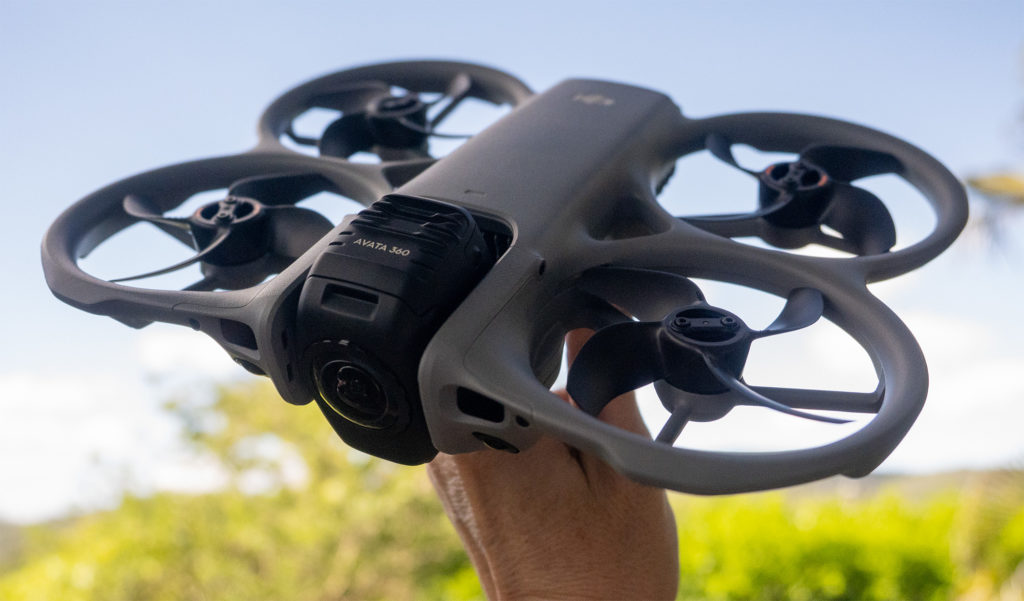
It’s fair to say that the Avata series of drones has a foot in both the regular and FPV drone camps, but being a hybrid is not a bad thing. This style of drone, with enclosed lenses to protect the drone’s rotor blades from damage (and protect the world from the rotors) is called a “cinewhoop”. It’s lightweight and easy to manoeuvre, close enough to a regular design that it feels familiar, but as the spinning blade are enclosed, you feel much safer flying closer to objects.
Although it feels safer to enclose the blades, the extra plastic does add weight. The Avata 360 weighs around 466g, much more than the 250g that some countries legislatively prefer, but that’s not (much of) an issue for me here in Australia. If you’re in the US, this drone will not be available through official channels, and though grey market supplies seem likely, warranty repairs may be problematic.
Both lenses are mounted on a single spinning mechanism with a single axis of movement. When the drone is launched, the lenses face to the front and to the back, obscuring one lens. Once launched, both lenses spin around to face up and down, and they spin back into the initial protective position when landing. The only issue I’ve had is that if you move the drone around on the ground before launching, you can accidentally spin the lenses and rest one on the ground. So far, I don’t seem to have caused any damage, but if you do scratch it (or smash it in a crash) these lenses are replaceable, in the field, with a kit.

In flight
Like the Antigravity A1 drone, the Avata 360 uses two 360° lenses back to back to capture the entire world around it. Yet like previous Avata drones, you can control the Avata 360 with either an FPV or motion controller with goggles, or a standard screened controller with joysticks. The A1 was FPV-only, so in the (small) world of 360° drones, this is something new, and certainly something more approachable for those used to traditional drones.

Indeed, if you want to fly FPV, the learning curve is steep, and, since a spotter is required to keep an eye on the drone in many regions, it’s not something always possible for a solo creator. We are not all Dutch Drone Gods. While automatic tracking can take care of aiming a regular drone in a simple aerial shot, that’s not an option in the fast-paced world of FPV.

Using a more traditional controller with a screen enables helpful tracking features that other DJI drones have long included. Spotlight Free allows the drone to circle or fly quickly up and away (AKA a “dronie”) from a person, while ActiveTrack can maintain a steady distance from your subject, even if they’re moving at bicycle speeds.
Obstacle avoidance works well as long as you’re not in Sports mode, and can be set to stop when it spots an obstacle or divert around it. After some practice moving between metal posts, I was unable to get the drone to fly into them.

When using a regular controller, some controls like tilt are essentially emulated in software, at least some of the time. A 360° camera doesn’t need to tilt to show a different angle, so it just reframes the view to show you what you’d see on a regular drone. Some tracking modes will turn the drone to face the tracked subject as they follow, while others will just reframe the view — but often, it won’t matter. In DJI Studio, while your in-flight tilts and pans are remembered, and presented by default, you can simply choose to ignore them, and reframe at will (Free View) or use Direction Lock to just look forwards.
Yes, the position of the drone will affect the perspective it captures, but as long as your subject isn’t too close, you’re set. A key advantage of 360° cameras has always been that you no longer have to aim them. In theory at least, if the drone sees everything around it, and you can reframe in post, a drone pilot can now focus just on flying, putting the drone in the right place, without also having to direct the camera at the same time.
While that’s almost the case, it’s not quite that simple, and 360° brings a few tradeoffs.
Sometimes, stitching lines or Dutch angles
When you stitch together images from two >180° lenses, sometimes the line between the lenses can be visible. This is true of just about all 360° cameras, and it can be true of the Avata 360 too. For most footage, there’s no problem. The further objects are from your drone, the less visible the stitching. However, if you’re flying very close to something, or if you change speed or direction quickly, the drone can tilt in such a way that the stitch line moves through the frame.

DJI have posted improvements to stitching during the pre-release period, but to be certain, avoid sudden direction changes. This is normal practice for traditional cinema-style drone shots, but if your newfound enthusiasm has you pulling off FPV-style shots, try to use a banked turn or a more gradual slowdown rather than a hard stop if you want to continue using that part of the shot. If you’re in control, making smooth directional changes, it’s all good, and I’d always edit out course corrections in traditional drone footage anyway. Straight, smooth lines all the way.
If you prefer, you can avoid stitching lines altogether by shooting in single lens mode, but this comes with tradeoffs too. While 360° footage can effectively be rotated any way you like, remaining perfectly stable, single lens footage on these lenses is missing a degree of compensation, because they can’t roll.

This drone’s enclosed design does come with a minor compromise: it’s a little more susceptible to being pushed around by wind, and it will sometimes tilt to give the blades more control. While that might not matter when shooting 360° footage — it always looks stable — this is more of a factor when shooting with a single lens.
When you combine a lens that can’t roll with a lightweight “cinewhoop” body that has to tilt to stay in one spot, sometimes your footage suffers. Unfortunately, if you shoot in a moderate breeze at an unlucky angle, the drone will tilt to fight the wind, and your shot will end up just a little Dutch. It’s possible to shoot single lens footage at a 4:3 aspect ratio, not just 16:9, and this may help give you a few more pixels to play with. Indeed, this FPV-style tilt is perhaps part of the appeal for many users.

However, if you want level horizons like I usually do, you’ll get the best results with the Avata 360 from 360° videos and stills. With those, you’ll get the highest quality results with a somewhat wider field of view.
Processing the 360° footage
The DJI Avata 360 can produce some amazing photos and videos, but as with other 360° cameras, it takes a little work to get the most out of it. Assuming you can avoid sudden direction changes, the magic with this drone happens in post, and there are a few possible different workflows. Like the Osmo 360, the Avata 360 shoots .osv files, and you’ll need to follow one of these strategies:
- Process the native 360° clips into rectilinear with DJI Studio, using the controls there to track and reframe. The options here are good, and you’ll have many different ways to create the angles and transitions you want. While I prefer to use the manual controls, there are many presets to help you explore the potential:

- Process the native 360° clips into stitched equirectangular 360° clips with DJI Studio and reframe or deliver to 360° in an NLE. Thankfully, the DJI Studio export process now supports exporting to individual source clips, making conversion to equirectangular far easier than before. It’s not fast, but at least you can leave it to process unattended. (This is also a big boost to Osmo 360 workflows — thanks, DJI!)

Both workflows all have pros and cons. Of course, if you want the most flexibility with tracking and the widest range of reframing options, go with option 1, reframing in DJI Studio. Here’s one example of how you can transform a single shot which flies straight up and down. This shot moves from Asteroid to Ultra Wide as the drone ascends, then the view spins around while the drone stays still, and then the FOV moves back to Asteroid again as the drone descends. Slow transitions in and out:
Here’s another example, from Stuart and Alina, of how a single shot can be turned into a smooth multi-angle sequence.
However, since I usually prefer Final Cut Pro, and I want to export to 360° native clips for the Apple Vision Pro as well as rectilinear footage, I’m going with option 2, and exporting to a high data rate. If you do keep the original .OSV files, Quick Look allows for quick previews in the Finder, so it’s easy to know what’s in a clip.
Reframing in FCP is straightforward. Add the equirectangular clips to a regular timeline, and you can adjust the field of view, Tilt, Yaw and Roll to look in any direction you want. Remember: you don’t need to animate every camera move — just cut between different angles and zooms to turn a single shot into many separate shots. Here’s a single shot shown four different ways:
Of course, for the full FPV experience, you can whip between them with smooth animations and add speed ramps if you like. Keyframing these parameters is smooth in FCP, and it’s fun to create a dynamic shot by simply looking around.
However, for the very best results, there’s another way to process 360° footage in FCP.
Switch Mapping into Tiny Planet mode, then change the Field of View to somewhere between 120° and 200°. Set tilt to 90°, and now you’ll have a wider-than-normal view with slightly warpy edges.

Outdoors, with a clear sky, this can look great, and because you’re able to use a wider field of view than usual, picture quality remains high. The downside of this approach is that your controls are a little compromised if you want to look up and down, but panning is solid.
Image quality and delivery format
Even though the Avata 360 can record an 8K 60fps 360° file, those pixels are still spread out quite thinly, and choosing a wider field of view uses more of those original source pixels in a finished rectilinear timeline. The maths are brutal: a 12mm lens on a full-frame camera gives you roughly 120° field of view, but that’s 1/3 of a 360° frame: 7680÷3 = 2,560 pixels across. 2.5K is well short of 4K clarity; you’d need to approach 180° to use about half the pixels you captured.
Making things worse, it’s an relatively small sensor compared to an oversampled mirrorless, and of course, FPV footage isn’t expected to approach cinematic drone image quality — the drone shots at the Olympics were all shot in HD, after all. Converting 360° footage to rectilinear isn’t going to deliver the absolute best image quality, but it’s definitely usable in many contexts. I’d turn sharpening down a little (try 1 instead of 2) and shoot in D-Log M for more grading flexibility, but it’s simply not yet possible to shoot higher resolution 360° footage in a drone.
In short, to maximize quality, treat this as an ultra-wide angle camera, because the more you zoom out, the higher the image quality. If you want to fill the frame, get closer, and at the end of the day, make the most of your reframing powers to create variety or more dynamic output. If you only want a single, static shot, or you’ve got time and suitable conditions to take several passes, using a traditional drone will give prettier results.
What about delivering to Immersive? As much as I love my Apple Vision Pro, in an immersive context (180° or 360°) it’s hard to find a source with enough pixels to really make it shine. The wider the field of view is, the more pixels you need to make it look great. When you stretch 7680 pixels across out over a full 360° field of view, you’ll discover that it’s not enough to look great. (Even if 8K was enough, it’s hard to share that many pixels. On all original Apple Vision Pro models with M2, YouTube limits 360° video resolution to a crippling 4K limit. This seems to be a codec problem.)
However, just like on the Osmo 360, still images hit a much higher resolution: 15520×7760. This is enough to let you zoom in a bit more and retain 4K clarity, and it doesn’t take long at all to just throw your drone in the air and snap an amazing photo from a perspective never seen. Yes, you can put this onto a Vision Pro (using an immersive viewer app like Kandao XR) and look around for as long as you want.
Here’s a straight-out-of-camera JPEG from the Avata 360.
Like the Osmo 360, JPEGs are stitched in-camera, which makes for a quick workflow. RAW shooting is available, but only to two separate DNGs that must be stitched in post. Also notable: if you want to work with 360° stills in post, Affinity is the app you’re looking for. Photoshop removed its 360° support some time ago, but Affinity retains the 360° projection modes from the earlier Affinity Photo to let you retouch and grade those stills seamlessly. I’d love to do a virtual tour in the air with one of these.
Conclusions
This drone delivers something unique. While the Antigravity A1 arrived first, for many operators it’s quite important that the Avata 360 can be operated alone, with a standard controller. If you need the very best 4K traditional, less dynamic aerial shots, this drone cannot deliver the highest image quality available, but for many, the tradeoffs are worth it.
Even if you want to keep your output relatively static, if you only need HD with reframing flexibility or are happy using ultra-wide shots at 4K, you’ll be happy here. The ability to aim-and-reframe in post can truly save precious flying minutes, making it hard to not capture a usable shot. It’s not always easy to frame well as you fly, even with all the tracking assistance available, and the dynamic transitions on offer simply aren’t possible with standard single lens drones. You can create shots with this drone that simply aren’t possible with any other.
When moving quickly, to follow fast-moving subjects or just for the thrill of it, not having to aim can make the difference between getting the shot or not. So, while this might not be the drone for every job, it’s certainly going to be the first drone a lot of operators reach for, especially if a client has an FPV-style shot in mind. As long as we don’t overdo the crazy transitions, there’s an awful lot of potential here. Recommended.
Available in many countries soon — shipping is estimated to start in April.
However, no official availability is expected in the US. If you do buy a grey market import, be sure to grab a lens replacement kit or two.