

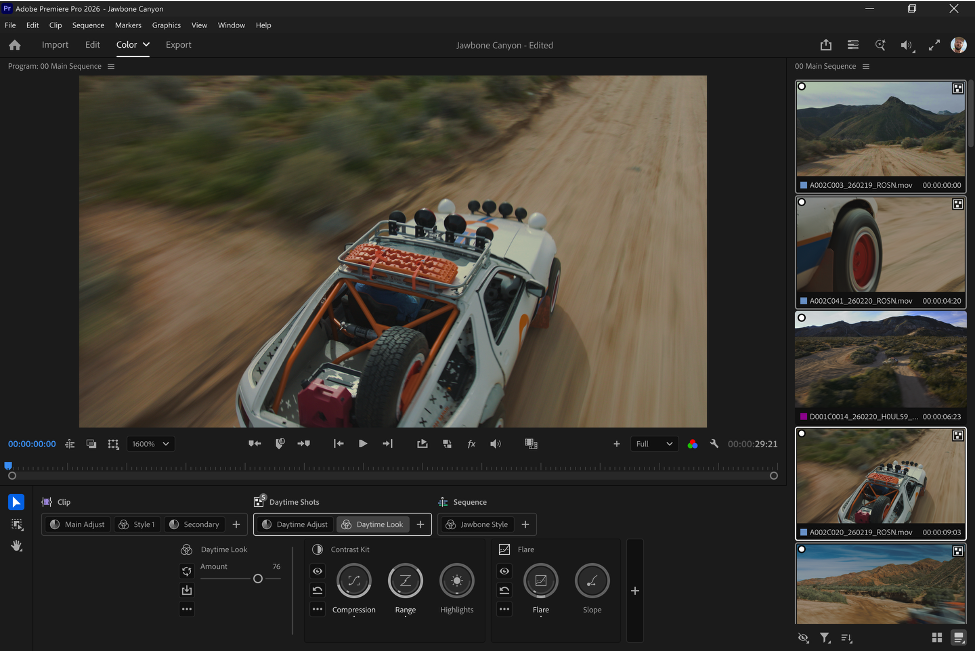

Color work often arrives at the end of the editorial process, whether or not the editor has time for it. The cut may be finished, but the footage still needs to be balanced. A log camera needs to sit alongside Rec. 709 material. An interview may need a small exposure correction, while the surrounding scene needs a more deliberate creative treatment. For editors working without a dedicated colorist, those tasks are part of the same delivery schedule as the final mix, captions, graphics, and exports.
That is the workflow problem Adobe Premiere’s Color Mode is designed to address.
Introduced in beta earlier this year, Color Mode provides a dedicated environment for color correction and grading inside Premiere. Since the initial release, Adobe has added tools that make the system more useful on real sequences: Auto Color, reanalysis and reset controls, new Midtones, Variable Vibrance, and Vignette modules, more flexible Style construction, and easier group management.
The overall direction has not changed. Color Mode is intended to let editors make broad, reusable decisions instead of rebuilding the same correction on every clip.
If you are new to the system, start with the article Why Adobe Rebuilt Color From Scratch. Then read Color Mode vs. Lumetri and Color Mode in Premiere: Setting Up for Success. For a deeper look at the workflow, see The Five Things Everyone Needs to Know About Adobe Color Mode in Premiere, The Clip Grid: A Different Way to Work, and Adjust vs. Style.
Auto Color provides a usable starting point
Auto Color is located within the Adjust operation and can automatically modify exposure and temperature/tint based on the frame at the playhead. Editors can also choose Auto Exposure or Auto White Balance separately. That makes it useful as a first-pass tool rather than a replacement for a final grade.
A difficult interview shot can be brought into a more workable range. A set of related clips can receive a shared correction before the editor begins refining the scene. Mixed-camera footage can be normalized enough to make meaningful creative comparisons.
The distinction makes all the difference because automatic correction is most useful when it removes repetitive setup work. It gives the editor a starting point, but the editor remains responsible for deciding how the shot should ultimately feel.
For a solo editor, that can significantly change the economics of a finishing pass. Instead of spending time getting every clip technically close before the creative work begins, Auto Color can help establish a baseline while there is still time to evaluate the sequence as a whole.
Reanalysis makes clip analysis more reliable
Color Mode uses just-in-time analysis when a clip is selected. The visible frame is used to establish zone thresholds and identify hues. That approach keeps the interface responsive, but it also means the selected frame can influence how the controls respond. A clip may open on a bright flash, a dark hallway, or an exposure transition that does not represent the part of the shot being graded.
The current workflow allows editors to choose a more appropriate frame and reanalyze the zone thresholds from there.
Reanalysis updates the underlying analysis without removing existing corrections. If the adjustment was appropriate but the threshold analysis was based on the wrong part of the shot, the editor can revise the analysis while keeping the work already completed.
There is also a reset-and-reanalyze command that clears the operation and rebuilds the analysis. It is useful when an operation has become difficult to interpret or when a sequence has been used to test different color setups.
The feature does not change the recommended workflow: establish the color setup before beginning the grade. It does provide a practical way to recover when testing, demonstrations, or late project changes have left the analysis in an unexpected state.
Midtones replace the need for a conventional gamma control
The Midtones module responds to one of the most common questions about Color Mode: why it does not use the traditional lift, gamma, and gain terminology.
Midtones is intended to provide the central function many editors associate with gamma, while offering more control over the surrounding tonal regions.
Raising the midtones can preserve the shadows instead of washing them out. Lowering them can protect the highlights from being pulled down. The amount of compensation can be adjusted, and the affected range can be narrowed or expanded.
This behavior is particularly important in HDR and wide-gamut workflows. A basic gamma function does not necessarily know the difference between ordinary midtones and HDR-strength highlights. Midtones is designed to preserve that distinction, allowing an editor to brighten faces or reshape image density without automatically affecting the entire signal.
The module is therefore not simply gamma under another name. It is a zone-aware tonal adjustment designed to behave more predictably across different working and output color spaces.
Variable Vibrance protects important colors
Variable Vibrance addresses a familiar problem with global saturation controls.
A scene may need more color separation, but the skin tones may already be close to their appropriate limit. Increasing saturation everywhere can make faces look unnatural. Reducing the overall adjustment can leave the background and production design too subdued.
Variable Vibrance allows the editor to move between a conventional saturation treatment and a more protected vibrance adjustment. One direction controls the intensity of the effect; the other determines how strongly skin-tone protection is applied.
This is useful for interviews, documentary footage, and branded work where the environment may need more color while the subject remains believable.
It also reduces the number of secondary corrections required. Rather than boosting the image, pulling back the skin tones, and then balancing the result again, the editor can make those decisions within a single module.
Vignette becomes part of the look
The Vignette module is designed to do more than darken the edges of a frame.
Editors can adjust its size, shape, color, and softness. A restrained vignette can help control attention in an interview or reduce the visual pull of a bright edge. A more pronounced treatment can become part of the project’s overall style.
Because Vignette is a Style module, it can be combined with other creative operations and saved as part of a reusable look. It does not have to be added as a separate finishing step after the rest of the grade is complete.
Styles are modular rather than fixed
Color Mode’s Style browser is built around the idea that a look is often a combination of several decisions.
Editors can select individual Style elements, combine them, and save the result as a custom Style. A warmer treatment, lower contrast, increased vibrance, a color shift, and a heavier vignette can all become part of a single reusable configuration.
Existing Styles can also be modified by adding or removing individual elements.
That makes the system useful for editors who work repeatedly for the same clients or within a recognizable visual language. A soft interview treatment, a muted documentary look, or a higher-contrast commercial treatment can be saved as a starting point and refined as the project demands.
Templates provide a neutral alternative. An editor can save a group of frequently used modules—such as Contrast Kit, Midtones, and Flare—in their default state. The template makes those tools immediately available without imposing a finished look on the image.
This is better suited to bespoke editorial work than a collection of fixed presets. The editor can begin with a familiar technical and creative toolkit, then build the specific look for the project in front of them.
The clip grid and grouping support sequence-level work
Clip-by-clip grading is easy to begin and difficult to finish efficiently.
Working from left to right through a timeline encourages isolated decisions. By the end of the sequence, earlier shots may no longer reflect the direction of the grade, and consistency depends on how well the editor can remember what happened several dozen clips earlier.
The clip grid provides a sequence-level view of the material. Editors can compare shots as a group, identify outliers, and decide which corrections belong at the sequence, group, or clip level.
Grouping is what makes that structure practical. Clips can be organized by scene, camera, lighting setup, or location. A group operation then applies to every clip in that group without requiring individual corrections.
The current workflow also makes it easier to add a clip to a selected group or remove it from a specific group. This supports the broad-to-narrow approach described in The Divide and Conquer Grading Workflow in Premiere’s Color Mode:
- Establish the sequence-level foundation.
- Refine shared issues at the group level.
- Reserve clip-level work for exceptions.
For an editor who is also finishing the project, this turns color from a long list of individual repairs into a manageable sequence-wide process.
Wide Gamut requires attention to reference white
Wide Gamut gives Color Mode more room to process the image before it is mapped to the output color space. That is useful when working with log, RAW, Rec. 709, and HDR material in the same project or when preparing multiple deliverables.
Some modules are also aware of reference white.
In HDR, reference white represents ordinary bright objects such as a white shirt, wall, or sheet of paper. Values above reference white are reserved for brighter elements, including direct sunlight, reflections, practical sources, and other HDR-strength highlights.
This allows Midtones and Contrast Kit to affect the ordinary portion of the signal without automatically pushing all bright values into the HDR range. Their highlight controls determine how much of the operation rolls into those brighter areas.
There is one important consideration when working in Wide Gamut and delivering Rec. 709. For Contrast Kit and Midtones, the highlight control should be set all the way up. Otherwise, the adjustment may appear to affect only part of the signal, leaving a visible bend in the upper section of the curve.
The behavior reflects the tools’ attempt to preserve the distinction between reference white and HDR highlights. In a Rec. 709 output, the editor generally wants the operation to extend across the full visible range.
For more on Color Mode’s zone-based approach to contrast and color, see Color and Contrast Controls: Zones, Not Lift/Gamma/Gain.
A more sustainable editorial finishing workflow
Color Mode does not remove the need for creative judgment. It provides a way to organize that judgment so it can be applied consistently across a sequence.
Auto Color establishes a starting point. Reanalysis allows editors to correct the analysis without losing their existing work. Midtones, Variable Vibrance, and Vignette expand the Style toolkit. Styles can be assembled, saved, and reused. The clip grid and grouping reduce repetitive shot-by-shot work. Wide-gamut-aware controls make the relationship between the working space and the final output more visible.
For editors who are also the colorist, producer, finishing artist, and delivery department, those details are significant. They reduce the number of times a decision has to be rebuilt and make it easier to keep the image coherent as the project changes.
Color Mode is not intended to replace the editor’s eye. It is intended to give that eye a more efficient system to work through.