When you look at Adobe CS Production Premium’s video production tools – Premiere Pro, After Effects, Encore, Audition, and Photoshop – many if not all could be considered industry leaders in their own right. But it’s how they share assets that makes the suite such a powerful performer.
Applications in Adobe CS Production Premium share assets in several ways. The goal? To save you time, reduce your work load, and ensure your assets retain their original quality throughout the video production process.
Linking assets and projects dynamically
Adobe Dynamic Link is a feature of Adobe Production Premium and Master Collection (it is not available in applications purchased separately). You use it to create links between projects, sequences and assets in Premiere Pro, After Effects and Encore. Creating dynamic links means you don’t have to render and import when moving assets between applications.
Choose Import After Effects Composition to link to an After Effects comp from within Premiere Pro.
If you want to change that linked After Effects comp, you can go back to After Effects and edit it or, from within Premiere Pro, right-click on the clip in a sequence or the Project panel and choose Edit Original. Any changes you make in After Effects will show up immediately in Premiere Pro (below). Because no rendering is needed, you save time and retain the asset’s original quality.
Any changes made to a linked After Effects comp, including animated text like this, show up in Premiere Pro.
The workflow can go in the opposite direction. Frequently when working in Premiere Pro, you need to tap into extra features available in After Effects. For example: fix shaky footage, track motion, animate text, or apply effects not available in Premiere Pro. To do that, select any number of clips within a Premiere Pro sequence, right-click and choose Replace With After Effects Composition. That replaces the clips with a single clip (see below) and opens After Effects with the selected clips on separate layers in a new comp. Any edits you make to the comp show up in the Premiere Pro sequence. Later, if you want to make additional edits in After Effects, right click on the linked clip in a Premiere Pro sequence and choose Edit Original.
Selecting multiple clips and choosing Replace With After Effects Composition replaces those clips with a single clip linked to the new After Effects comp.
Finally, whether you work with a suite or purchased Premiere Pro separately, you can dynamically link Premiere Pro sequences to Encore. Select a sequence and choose File > Adobe Dynamic Link > Send to Encore. Or, from within Encore, choose File > Adobe Dynamic Link > Import Premiere Pro Sequence – or – Import After Effects Composition. You can then use the linked sequence or comp as a timeline or an animated background for a menu.
Once again, there is no need for intermediate rendering. Sequences show up in Encore in their original, pristine condition. If you want to make any changes, simply return to Premiere Pro or After Effects, perform any needed edits, and click Save. The changes show up instantly in Encore. Only when you burn a DVD or Blu-ray disc or create a “Flash DVD”, will Encore render your Premiere Pro sequences or After Effects comps.
A Dynamic Link misconception
One advantage Premiere Pro has over other non-linear editors is that it keeps all video files in their native format. There is no need to transcode to enable editing. In particular this is true for AVCHD. Most AVCHD clips are Blu-ray “legal,” meaning they can be burned directly to recordable Blu-ray discs and will play back smoothly on Blu-ray drives. So, some might logically conclude that by dynamically linking a Premiere Pro AVCHD sequence to Encore, that sequence could be burned to a Blu-ray with no additional transcoding needed. That is not the case. There are some technical issues that preclude that.
You can place Blu-ray “legal” AVCHD clips on a timeline in Encore and burn a Blu-ray with no need to transcode those assets.
What you can do is import AVCHD files directly into Encore, create a single timeline, and add and arrange those files on that timeline (above). In that case, those AVCHD files will not need to be transcoded (below) as long as they meet Blu-ray specs (see Encore Help). This is a great way to quickly and easily distribute “dailes” via Blu-ray discs.
Blu-ray legal AVCHD clips show up in the Encore project panel with notations that no transcoding is needed if you are creating a Blu-ray disc.
next page: editing audio in Audition, plus using Photoshop with Encore, After Effects, and Premiere Pro
Edit with Audition
As you work on clips in Premiere Pro or After Effects, you might need to do some audio work that goes beyond the capabilities of those two programs. For example, removing noises like an electric hum, a motor, or vinyl record clicks and pops. Your best bet is to use Adobe Audition. Until recently, Audition had been sold only as a standalone program. Now it’s part of CS5.5 Production Premium.
From within Premiere Pro you can select a clip, several clips, or an entire sequence, choose Edit > Edit in Audition, and then choose Clip or Sequence.
If you choose Clip, the selected clips are replaced with “extracted” audio clips (without deleting the original clips from the Project panel) and those “extracted” audio clips open in Audition. In the example shown below, we used Audition’s Noise Reduction effect to clean up the audio portion of a video clip.
The view in Audition’s Spectral Frequency Display of the audio portion of a video clipped before and after using the Noise Reduction effect.
After you edit and save those clips within Audition, the changes show up immediately in the replacement clips in Premiere Pro. To do any additional editing in Audition, right-click on a clip in Premiere Pro and choose Edit Original.
The process is similar in After Effects. Select a single clip, either from the Project panel or a comp layer, and choose Edit > Edit in Audition.
After you edit clips from a Premiere Pro sequence in Audition, you need to take one more step to have those changed clips show up in Premiere Pro. Choose Multitrack > Export to Adobe Premiere Pro. You can then choose to add the entire set of clips to new audio tracks in your sequence.
Working with Photoshop in After Effects and Premiere Pro
One other advantage of the direct connection to Photoshop is that from within Premiere Pro or After Effects, you can open any graphic or image in Photoshop, create separate layers, and then import that layered Photoshop file back into Premiere Pro or After Effects. This approach is used frequently to select objects in a photo to create a “dimensional still;” a technique that gives the sense of 3D motion to what started out as a flat image.
Creating and editing Encore DVD menus in Photoshop
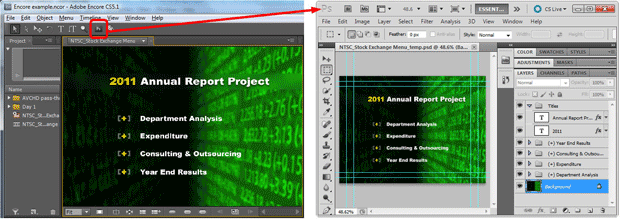
All menus in Encore are Photoshop files. This gives Encore a significant competitive edge over other DVD authoring products. Click the Edit Menu In Photoshop button (circled in the figure below) to open the currently active menu, whether it’s a menu from Encore’s library or one you are building from scratch. That opens the menu (named slightly differently than the original template or menu name) in Photoshop with all layers intact. Make any changes you want, save that work, and those changes will show up in Encore. The original menu or menu template remains unchanged.
Encore menus (left) are all Photoshop files. Clicking the highlighted Edit Menu in Photoshop button, opens that menu in Photoshop (right) with all its layers intact.
Work faster and preserve asset quality
The typical production studio workflow requires rendering video projects, special effects and animations as well as saving image or graphic files. If you want to make changes, you need to reopen those projects and then render or save them again. Once you try some of the Adobe Production Premium asset sharing techniques, you likely will not want to return to that old school video production approach.
Jeff Sengstack is a video producer, a junior college instructor, and creates video training for lynda.com, including the tutorial Premiere Pro – Color Correction and Enhancement
FTC Disclosure: The creation of this article was partially subsidized by Adobe. Although they approved the general subject, they had no control over its editorial content.

