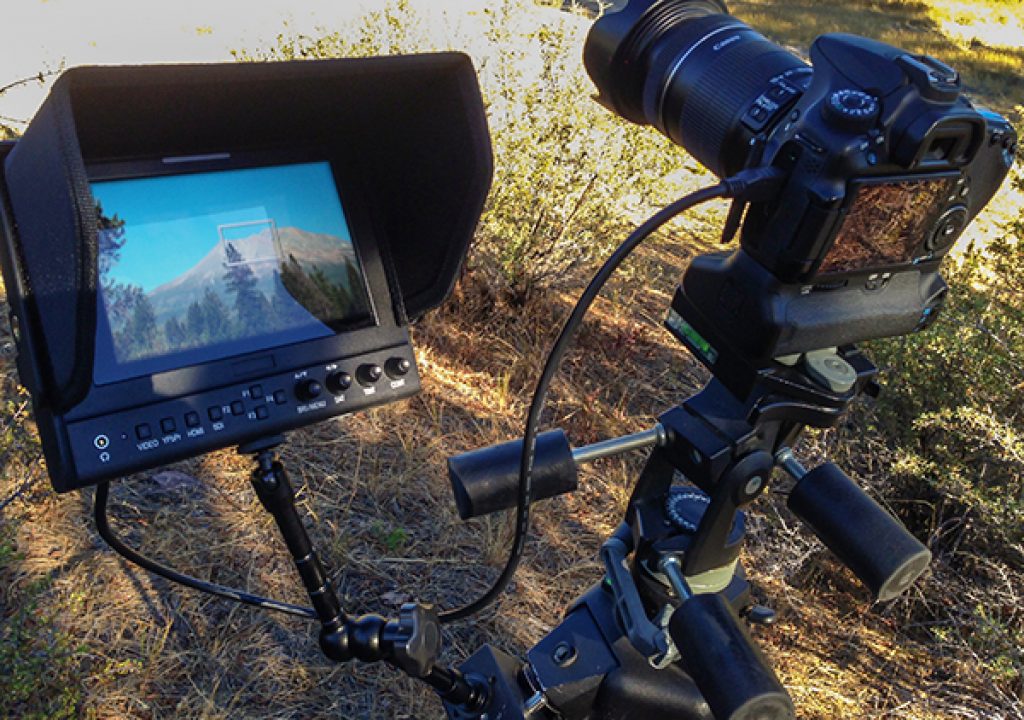
I took this new Flashpoint 7″ HD LCD Field Monitor for a test, LITERALLY in a field! I was impressed with the features and flexibility of this portable monitor right out of the package on location during a photographic road trip this Fall – especially for only $400.
Since this product was sent to me from Adorama just the day before I had to leave for a 2-week road trip, I didn't get a chance to examine it or play around with features until I was on-location in a remote off-road area. I've really wanted to test a portable HD field monitor with my DSLR and the GoPro Hero3 for shooting B-roll, so this was a great opportunity to see how the Flashpoint 7″ LED Field Monitor performed and how easy it was to setup and use with different cameras. To my surprise, it was quite easy to figure out with the intuitive menu controls and much brighter/clearer than some of my more expensive LCD field monitors costing much more.
What Comes in the Kit
Here's the list of Key Features from Adorama's website:
- Flashpoint PRO-1 7″ LED Field Monitor
- Folding Sun Shade Cover
- Shoe Mount
- Battery Plate
- HDMI A/C Cable
- 12V DC Adapter
- Power and Tally Cable
- Custom Suitcase
- Manual
Optional Accessories: Battery Plate DU21 – Battery Plate QM91D – Li-Ion Battery – VESA 75mm rail-mount slot
One thing I really like is this custom carrying case. I've tried to cobble-together protective cases/bags for my monitors in the past – end up with bubble wrap in a cardboard box in some cases or crammed inside another camera/gear box. Knobs get busted and parts lost. Call me crazy, but for me this is a big plus!
Another feature I liked was having all the controls on the front panel and clearly marked so you can make adjustments and access the menu options quickly without having to fumble with controls on the side that may be hard to reach due to your mounting position of the monitor to your gear.
The housing is made of powder-coated metal so it's durable and solid. And having the built-in speaker/headphone jack makes monitoring audio or playback from the camera easier to manage when necessary. The sun hood velcros to the frame when necessary and folds flat to easily fit inside the case and acts as a screen protector when stored.
Features & Specs
The monitor comes with an F-970/LP-E6 adapter plate that accepts a standard Sony-style battery pack (Flashpoint makes a good/affordable battery pack I've used on several devices). There are two HDMI connections (both IN/OUT) so I assume you may be able to daisy-chain monitors or send the signal to another camera/recording device, though I haven't tried this yet. There are also BNC connections for Composite and YPbPr plus two RCA connectors for Audio L/R. There are three brass 1/4-20 mounting grommets on the sides and bottom to secure the monitor to an Israeli Arm or tripod, plus the kit comes with an articulating shoe mount. A three-way switch allows you to select between battery or 12v AC power and off. The kit includes an AC adapter with a Tally Cable.
The monitor has an 800:1 contrast with a brightness output of 400cd/m2 (candela per square meter) which isn't extremely bright but equivalent to a typical laptop screen and not bad for an inexpensive battery-powered field monitor – especially in this price range. Having the sun hood helps immensely.
With a physical resolution of 1280×800 16:9 aspect ratio the monitor can be scaled up to 1920×1080 resolution. This is a good standard resolution for most DSLR and pro-sumer HD camcorders today.
I did notice that the resolution of my Canon DSLR didn't entirely fill the screen without cropping so it was scaled to fit to approximately 85% of the screen and offset so not centered by default. If the monitor is set to 16:9 Pixel to Pixel match it's cropped. Since it's reading the camera's HDMI output as 480p (1080i) then I assume it must be the Canon's live monitoring output is limited.
But switching the monitor to 16:9, Pixel to Pixel and 480p, you get the full images, smaller on screen with the camera data.
I'd still prefer full-screen with data overlay like with the GoPro (see next page).
CONTINUED ON NEXT PAGE –>
Other menu options/controls allow you to reassign the F1-F4 buttons and the dial controls, the color temp and other normal input/orientation parameters.
- F1 = Enables Peaking (red color)
- F2 = Enables False Color
- F3 = Enables Exposure (zebra)
- F4 = Enables Histogram
Connecting to a GoPro
I connected the monitor to a GoPro Hero3 through HDMI and it worked brilliantly. With the GoPro Hero3 or Hero3+ encased in a Genus GoPro Cage on a special quick-release mount on my tripod
I set it to Full Screen mode and it didn't crop or overscan.
It even mounts great to the Genus GoPro Cage directly with an Israeli arm for doing remote time-lapse shots on a ball head tripod.
Overview
I've used several moderately-priced HD field monitors in the past few years and I'd have to say the quality build of the Flashpoint 7″ LED HD Field Monitor is really well constructed with many features you're looking for – especially at a price point of only $400. I am hoping to resolve the resolution issue with my Canon DSLR and possibly try it with a couple other cameras and provide an update here soon.
_________________________________________________________________
Jeff Foster is a published author of several how-to books and training videos in the motion graphics, animation and video production industries and is an award-winning video producer and artist. Visit his web site to learn more about his training methods, tips & tricks at PixelPainter.com

