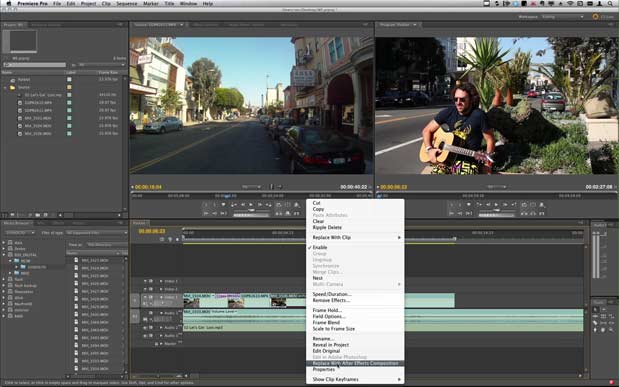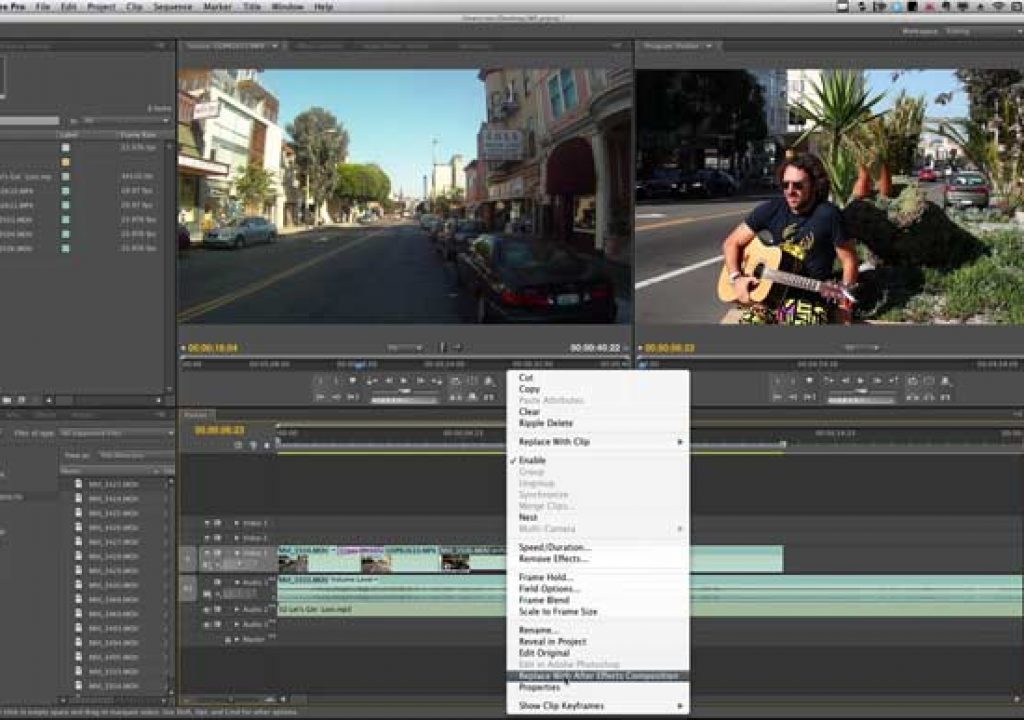
The Dynamic Link process to stabilize a Pr clip in AE begins in the Pr timeline.
Warp Stabilizer was arguably the biggest addition to After Effects CS5.5. Once you understand how to use it, it’s a tool that can change the way you shoot; if you find yourself without a tripod or any kind of stabilization with a camera as notoriously unsteady as a DSLR, even on a moving shot, you can end up with footage that can look as if a dolly or SteadiCam were used to take it.
For editors and shooters who work more in Premiere Pro than in AE, this is clearly a case where Dynamic Link, the technology bridge between the two apps, is useful. Warp Stabilizer isn’t part of Pr, and it is relatively straightforward for basic usage even for the casual AE user. This article not only walks you through how to achieve shot stabilization on clips in a Pr edit, but it opens the door to how to use Dynamic Link generally, for those who’ve wished they had a better handle on it.
We begin in Pr, with an edit. I have a collection of shots that were taken handheld and head-mounted, with a 7D and GoPro, respectively. The handheld shots are intended to be lock-offs, while the head-mounted shots are intended to be smooth and dolly-esque. Hello dolly? Nope, goodbye!
The simple edit contains of shots that play back perfectly without transcoding thanks to Mercury Playback Engine optimization combined with an nVidia CUDA card, a huge Pr advantage unavailable in AE.
The basic recipe is as follows:
- Select a clip and right-click to choose Replace with After Effects Composition.
- In the AE timeline, right-click the layer and choose Stabilize Motion.
- Press 0 on the numeric keypad (or control + 0 on a laptop) to preview the result.
- Save the AE project.
- Return to Pr and preview the clip.
- Mark the comp’s region in the timeline with the work area in and out points and choose Sequence > Render Entire Work Area.
…with a few extra notes at the end to help with some typical specific cases that can add a step or two.
Select a clip and right-click to choose Replace with After Effects Composition
If AE isn’t already running, it starts up and populates a new project with the selected footage inserted into a comp. (If it is running with a project open, the footage and comp are added to that project and highlighted in the Project panel.) With multiple shots, you’ll decide whether to give each of them a separate project or build them all up in one AE project, which I’ll do in this case.
The comp is trimmed to the exact length of the clip in the Pr timeline. That’s good in that you only stabilize the section of the source shot that you need. However, it also means that if you want any extra handles for dissolves, extra steps are required. We’ll revisit those below.
Warp Stabilizer is most easily activated by right-clicking the clip in the AE timeline.
In the AE timeline, right-click the layer and choose Stabilize Motion
The Warp Stabilizer effect immediately goes to work on the layer. A blue bar appears across the footage as it is analyzed, and progress percentage and overall frames visible in the Effect panel. Next an orange bar briefly appears across the footage as it is stabilized, and once that disappears, the clip is tracked.
Warp Stabilizer hard at work stabilizing the clip. To lock it off, choose the No Motion option.
Press 0 on the numeric keypad (or control + 0 on a laptop) to preview the result
If you were looking to smooth camera motion, you may already be done with your work in AE. The simplest method to adjust for over-scaling (indicated under Auto-Scale in Effect Controls) is to reduce Smoothness. That’s hardly the limit of what you can do, but in this case let’s assume we’re good and keep moving.
Save the AE project
This is an optional step that is just good practice, given that stabilization data must remain in place here for the Pr project to access it.
Note: if you need to re-edit the stabilization later, right-click the linked comp in Pr and choose Edit Original to reopen it in the saved AE project.
The pink color of the clip indicates that it is dynamically linked.
Return to Pr and preview the clip
The blue source clip in the timeline is replaced with a pink Linked Comp. The yellow bar over the clip “indicates an unrendered section that probably does not need to be rendered in order to play back in real time and at full frame rate,” according to Adobe help.
At the moment, if the AE timeline itself still has a green bar from the preview generated two steps back, the clip plays back smoothly. But if that preview is no longer cached, or AE is closed, Pr still has access to those results. However, Mercury Playback Engine doesn’t deliver real-time playback in that case, because AE doesn’t support it.
Therefore there’s an additional step – and a couple of caveats.
The yellow line in the timeline indicates that Pr will attempt to play the clip in real time.
Mark the comp’s region in the timeline with the work area in and out points and choose Sequence > Render Entire Work Area
The yellow demarcation in the timeline becomes green. The clip is now pre-rendered and smooth playback occurs. You have succeeded in applying Warp Stabilier to a shot in the Pr timeline!
Now the caveats.
If you have a qualified nVidia CUDA card, you have access to GPU acceleration in Project Settings.
The linked comp, by default, has no handles
Any crossfade or other frame-dependent transition that was applied to the clip is lost in this process, because by default, AE trims the comp to the edited in and out points of the clip. That’s not a bad thing; if you’re only using 3 seconds out of a 10 minute take, you certainly don’t want to stabilize the whole clip.
So what do you do to get those handles back? All of the methods will feel a little kludgy, but here’s the cleanest one I came up with, using the addition of a free script to AE. Download http://aescripts.com/layer-handles/ and place it in the Scripts/ScriptUI Panels folder (under Applications/After Effects CS5.5 in the Finder or Program Files in Windows Explorer – then restart the app):
- In AE’s Composition > Composition Settings for the dynamically linked comp, change Duration to add the time needed for top and tail handles, e.g. 24 frames or one second longer.
- Select the layer and choose Window > Layer Handles (assuming you followed the steps above to download and install the script). This opens the Layer Handles panel, where you can specify the amount to extend the in and/or out point.
- Click the Analyze button in the Warp Stabilizer effect in the Effect Controls panel to re-analyze the clip at its new duration.
- Save the AE project.
- In Pr, use the Slip Tool to offset the clip by however many frames you added to the head of the shot.
Then you have the handles needed to dissolve.
There is no automated “render and replace” option
At some point you’ll find you no longer need the flexibility to choose the Linked Comp and choose Edit > Edit Original to re-open it in AE, but there is no way to completely commit the edit other than to manually replace it in the timeline. There’s not even a proxy system, other than the Render Entire Work Area option, above.
Any edits to the Effect Controls of the clip in Pr prior to beginning this process will cause the clip to be nested in a sub-comp in AE
That’s not the end of the world – you can stabilize the clip in the subcomp – but because the goal here is to make this process lucid for people who might not otherwise understand how to use AE or Dynamic Link, I felt the need to mention it.
At some point, Adobe will hopefully further refine some or all of these issues and make the process of stabilizing a clip in Pr that much simpler; for now, the above should help you make use of the tool even if you have no experience with AE or Dynamic Link.
FTC Disclosure: The creation of this article was partially subsidized by Adobe. Although they approved the general subject, they had no control over its editorial content. Mark also does contract work for Adobe from time to time, in addition to using their products to create visual effects for major motion pictures.

