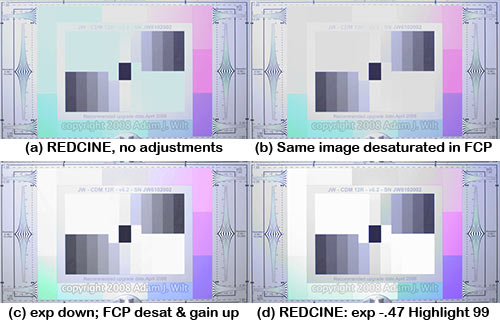
In my unfair comparison of three cameras, I found that RED’s overexposed highlights went cyan and got darker than surrounding, non-overexposed areas. Here’s why it happened, and how to fix it—it’s an easy fix, but you’ll appreciate it more if you see what happens if you don’t use it!
RED is a raw camera: it records 12-bit linear data straight off its “Mysterium” sensor, without any sort of gamma correction, knee processing, or other image adjustments. Even white balance and ISO (speed) ratings are stored as metadata instead of being “baked into” the image, so you have freedom in post to change your mind.
With freedom comes responsibility: highlight processing that happens automatically in traditional video camera, or is taken care of by the shoulder of film’s characteristic curve, is left up to you to deal with. If you do nothing, you’ll see weird stuff, like color casts and tone reversal.
Here’s our standard ChromaDuMonde chart, overexposed three stops under tungsten light, as seen in REDCINE (one of RED’s two “digital darkroom” programs for processing raw images). All three channels (red, green,and blue) of the sensor have fully saturated on the brighter parts of the grayscale, and on the color chips in the upper left corner of the chart.
Our chart in REDCINE, color matrix off. R, G, & B histograms all peak on right side.
We’re looking at the “rawest” view REDCINE provides: the color matrix metadata has been turned off (though a gamma curve is still present), so in effect we’re seeing the colors the camera saw. RED ONE’s native color balance is 5000K, considerably bluer than the nominal 3200K put out by tungsten lighting. Tungsten, as far as RED ONE is concerned, is rich in red light and is deficient in blue, so this image tends towards a reddish orange.
Observe that all three color channels have those overexposed bits right up against the right-hand side of the histogram; they’re all maxed out at around 99%.
Next, let’s turn the color matrix on, to recover the “look” of the chart using a white balance of 3419K, as measured by the RED ONE on location. This “look” includes rec.709 colorimetry and gamma.
The same chart with matrix applied (white balance 3419K). Note green and blue peaks have been “pushed off the right side”.
REDCINE has applied the color temperature metadata to the raw image, so now the neutral gray parts of the chart aren’t orange any more. However, the overexposed highlights have gone cyan, and they’re slightly darker than the gray chart background.
Look at the histogram: REDCINE has tried to keep the same brightness values overall. To obtain the desired color balance, the red channel has been toned down considerably; the green has been boosted slightly and the blue even more, but they’ve been boosted into clipping at the right end of the histogram.
The cyan occurs because toning down the red has pulled its peak down to around 91%. That peak was at full sensor saturation; there isn’t anything above that in the red channel. If you pull it down to 91% to balance color, but keep the the same brightness scale, anything over 91% brightness will have no red in it, and so it will go cyan (the complement of red).
(Of course, the particular highlight color depends on whatever the color-corrected channel balance is: in our case, the red was cranked down to compensate for its overabundance in the tungsten source, so when highlights run out of red they’ll go cyan. Had we been shooting in open shade on a sunny day, with a very blue color temperature of perhaps10,000K, we’d have to pull the excess blue signal down in post, and our highlights would turn orange instead.)
And while it’s easy to bring the red down to 91% of its previous value, it’s harder to boost green and blue higher (and thus maintain the same overall brightness), because they clip at 100%. ITU-R BT.709 colorimetry calls for luma to be constructed as follows:
Y = 0.2126 R + 0.7152 G + 0.0722 B
(For simplicity’s sake, we’ll assume that this equation is used to compute luma in the RED apps; there are other complications involved which may vary the coefficients, but the general concept is the important part, not the exact numbers.)
For example, the raw, unmatrixed image has overexposure at R,G,B = 100%, 100%, 100&, for a Y value of 100%.
With the color matrix applied, RGB values of 91%, 102%, 108% would give Y = 100%, but since G & B are clipped at 100%, R,G,B = 91%, 100%, 100% results in Y = 98%.
If the colors are even more unbalanced, the luma loss in overexposed highlights is even greater: R,G,B = 80%, 104%, 120% equals Y = 100%, but R,G,B = 80%, 100%, 100% results in a Y of only 96%.
And those calculations assume we still have the red signal contributing 80% or 91% of their original strengths—but of course, they’re limited at lower brighness values by those same ratios; in highlight areas, they have already saturated, and contribute even less!
(Let me emphasize that this darkening of overexposed highlights occurs in the matrixed version of the clip, especially when displayed onscreen or exported to a file with 709 gamma and unmodified exposure. There’s still enough information in the raw data to reconstruct highlights cleanly, as we’ll see.)
So we can get tints in our highlights because a fully saturated color gets scaled back in post, making it unavailable at the higher luma levels. We can get darkening of those same highlights since its other components are clipping before they can contribute as much as they should, and also because we lose the contributions of scaled-back colors.
The result is something like quadrant (a) of the image that leads this article.
So: what to do?
You can take this image and desaturate the highlights in FCP or Avid or whatever NLE you’re using. That takes care of the tint, but not the tone reversal: you’ve already lost information you need due to the clipping of the boosted color components. You’ll get something like (b) in the lead image: I simply took the image in (a) and used FCP’s “Desaturate Highlights” filter on it.
To fix the tone reversal, you need to ensure you don’t clip the boosted colors: you need to decrease the overall brightness of the image to avoid that clipping:
Same chart, matrix applied, exposure set to -1.35 to recover green & blue peaks.
Now you have an image that has the highlight coloration, but you can at least recover tonal-scale information in the remaining components. Quadrant (c) of the lead image shows what happens if you pull the exposure down to -1.35 in REDCINE, desaturate the highlights in FCP, and then pull the exposure back up. I also added an S-curve to the highlights using the Proc Amp control, and allowed my highlights to go to 109% for that last little bit of added brightness range.
That’s fine as far as it goes, but it’s far more work than you need to do. RED ALERT! has the DRX control to handle the highlights for you:
In RED ALERT!, use DRX and Exposure sliders to recover highlights cleanly
REDCINE has a similar control, called Highlight. Quadrant (d) in the lead image shows REDCINE’s output with exposure of -0.47 and Highlight set to 99.
These controls can be adjusted by eye and by histogram, with the exposure control used as needed to pull highlights into view.
These controls have much the same effect of what I did in my multi-step process with REDCINE and FCP, but as they work on the raw data entirely within REDCINE and RED ALERT!, they don’t need the two-step effort of exposure reduction followed by gain boost in FCP—and they’re a lot quicker and easier to use!
Graeme Natress, the man behind much of the image processing at RED, says:
…just dial in DRX until things look right. Full DRX is full reconstruction.
…if blue clips last, red and green will be stretched to fix… The code is more complex than that, but that’s the visual appearance.
Also, FYI, it happens on the RAW data before matrix and LUT, so it’s sorta photometrically correct. It also needs “knowledge” of the intended white balance, or how else does it know that you want white to be white or white to be off-white?
From this it’s obvious that you should use the controls in RED’s apps and not faff about in Final Cut Pro as I did!.
The tricks to using DRX in RED ALERT! and Highlight in REDCINE are that:
- They don’t have any visual effect unless you have hot areas of the image for them to act on, so their usefulness isn’t immediately apparent.
- REDCINE’s Highlight control, at least in build 90, doesn’t have any effect unless you twiddle another control afterwards. I simply double-click the Contrast control immediately above Highlight to trigger the on-screen change (this bug is supposed to be fixed in subsequent builds).
The proxy Quicktimes generated by the RED ONE appear to have this highlight processing built in, but of course you’re stuck with the “one-light” exposure of the proxy. RED’s “digital darkrooms” let you “re-time” both exposure and color using the raw data itself, just as you can usually pull more detail out of a DSLR’s RAW images than from its JPEG or TIFF pictures.
The takeaways from this whole exercise?
- Don’t be frightened if you’re using the RED ONE and see weird things in the highlights. They’re fixable using RED’s own apps.
- Traditional video cameras hide this from you, processing it internally. It makes you appreciate what “normal” video cameras have been doing for us over the past few decades.
- Color film handles overexposure with the gradual desaturation and highlight compression provided by film’s nonlinear characteristic curve. It makes you appreciate what film has done for us over the past hundred years.
- Shooting with RED brings all the advantages of the raw workflow, but it requires additional work on your part to understand what’s involved and deal with it. It’s not video; it’s not film: shooting with a raw-data camera like the RED ONE (or raw cameras from Silicon Image or Dalsa) is its own thing, and it comes with unique concepts and workflows.
- Once you know what ‘s involved, it’s pretty darned trivial to deal with this added complication, even if it’s pretty scary the first time you see it.

