Adam Wilt gets to play with the best toys, in this case a prototype Sony FS700 slow motion camera. He invited me over to play, and the results were really, really interesting. Adam’s article talks about some of the technical issues he ran across, so in this article I’m going to focus on the lighting side of what we did.
Before you read this article, go to Adam Wilt’s blog and watch the finished video of our tests. I’ll wait.
First, fire. I’ve always loved playing with fire, both metaphorically and physically. In this case Adam had already shot some striking match footage (pun intended) and all I had to add was a little bit of a lighting twist on it: whereas Adam had shot his match strikes with a daylight white balance, I opted for a tungsten balance so I could add some cool light from a 400w HMI PAR.
Fire is naturally warm and I wanted to add some color contrast, so opting for a tungsten white balance made the HMI’s light appear very cool. This light did nothing to the flame but it did give the matchstick an edge light and make the smoke from the match blue.
The match, just before ignition. The blue smoke is backlit by an uncorrected 400w HMI PAR.
The match, fully lit. The blue light from the HMI creates a little bit of contrast on the head of the match.
This was a bit of a rush lighting job. Adam already had the HMI out and powered up for some shots he was doing earlier, so I merely moved it around until it backlit the match from a severe angle. Naturally this meant the light was aimed straight down the lens, so I made myself a lenser out of a C-stand and a tennis ball:
The tennis ball casts a round shadow across the lens element, eliminating flare from the lens while allowing the HMI’s light to illuminate the match head.
This is why it was tricky keeping the flare out of the lens. That’s a tilt/shift lens on a bellows.
Fire looks beautiful in slow motion, not just because of its motion but because it’s so bright that the exposure time has to be pretty short to retain detail in the flame. This exposure looks perfect.
Next, we moved on to liquids. We set up a collapsible table in the studio and brought in water and ice.
That’s me on the right, pondering my lighting setup. The 400w HMI is lighting two layers of Lee 216 diffusion, to create a very flat, even field of light. There’s a 2’x4 Kino Flo “Fat Boy” to the right of the pouring station.
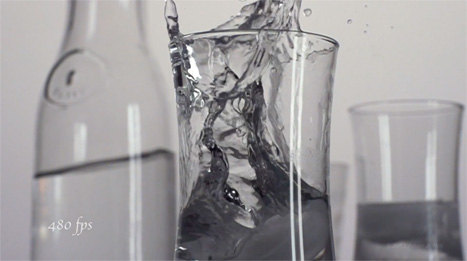
I’ve shot some liquid pours before, and I’ve learned that when it comes to clear liquids the background is more important than anything else. Aiming a light at a clear liquid does nothing, as there’s really nothing for the light to illuminate. The shot becomes about what one sees through the liquid.
I’ve done a fair amount of still work and some product work where I’ve made the background the light source as well, and that setup worked very well here. You can’t light water, but you can light what’s behind and around it:
One of the tricks of product photography is to use a wide lens up close. Do so forces the perspective and emphasizes shapes and motion.
We’ve exposed for the background here, and let the rest of the studio go dark. Clear water will project light forward like a lens but the surfaces of moving water will reflect what’s around them, in this case simple blackness. The contrast between the light coming through the water and the black reflections is really interesting. The exposure could probably be pushed a little farther to emphasize the highlights against the blacks, but you can see the seeds of something interesting here.
The highlights in the glass are two tubes from the Fat Boy sitting off to the right side. Initially I was hesitant about adding this as I was worried it might ruin the bright/dark effect but Adam wanted to get some sidelight on the ice. When I saw that it actually worked well I was reminded me of a lesson I’d learned a long time ago but hadn’t immediately remembered:
Sometimes, when a shot contains a reflective/translucent object alongside a solid object, both can be lit in very different ways without interfering with each other.
Here the translucent and reflective water didn’t really react to the sidelight at all, but the solid ice did pick up enough illumination to be easily recognizable as ice:
If I was doing this for a spot I’d have made the sidelight taller and much more diffuse. Tallness helps ensure the highlight in the glass reaches all the way from the bottom to the top. Curving glass reflects at different angles, so a taller light source helps chase that angle so the reflection doesn’t disappear. The diffusion would allow me to make it a broader and sportier reflection instead of just the two bulbs we have lit here. Still, though, it’s an interesting look and something I’ll store away for the future.
The Sony FS700 looks like it’ll be a lot of fun. I’m working at the DSC Labs booth giving chart demos at NAB, but I’m directly across from the Sony booth so I may stop over for another look. Adam tells me that there’s a chance this footage may be shown in Sony’s 4K theater, which could be quite a lot of fun.
Stop by and visit me at NAB at DSC Labs, booth C10515, and I’ll give you a chart demo on your way to see the FS700.
Thanks to Adam Wilt for including me in his playtime, and for the still images he contributed for this article.
Art Adams is a DP who likes to play with fire in the deep end. His website is at www.artadamsdp.com.

