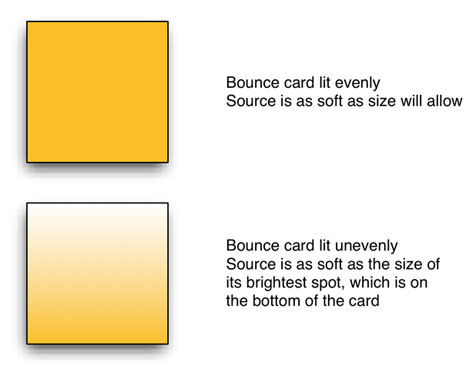
Is bounce light really just about aiming a light at a white card and walking away? No. There are a couple of tricks to getting the most out of your bounce source, and I can show them to you fairly quickly using a 4’x4′ bounce card as an example.
First thing to consider: material.
Foam core is slightly shiny and may cast a very subtle hard shadow in addition to a nice soft one. Sometimes this is okay, sometimes it’s not. Just know that this can happen and pay attention to when it works and when it doesn’t.
Gryfflon is slightly shiny but overall a good soft bounce material.
Bead board is a styrofoam-based material with a very matte finish. There is no specular kick of the type seen when using foam core or gryfflon.
Show card is dull and very matte while also being flexible. It’s good for tacking to walls or shoving into corners.
There are many other materials to experiment with but this will get us started.
We use “active” (a bounce card lit by a dedicated light, as opposed to “passive,” which picks up light that’s already in the scene) bounces when we want to turn a surface into a light source in order to create very soft, wrap-around light. The size of the source makes a difference. For this reason we almost always want to fill our bounce card completely with light. Spotting a light into the center of a 4’x4′ bounce card gives us a 1’x1′ source, which has a very different feel from a 4’x4′ source.
We’ll also get more punch out of the bounce if we fill it completely. A light spotted into the center of a bounce actually results in less light reaching the set than a light that has been flooded out to fill the card.
I suggest doing this:
This offers maximum output from your bounce card. (This technique also works with diffusion frames.) It’s possible to flood so far out that light spills off the edges of the card but at that point you’re starting to waste light. A little light can spill off but you want most of the light to fill the card side to side.
It’s common to place the light below the bounce card, looking up into it, but there’s a gotcha to avoid:
Avoid placing the light so that the bottom, or the side closest to the light, is significantly brighter than the rest of the card. If the bottom half of the 4’x4′ card dominates in brightness then you’ve converted your 4’x4′ source into a bright 2’x4′ source next to a dimmer 2’x4′ source. If this is the look you’re going for, great–otherwise try to light the card as evenly as possible.
Here are three ways to light a bounce card. Some are better than others:
The top method shows the subject the full face of the card but the uneven illumination compromises the size of the source.
The middle method lights the card more evenly but slightly reduces the height of the source from the subject’s perspective, which is usually not a problem.
The bottom method lights the card perfectly but if the subject lands in just the right spot the lamp will cast its own shadow.
Bounce sources are wonderful things and I use them all the time–but I always want maximum light output and the largest source possible that the bounce material will give me. Otherwise, why do it?
Art Adams is a DP who likes direct directors and indirect lighting. His website is at www.artadamsdp.com.

