Last August I had the opportunity to DP a documentary feature film directed by my good friend Kendal Miller. The story followed two friends as they traveled across the US to the Oregon coast on a motorcycle and sidecar.
Much of the film was to be shot handheld, and we planned to intersperse short cut-scenes of traveling footage. These in-betweeners were to be shot clean, smooth, and glossy to contrast against the handheld work. This was an intentional choice we made early in pre-production when building our visual language playbook. We'll share more on the choices behind that in an upcoming post on visual language for the film.
We had a very small crew and a budget without a lot of room for extras, so it was important to select tools that were multipurpose and easy to work with. One of the tools we chose for these glossy shots was a DJI Ronin brushless gimbal system. The gimbal was a good choice since we needed it for driving footage, and also for a few long one-shot sequences we intended to shoot along the way. A C300 was to be used on the gimbal, and the Ronin was an affordable solution for that camera.
We also used a Ken Labs gyro system to shoot longer lens traveling shots when not using the Ronin, primarily working the gyro shots handheld with a 70-200 IS zoom. Our camera car was a Dodge Caravan minivan with sliding side doors and a rear hatch that could be left open for low-speed driving. Ken Labs gyros are an amazing tool for stabilizing handheld/moving footage, and they are fairly easy to use as well.
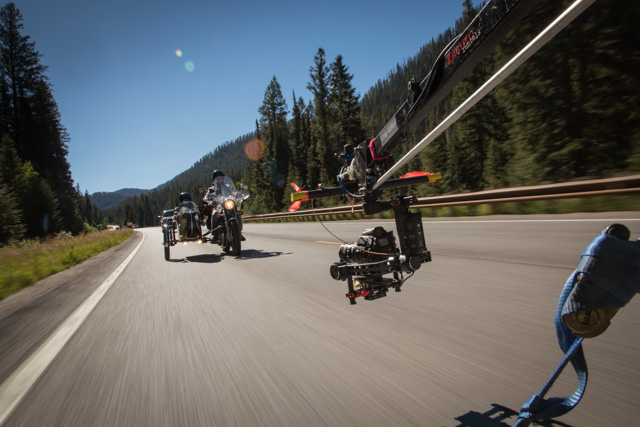
With the film's tight budget, we had to come up with a solution for capturing these glossy moving shots from our camera car. Based on my experience with a similar setup I had on a travel shoot earlier in the year, we designed and Kendal built a hitch-mounted platform that would support a short jib arm. The platform was made from a hitch luggage carrier platform that was reinforced and cross-braced. On that platform Kendal attached a Mitchell Camera Riser, which allowed us to quickly mount a rented Long Valley jib arm. This particular jib was chosen as it is a very small, lightweight jib that is surprisingly stable…it has zero bounce or play in the arm. Many lightweight jibs have “give” along the length of the arm, but not this one. It also builds very quickly…we could mount or stow the jib in minutes, and simply leave the rear platform and risers attached to the back of the minivan for the duration of the project.
Attaching the Ronin to the jib would have been a lot simpler to accomplish with the Ronin mounting solutions that CineMilled now offers. At the time, however, that was not an option as they were not shipping in time for our shoot. So we came up with a homebuilt solution of Cardellini clamps and gobo heads to undersling the Ronin gimbal on the end of the jib. This would have been easier to build and probably more stable with the Cinemilled solution.
The C300 mounted on the Ronin, allowing us to put the lens inches from the ground, or up to a eye level on a motorcycle. I rode in the back of the minivan, operating the jib. Kendal would monitor via an SDI-attached SmallHD AC7, and he operated the pan/tilt of the Ronin with the wireless controller. Basically we used the Ronin as a hot-head on the jib, with the added advantage of the gimbal automatically soaking up bumps and wobbles. This gave us a nice wide arc of coverage behind the camera car, with plenty of flexibility to shoot backwards or even from the side of our subject.
We found we could shoot up to around 30-40mph (depending on road conditions) with this setup and still get usable shots. The only issue we ran into was in filming 90-degree turns. For some reason, as you make the turn, the Ronin senses the movement and will smoothly “counteract” it, which actually ended up unleveling the camera horizon. So you would exit the turn with the camera dutch tilted a few degrees in either direction. The solution was to anticipate this on tight turns, and Kendal would carefully ride the horizon stick on the Ronin handheld controller. Problem solved.
For close-in shots from the side and rear 3/4 of the motorcycle, I simply worked handheld out of the sides of the minivan with the sliding doors open. I would either use the Ronin or Ken Labs gyro for these shots, depending on how much setup time we had and the lens choice. The Ronin seems to work best for driving shots in low-wind on the wider end of the lens, generally under at a 50mm and wider focal lengths. Oftentimes I would use a wide lens and hang the Ronin out the side of the vehicle with the motorcycle framed from the front-side (leading them) or rear-side (trailing them slightly). This allowed me to work a few feet away from the subject for dynamic low-angle compositions.
For longer focal-length shots where I needed to react a little more organically to the movement of the motorcycle or subject, I would mount the small Ken Labs 4×4 gyro on the tripod mount of a Canon 70-200 IS lens, and work handheld. With some careful and stable framing, I could capture shots all the way up to 200mm. I found that from around 70-135mm, it wasn't that hard to capture smooth footage with the gyro spooled up. The gyro would stabilize out large wobbles and bumps, and the IS lens would soak up the small high-frequency vibrations. It worked quite well, both out of the back of the vehicle and from the sliding side doors.
I also occasionally worked on the gyro with the 2x extender mated to the 70-200, though that was difficult unless the road surface was very smooth. The downside to the gyro is of course that you have to spool it up to full speed before it will dampen movement…this takes about 10-12 minutes. So there were a few shots we missed by not having the gyro spooled up in advance. It's a little loud as well, so you tend to want to spin it down when you aren't actively shooting. You have to think ahead when working with a gyro. Fortunately, the battery pack will give you on and off shooting for most of a day, and the rental package we had came with a 12v adapter as well.
To capture footage from behind the motorcycle, we built a front-mount for the Ronin on a Jeep Grand Cherokee. The Jeep had tow hooks on the front that allowed use to tie into the frame with Cardellini clamps. From there we used c-stand arms to triangulate a support arm hanging out in front of the vehicle. From the top side we used another arm tied into a large suction cup on the hood.
The Ronin was hung from this, which placed the lens just above bumper height. We ran an SDI cable back into the cab, and operated the pan-tilt head wirelessly from the passenger seat. By coordinating movement of the vehicle with the pan/tilt movements, we were able to get some really beautiful driving shots from behind the moving motorcycle. However, since this was a hard mount, the road surface needed to be quite smooth to capture usable footage.
The Ronin smoothes out a lot, but gimbals can't handle hard mount jitter…they need to be isolated from that type of vibration. Our mounting solution could have been improved with some kind of dampening mount or material between the gimbal and the support arms. That is something I intend to explore the next time I have a shoot like this..possibly purchasing or renting an existing solution to this problem.
The first time we built the hood mount, it took a couple hours to figure everything out. But once it had been built and everything carefully marked, we were able to break it down and re-build it in about 15 minutes as needed. This was a nice option to have at various points in the journey. Small side-note…you will want to put a filter in front of your lens, to protect from dust and rock pecks. And bring spares…we destroyed a few polarizers on this shoot.
Throughout the shoot we used in-ear headsets and throat mics for the talent on the bike, that allowed us all to communicate two-way. It was simple to ask them to slow down or speed up slightly as needed. It was also very useful for coordinating safety issues for our setups. With clear communication between the bike and the camera car, we were able to get beautiful dynamic moving shots within a few feet of the bike.
Using these three simple and affordable camera configurations throughout the length of our film shoot enabled us to capture some lovely car-to-car footage at a minimum of cost and effort, and with a very small crew. The Ronin performed quite well in each of these scenarios, and I'm very happy with what it enabled us to capture. And the gyros are a must have for any driving shoot…they are rock solid are extremely useful.
You can follow updates on the documentary film release here, and you may also be interested in Brian Hallet's article on car-mounting the Ronin using a suction cup kit and the new Cinemilled adapter plate.

