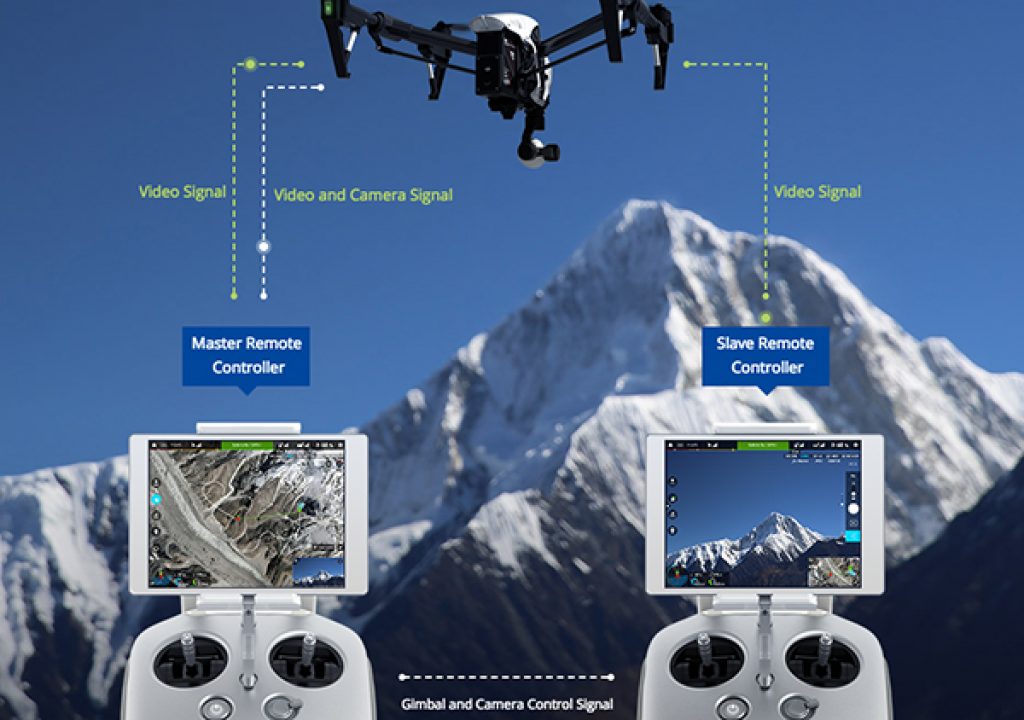
My second part as a follow-up to my first DJI Inspire 1 review, covers what I think is one of the most advantageous features of the DJI Inspire 1 that makes it a professional aerial videography tool: Dual Operator Control. This allows the pilot to manage and control the craft’s flight while a camera operator can control the camera’s gimbal and recording operation in-flight with a second remote. This is the first commercially available dual-operator quadcopter on the prosumer market, that functions very much like a larger professional multirotor system.
My second part as a follow-up to my first DJI Inspire 1 review, covers what I think is one of the most advantageous features of the DJI Inspire 1 that makes it a professional aerial videography tool: Dual Operator Control. This allows the pilot to manage and control the craft’s flight while a camera operator can control the camera’s gimbal and recording operation in-flight with a second remote. This is the first commercially available dual-operator quadcopter on the prosumer market, that functions very much like a larger professional multirotor system.
DJI Inspire 1 Dual-Operator Control
Using a second controller for the camera operation will result in more advanced shots and smoother video. For instance, allowing the pilot to maintain a smooth and straight flight path, while the camera operator (cam op). You can use either a second iPad or Android tablet or smartphone for the FPV monitoring and controls, or even use an HDMI capable monitor. One nice feature is to have the ability to turn off the OSD so the cam op can focus on just the image/positioning and use the record buttons on the controller to start/stop recording. Of course this requires the camera to either have all the settings/presets established before flying or the pilot will need to make adjustments from his smart device during the flight.
I normally use a Nexus 7 Android tablet as my second remote FPV/data device if I’m flying with a colleague that’s experienced with it. But if I’m training or working with another cam op that just wants to see the image and get a clear view of what they’re shooting, I’ll often use a Black Pearl FPV monitor connected with HDMI and turn off the OSD, I can also add the screen shields which improve the screen’s visibility from glare.
Here’s a demo video compilation I edited from several flights using the dual control setup, including a few shots of BTS showing us flying:
It takes time to learn how to control the camera gimbal remotely as a second operator. Even experienced camera jib operators need to practice a bit before shooting with one of these systems, but the sticks can be configured not only for direction but the gains can be adjusted to slow-down the rotation or tilt movements for smoother video panning.
Setting up your second controller
It’s relatively easy to pair your second controller as a slave to the master pilot controller. It’s all done with the second smart tablet under the RC Settings menu. There are plenty of resources online that guide you through this process if you need additional help.
Practice makes perfect
When I was training new pilots in my group out at the Aerial Videography workshops at NAB in Nelson, Nevada this year, I gave them all a chance to try out the second controller operation. A few of them locked into a groove after a few passes but most got a bit disoriented and would require a lot more practice.
The bottom line is that you shouldn’t just show up at a shoot and think someone there can simply handle the cam op position without prior experience or a lot of practice. It’s best if you can work with one or two operators consistently to develop a workflow that you can establish to minimize retakes as much as possible. It’s really important to have verbal communication between the pilot and the cam op so you can both plan and gauge each shot before and during the shot. Letting the pilot know to adjust speed, elevation and approach angles will result in better shots and safer flying.
Many thanks to the guys at Multicopter Warehouse for providing the craft and support to complete this series of tests!
I will be going into more detail about different photo and video shooting techniques in my next part of this series.
There’s just so much more to explore with the Inspire 1!
Stay tuned for Part 3: Advanced Photo & Video Techniques *Coming Soon!
_____________________________________________________________________________________
Jeff Foster is a published author of several how-to books and training videos in the motion graphics, animation and video production industries and is an award-winning video producer, trainer and artist. Visit his web site to learn more about his training methods, tips & tricks at PixelPainter.com

