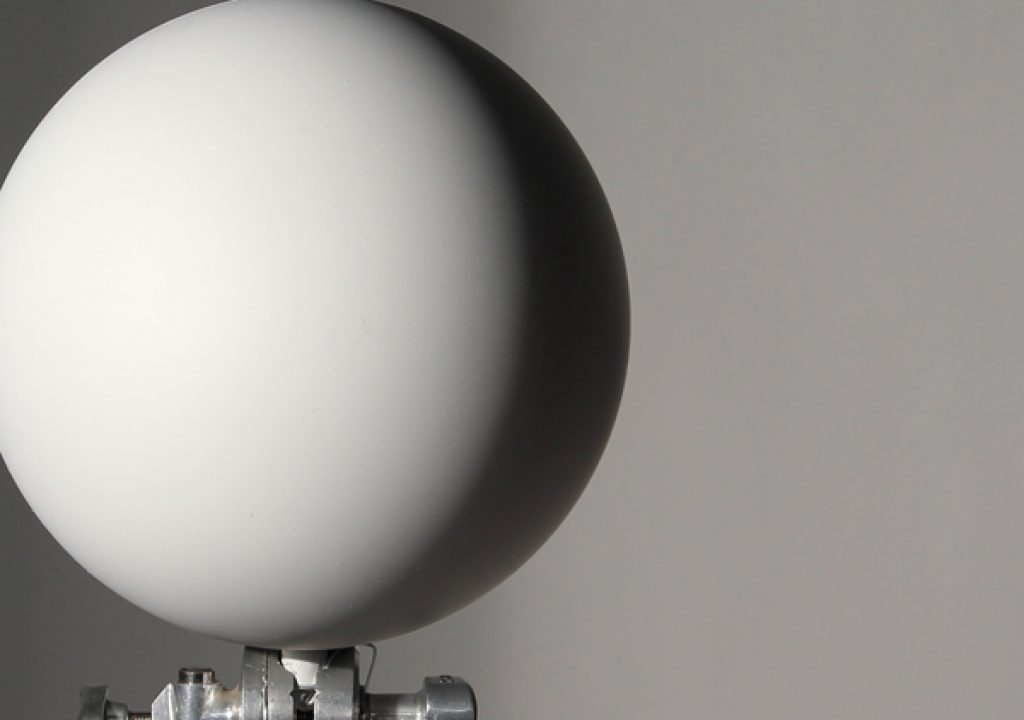
In today's TSL lesson we are going way back to the very basics of a one light setup to light a face. Our talent Tiffany Taylor is beautiful and it's very easy to demonstrate on her face. Everything in the world is a ball, a cube or a cylinder. The human face is nothing more than a ball with features. Let's look at how to light the face and background to create separation and interest with a single light source. We are using a Dynalite continuous light source for our portraits because we are shooting on the Canon 1DC and will pull still images from the video footage. This was an interesting process and one we will talk about in our next lesson at length. Let's look at the basics of a one light setup.
1. Everything in the world has a shape and is either a ball, a cube or a cylinder. A face is a ball, a round surface. Because it is a round surface, as we set our key light, we get a nice highlight across the face. We have a deep shadow that drops away from the light.
2. As we fill the shadow we create what is known as “the core”. The core is an area of transition between the highlight side of the object and the fill side.
3. If we push our fill card in too far it destroys the core and makes the light flat or uninteresting. We want a nice ratio between the highlight side and the shadow side. When done properly this leaves a nice core.
4. Most people have features. When you add a feature like a nose to a face it creates additional shadows that need to be moved around to shape the face. As you lift the light up it starts creating a bit of a “Rembrandt” on a person's face. This is a shadow that falls off the nose and connects with the shadow side of the face. The light must be up and to the side to create this look.
5. Our light is pointing directly at the face to create the Rembrandt and is falling evenly on the background. If we feather the light away from the background and toward the camera it will move a shadow line across the background. We want to move this shadow line across until it splits the ball in half and we are left with a shadow side behind the highlight side of the ball and a highlight side directly behind the shadow side of the ball. Our one light is now creating interest on the face and separation from the background at the same time. The highlight side of the background corresponds with a shadow side of the face and the shadow side of the background corresponds with the highlight side of the face.
6. The final step is to bring in a fill card to fill in the shadow side in the way that will not obliterate the core but create a nice transition from highlight to shadow. This is the basic one light set up. Lets bring in our talent and see how we can apply this principle to a person.
7. As we bring in our talent we are going to go through the same process that we did with the ball. The light must be raised to give us a nice shadow on her nose that blends into the shadow of her cheek. Once this is achieved we will feather the light away from the background until the shadow line of the light splits her face and creates separation. We want highlight to shadow on her face and shadow to highlight on the background.
8. As described previously we can see how the highlight side of her face corresponds with the shadow side of the background and the shadow side of her face corresponds with the highlight side of the background.
9. Today we are shooting with the Canon 1DC which is a 4k camera. We will not be taking any still images but will pull the frames from the video instead.
10. Here is an example of a frame we pulled from the video. The images came out great and were large enough to make wonderful prints. The only problem we encountered with this process was motion blur on our talent. Even at the slightest turn of the talent's face she blurred and the images were unusable. We had to look for images where she was not moving at all so that the sharpness was acceptable.
11. We decided to shoot some more shots with heavier make-up. Our make-up artist Teri Groves gave the talent a bit of an Egyptian look.
12. In this image I feathered the light away from the camera so that the background would be lit evenly from side to side.
14. When Julene brought in a small hat I feathered the light back toward the camera to give us separation on the background. It's a nice subtle gradation across the background creating separation and interest.
15. Finally we experimented with shooting through a piece of black fabric. We used it to soften the image and create an elegant old-fashioned movie look using just one light.
15. Finally we experimented with shooting through a piece of black fabric. We used it to soften the image and create an elegant old-fashioned movie look using just one light.
Special thanks to our great sponsors!
http://www.kesslercrane.com
http://www.tamron-usa.com
http://www.dynalite.com
http://www.photoflex.com
http://www.rosco.com
http://www.glidecam.com
http://www.vanguardworld.com
http://triplescoopmusic.com
http://theslantedlens.com
http://www.lensprotogo.com


