


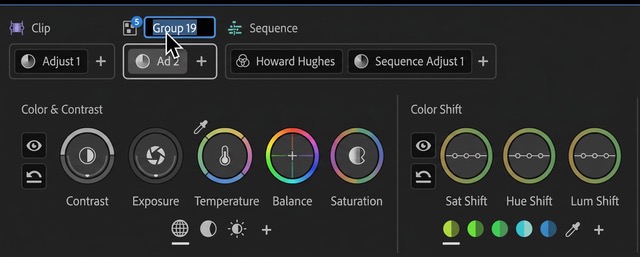
Color Mode is not built on effects, layers, or nodes. It is built on Operations—named reusable image decisions that define what you are doing to the image, and where that decision applies across clips, custom groups, or sequences. Operations are how you move through a sequence, organize your work, and understand how color decisions propagate.
They are a new construct, not a reskin of existing models. You can add them, move them, duplicate them, paste them, and reassign clips without rebuilding your grade. The system is designed to be direct: drag, drop, adjust, and continue working without breaking structure.
There are two kinds of Operations in Color Mode: Adjust and Style. Each has a clear role. Keeping them separate gives you consistent results, reduces repeated work, and makes the grade easier to read and manage as your sequence expands—more shots are added, more scenes and cameras are introduced, and the number of color decisions increases.
Adjust Operations: The Tools You Need Only When You Need Them
Adjust Operations are where you handle the technical side of the image. The toolset is intentionally limited to the tools you need to get specific results quickly—exposure, contrast, white balance, tone mapping, and other primary controls used to bring shots to a consistent exposure, color balance, and contrast baseline. Using the same set of controls for every shot means exposure shifts respond the same way, white balance corrections land predictably, and contrast adjustments translate cleanly from one clip to the next. Because of that consistency, you can apply a single Adjust Operation at the sequence or group level and trust that it will behave uniformly across all affected shots.
An Adjust Operation answers two simple questions: “Does this image need photographic improvement, and does this shot match the rest of the sequence technically?” If it doesn’t, fix it here. Because you’re using the same controls on every shot, the result holds up when you apply it across many clips.
Where you apply that Operation determines its impact. If you want to affect every clip at once, you work at the sequence level—any Operation placed there propagates across the entire timeline. If you work at the group level, the Operation applies only to the clips in that group. If you work at the clip level, the adjustment affects only that single shot.

Style Operations: Building and Shaping the Look with Modules
Style Operations are where you define the look. Unlike Adjust, Styles are built from modular pieces and are meant to be constructed, combined, and reused.
At the core of a Style are modules—single, focused color effects that do one thing well—contrast shaping, film emulation, color separation, flare, or tonal response. Instead of applying a single baked look (like a LUT), you build a look by stacking modules, each contributing to a specific part of the final image.
For example, a “cinematic” look is not one thing. It is the combination of contrast behavior, color response, highlight rolloff, and shadow treatment. In a Style, those are separate modules working together:
- A contrast module defines density and tonal shape
- A film color module defines color response and palette
- A flare or highlight module controls shadow and highlight behavior
- Additional modules refine detail, separation, or stylization
Because each part is independent, you can adjust or swap individual pieces without rebuilding the entire look.
This is the key difference between Styles and LUTs. LUTs are fixed transforms—once applied, they are difficult to modify and often behave inconsistently across different shots or camera formats. Styles remain fully adjustable. You can tune strength, rebalance color vs. contrast, protect highlights, or adapt the look per shot without breaking the overall aesthetic.
Styles are also not limited to presets. You can:
- Apply a preset as a starting point
- Modify the underlying modules to fit your footage
- Combine modules to build a new look from scratch
- Save that configuration as a reusable Style
Once created, a Style can be applied at the sequence, group, or clip level. Applied at the sequence level, it affects every clip at once. At the group level, it defines a shared look for a subset of shots. At the clip level, it allows for targeted refinement when a shot needs to deviate.
This makes look development iterative instead of destructive. You can explore different directions, swap Styles, or refine modules without undoing your technical corrections.

Working Across Multiple Clips & Contexts
A single clip often belongs to more than one context at the same time—a scene, a camera, a lighting setup. Groups in Color Mode reflect that flexibility of workflow. Instead of choosing one or the other, you can let those contexts work together. You can make a decision once for a camera, another for a scene, and have both apply without conflict. The Color Mode system keeps those decisions organized so they build on each other instead of fighting each other. Each group should represent one idea, so when you look at your grade, you understand why something was done and where it’s coming from.
Groups are only useful if they reflect what’s actually happening in the footage. When clips are grouped correctly, decisions carry naturally. When they aren’t, you end up compensating shot by shot. A good signal that things are working: you spend less time fixing individual clips because the group is doing the work for you.
The system works best when it stays simple: broad decisions at the sequence level, shared decisions at the group level, and small refinements at the clip level. When that structure holds, changes carry across the sequence naturally, and the look stays consistent without you having to chase it shot by shot.
At the highest level, that’s what the Color Mode Operations system is doing for you. Adjust Operations establish a stable foundation for your grade. Style Operations build on top of that to shape the look. Sequence, group, and clip levels give you control over how far each decision reaches. Once those pieces are in place, the work stops being about managing individual shots and starts behaving like a system—one where decisions are clear, repeatable, and easy to evolve as the sequence comes together.
This is article number six in a series on Color Mode in Premiere. If you missed any of the previous articles, start with Why Adobe built Color Mode. In the next article, we’ll shift to The Divide and Conquer Grading Workflow, which covers how fast a full sequence grade can actually be and why this approach changes how people think about color work.