


In today's TSL lesson we are back in New York City shooting in Times Square. I wanted to explore shooting Bokeh with all the intense lighting of Times Square. Not to mention the incredible energy you feel just being there.
The term “bokeh” comes from Japanese and means “blur” or “haze”.
In this lesson we will take a look at different lenses and aperture settings to see how they create this cinematic look called Bokeh. Different lenses create different patterns. We will look at using a long lens at 200 mm and how that compares to a 50 mm lens. Before we head out on location to Times Square let's take a look at how to create Bokeh.


#1 With Christmas lights strung on a white wall I shot this first image using a 50 mm lens at f 2.8. The lens was 3 feet away from the subject, and the subject was 3.5 feet away from the background. The lights are not very blurry but a good start.

#2 Here is the same lens at the same distance but the f-stop is now at 1.2. There is a huge difference here and the faster f-stop makes the background circles larger.

#3 Still using the 50mm lens I moved away from the background 4 feet. Here is the 50 mm lens at f 2.8. The lens is 3 feet from the subject, the subject is 7 feet from the wall. The blur increased as we moved away from the background.

#4 Here we are at the same distance as in the image before (subject to lens – 3 feet, subject to wall – 7 feet), but the background looks much nicer on the same 50 mm lens if we open up our f-stop to 1.2.

#5 Here is a 50 mm lens at f 2.8. I pushed in 6 inches to be 2.5 feet from the subject. Stewart is still 7 feet from the background. The distance change of 6 inches increased his head size and created a much stronger Boken. The blur looks similar to the previous image with an f-stop at 1.2, even though we are now at f 2.8.

#6 This image is shot with a 100 mm lens 8 feet away from the subject and 13 feet away from the background.

#7 I pushed in with a 200 mm lens 8 feet from the subject and 13 feet from the background. The head size increases but we get a wonderful bokeh.
So we learn that to get the best bokeh we need to:
1. Get as close to the subject as we can.
2. Move as far away from the background lights as possible.
3. Keep the aperture wide open.

#8 Now let's go back to Times Square and see how to apply these principles on location. We met Ying Ying Li in Times Square. She was a great talent that we got from NY Casting. Here is the lighting set up. This image is taken only with ambient light coming from the billboards around us. It's a difficult lighting situation because it always changes both in color and intensity as the billboards change. It did give some very cool color effects.


#9 I shot at f 4.5 and a shutter of 1/60 of a second. My ISO was 320. I shot 10 feet away from the subject with 70-200 mm zoom. I shot mostly with a 150-200 mm.

#10 Here is our key light. It's a Dynalite head with a Photoflex Octodome coming in from the camera left side. The face is still very dark but the bokeh looks great. Our background lights are far away enough to create a good look.

#11 Our last light is a pop up Photoflex reflector. It adds a nice fill / key light on our talent's face. I panned the key light camera right to take the intensity off her head and move the center of the circle of coverage to the reflector. The back of her head was lit by the outside of the area of coverage and the reflector was lit by the center of the area of coverage, which is brighter. It needs this extra brightness to give enough bounce fill to balance the direct light on the back of her head.

#12 Here we see all the lights in place. This lighting set-up allows her to turn her head into a nice Rembrandt light or to turn away and have a nice rim light.


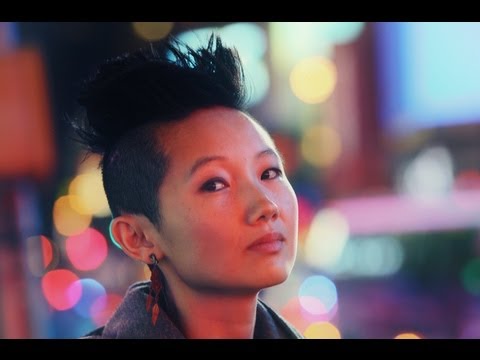
#13 Here is the final image. Keep those camera's rolling and keep on clickn'.
Special thanks to our great sponsors.

