One of the most useful things I ever did as I began to master the Avid user interface was – I know this will be hard to believe – read the manual. Actually I read EVERY word of EVERY manual. The folks at the Avid Technical Publications department can confirm this, because I sent them many pages of corrections for which they sent me an actual one-of-a-kind “Deputy Tech Pubs” badge. Geeky? Yes. Should YOU actually read the manuals? Of course not! That’s what this series is intended to prevent!
Anyway, when I read the manuals, I was already quite proficient at editing on Avid and thought that I knew pretty much everything I needed to know. I was mistaken. There were all kinds of little timesavers and tips that I found in the manuals. I called them “Hidden Gems.” While many people know some of these gems, there are a lot of people who may benefit from some of them, so to start out, I’ll go back to a list of my favorites from the old manuals. I’ll start looking through the latest manuals for tips to share about the most recent release of Media Composer as well. I’ll try to write a new “Avid Hidden Gems” column every week. I’ll keep each article to five “gems” so that you can try out one a day.
HIDDEN GEM #1
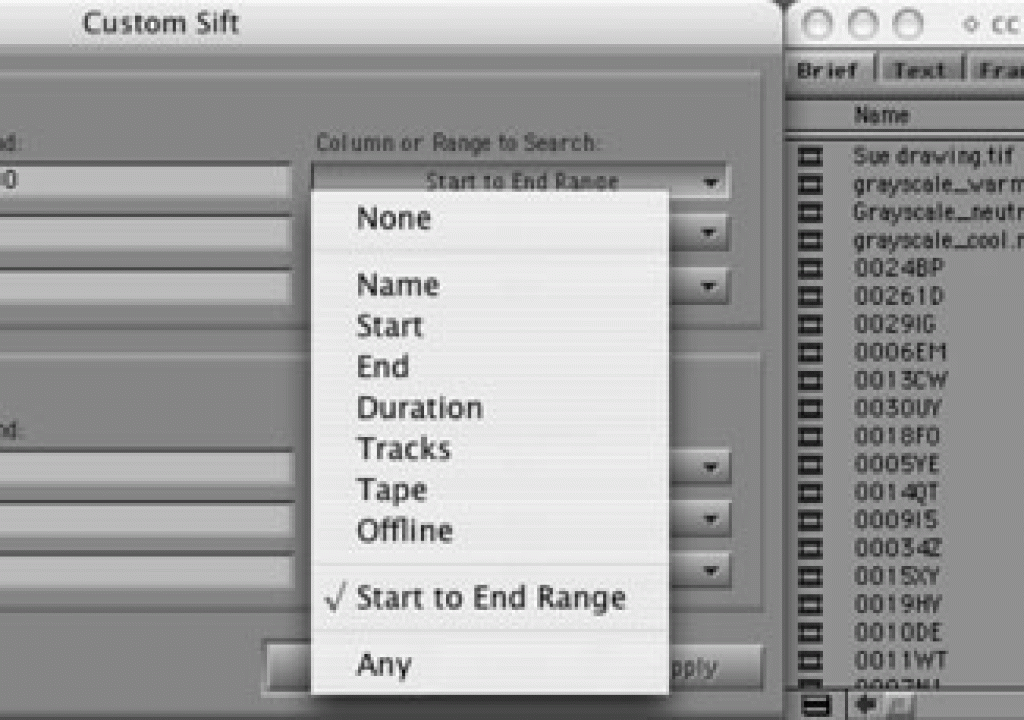
Did you know that sifting timecodes in a bin can be done on the INCLUSIVE timecodes in a shot? In other words, it’s easy to sort or sift on a starting or ending timecode, but you can also sift based on a specific timecode WITHIN a clip. Just select a bin, go to Bin>Custom Sift. Type the timecode you want in the “Text To Find” area and switch the “Column or Range to Search” to “Start to End Range.” To make this faster, you could map “Custom Sift” to a keystroke and you only have to type the numbers of the timecode. No colons or semi-colons are required.
HIDDEN GEM #2
Alt-clicking (PC) or Option-clicking (Mac) on any purple rectangle next to an effect or color correction parameter resets it to the factory default. And I actually discovered an “easter egg” that I’d never known about before as I did the screenshots for this article: If you control-click (on a Mac) you SEE the default setting without actually changing to the default setting. So this is a way to see a “before and after” of your effect or color correction.
HIDDEN GEM #3
*To map Top and Tails, go to Settings and call up your Keyboard setting. Then hit command-3 (Mac) or control-3 (PC) to call up the Command Palette. From the Edit Tab in the Command Palette, drag Top and Tail to two adjacent keys on your keyboard.
HIDDEN GEM #4
Sometimes I do my off-line edits at lower rez and sometimes I do them at high rez. And sometimes, when I’m very naughty, I mix them. So, when I go to create the on-line version of my sequence, I want to be careful that all of my footage is at the correct, high resolution and that my audio clips are all the same sample rate.
To do this check, I put the sequence to a bin all by itself, then I click on the bin’s fast menu, choose Set Bin Display and put a check mark next to “Show reference clips.”
The bin will be populated by all of the clips associated with that sequence and you can sort it by video resolution or sample rate or anything else you want. Any clips that are in the wrong video resolution or sample rate can be re-digitized or corrected. Always a good thing to do before a layoff.
HIDDEN GEM #5
I hope that some of this has been useful and that you’ll join me in the coming weeks for even more “Hidden Gems.”

