This column on Avid tips and tricks was originally designed to include hidden “gems” from the Avid user manual, but today we’re going to feature a bunch of nice “gems” from one of our readers, Josh Petok as well as a stream-of-conscious of gems from me. Manuals? We don’t need no stinkin’ manuals for these gems!
Josh’s gems are definitely included in the list of tips that I know I learned at one point but I’d stored them away in that section of my brain that has the giant dust bunnies and is crawling with spiders. That doesn’t mean that they’re not great tips! Far from it. These are excellent tips and Josh has reminded me that I need to store them somewhere closer to the frontal lobe with the important information like my wife’s birthday and our anniversary.
Josh Gem #1
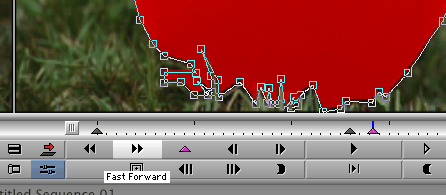
1. RW and FF keys are your friends
On animates and paint effects, some shapes will contain a lot of points. If you have a point selected in an animate or paint effect, FF will go to the next point and RW will go to the previous one.
Steve’s riff on Josh’s Gem #1
Fast forward and rewind are really great all-purpose buttons. Their regular purpose is often ignored, but it shouldn’t be. You’ll use FFWD and REW more if you map them to a handy spot on your keyboard. I mapped FFWD to the straight TAB key and REW is mapped to SHIFT-TAB. You could also map them to the up and down arrow keys if you’re a Final Cut editor. That would mimic the behavior of FCP.
Remember that Avid’s playhead is FRAME INCLUSIVE. That means if you jump to the head frame and mark an out point, you are INCLUDING the frame that you’re parked on. In other words the outpoint may seem to be one frame past where you’re parked. Lots of people make this mistake when they’re marking in and out marks for Titles that go above edits, resulting in one extra frame of the Title over the next shot.
Josh’s Gem #2 – Trim Left and Right aren’t only for trimming
If you have a keyframe selected in the effect timeline bar, trim left will move the keyframe back one field and trim right will move the keyframe forward one frame. The trim right and left 10 field will also work in 10 field increments. (Props to Jeff Greenberg from FMC for a little help. I had said the keyframes moved in “frames” originally.)
When a point of an animate or paint effect is selected in the effect preview window, the trim left and right will nudge a point left or right. Trim left and right 10 frames will also increase the position by 10 pixels. Adding the option or alt key will enable nudging the point up or down.
These keys will also work if a whole shape is selected. The entire shape can be nudged with the same keys.
Josh’s Gem #3 -copy and past keyframe data
You can copy and cut keyframes by selecting a key frame and hitting the command/control C or command/control X. Add another keyframe and paste it back in. This is pretty obvious, but is really useful if this somehow slipped past you.
Steve’s riff on Josh’s Gem #3 – paste info into just one parameter of an effect
In addition to the basic copying and pasting of information from one keyframe to another you can also save an effect to a bin and just drag that effect onto JUST a single parameter of another keyframe. To do this, drag the effect icon from the bin directly over an effect parameter instead of dropping it on the clip in the timeline.
Steve’s other riff on this same thought
You can select multiple keyframes at the same time to apply the same parameters to all of the keyframes. That’s kind of obvious, but you never know what’s going to cause an epiphany for someone.
Josh’s Gem #4 – the render killer
Option/alt dragging in the effect position bar will give you a quick preview of how your keyframing is working without rendering. I’ll usually option drag between two keyframes to find a good spot to drop a middle keyframe.
Steve’s gem #1
Steve gem #2
OK, for those who came from Media Composers or Symphony systems, this may not be an amazing gem, but if you have recently converted fromXpressPro, then definitely check out the Composer setting and click the “Center Duration” button. This will put a small timer window in at the top of your source and record monitors showing you the amount of time between your in and out points or of your sequence or source clip if no marks are established. I saw an inexperienced editor setting the tracking information above his monitors to give this information. That DOES work, but it’s a waste of the capabilities of your tracking data. Plus you have to use one on both the source and record monitor to keep track of ins and outs on both monitors. With Center Duration, it gives you data on whichever monitor is active.
Steve Gem #3
That’s it for now. Sorry it’s been so long since the last column. Thanks to Josh for some great tips.

