We’re fans of the Live 3D Pipeline workflow between After Effects CC and CINEMA 4D Lite. And Adobe has automated a large portion of the process to get the two to work together: In After Effects, create a New > Layer > MAXON CINEMA 4D File, and not only is a layer created in AE with the CINEWARE plug-in applied (where all the magic happens), C4D Lite is also opened with a new project linked to that particular instance of the plug-in for live rendering. However: At least as of AE CC 2014.2, not all of the necessary information about the AE composition is passed onto the C4D project, and neither is the AE project configured to match some assumptions C4D is making. Therefore, it’s up to you to fill in or correct the necessary parameters.
Preparing the C4D Lite Project
Although After Effects can automatically create a C4D project, it does not pass along the AE comp’s or project’s parameters to C4D. Therefore, after C4D Lite is automatically opened by After Effects, there are a few parameters and preferences you should change. Start by accessing the Project Settings in C4D Lite: They should appear in the panel in the lower right of the default workspace (show below). If you don’t see these, open them using Edit > Project Settings.
First, note the frame rate (FPS) – it defaults to 30, regardless of the frame rate of your After Effects composition. If you want your previews and the timing of your keyframes in C4D to match what you see in AE, you’ll need to edit this rate to match your AE comp. But note that C4D does not accept fractional frame rates such as 23.976, 29.97, or 59.94; you’ll need to enter the nearest integer rate (24, 30, or 60 respectively). If you have to enter one of these slightly faster rates in C4D, don’t forget to set the Layer > Time > Time Stretch value for the corresponding layer back in After Effects to 100.1%, which slows it back down by the requisite amount to match your comp’s fractional frame rate (see the next figure below).
Second, the Maximum Time probably won’t match your comp duration back in AE. Enter the last frame number of your AE comp into the Maximum Time field (and optionally, the Preview Max Time field as well). If you defined the comp’s duration using timecode rather than a frame count, and can’t do the math quickly in your head, go back to AE, press End to jump to the last frame in your comp, and read the small frame count number underneath the main timecode display in the project panel (shown below). Then jump back to C4D and enter that number. Save the C4D project, jump back into After Effects, and if necessary trim the length of the layer bar for the C4D layer to match the comp’s length:
Now turn your attention to the bottom of the C4D Project Settings dialog: See the settings for Linear Workflow and Input Color Profile? These defaults – more realistic linear light compositing enabled, and sRGB color-managed workspace – don’t match the defaults in After Effects. We’ll change those in After Effects in a moment; first let’s finish up our parameter-setting in C4D.
You have the frame rate and duration taken care of; now it’s time to set the frame dimensions. In C4D, open Render > Edit Render Settings, and make sure the Output panel is selected (the initial default). Set the Width and Height to match your comp’s dimensions back in After Effects. Ignore the little warning that the maximum Image Resolution is 800×600; that only applies to renders directly from C4D Lite – renders back in AE using the Live 3D Pipeline are not affected. If your comp is not using square pixels, change the Pixel Aspect parameter in C4D’s Output panel to match.
Preparing the After Effects Project
Now you can return to After Effects and set it up to match the C4D project’s expectations. (Since you start a Live 3D Pipeline project in After Effects, you can set up these parameters first if you like – the order isn’t important.)
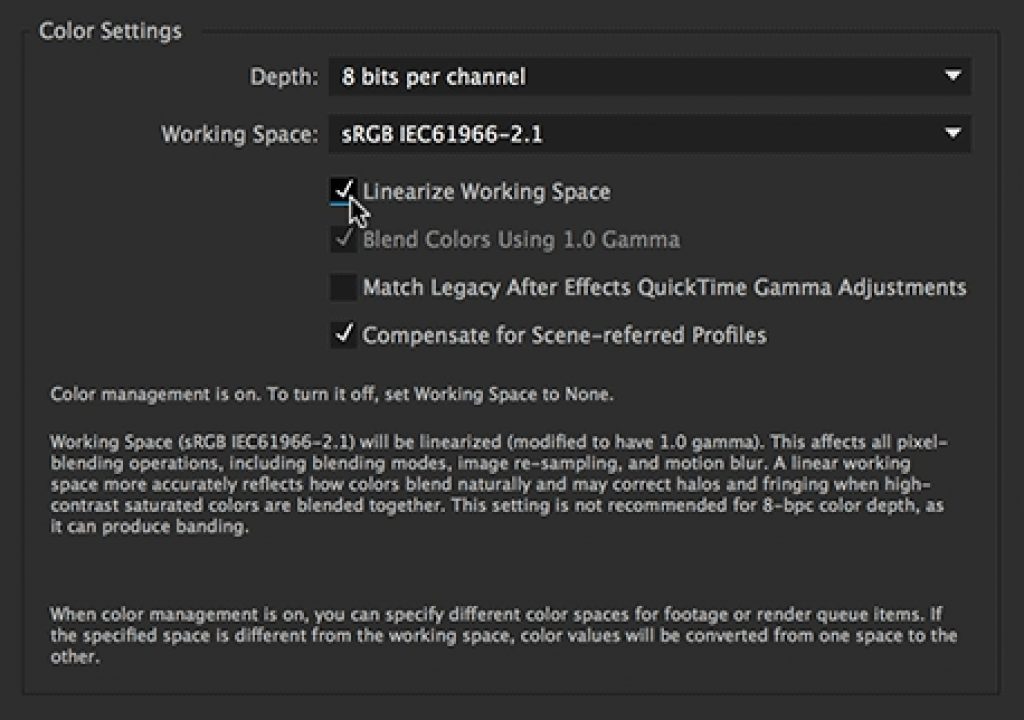
Back in AE, open File > Project Settings, and turn your attention to the Color Settings section of the dialog. To match C4D’s expectations, set the Working Space popup to sRGB, and then enable Linearize Working Space. Your settings should match those shown below:
There’s a good chance that your final destination for this animation – such HD broadcast, or a projector in a particular venue – might use a color space other than the default, computer-standard sRGB. Unfortunately, C4D has limited choices for the color space. Fortunately, After Effects can transcode to other color spaces when it renders the comp and saves the results to disk. After you’ve added the comp to the Render Queue, open the Output Module dialog for this comp, select the Color Management tab along its top, and set the Output Profile to your desired destination such as sRGB’s close cousin HDTV or the profile for the projector you’re using:
(For bonus points, also open the Render Settings dialog and change the project’s color depth to 16 bits per channel, to help cure color banding issues that tend to be exaggerated by the linear light compositing mode you enabled back in the Project Settings.)
To help remind you of these issues (and others, including setting up your AE comp to match your client’s requirements before you create a single object), here’s a free movie from our recent course on lynda.com “Creating Flying Logos with After Effects and CINEMA 4D Lite” that walks through the After Effects portion of this initialization:

